Overview of AWS Organizations
AWS Organizations provides policy-based management for multiple AWS accounts. With AWS Organizations, you can create account groups and apply policies to these groups. Organizations allows you to centrally manage policies across multiple accounts without using custom scripts or manual operational processes.
Using AWS Organizations, you can create Service Control Policies (SCPs) to centrally control how multiple AWS accounts use AWS services. Organizations supports creating new accounts via the API, SDK, and Console interface. Organizations also simplifies billing for multiple accounts by allowing you to set a single payment method for all accounts in your organization through Consolidated Billing. All AWS customers can use AWS Organizations at no additional cost. Note that an AWS account can belong to only one Organization.
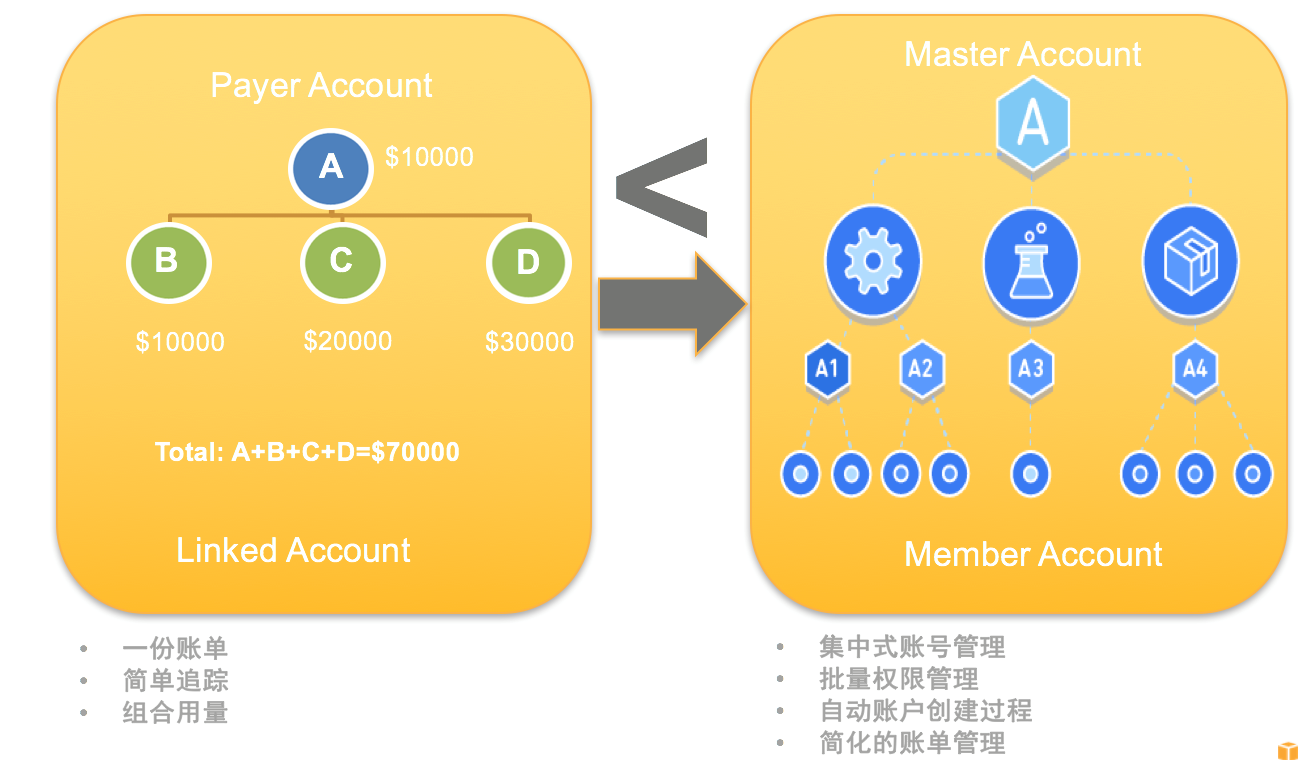
Key Concepts of AWS Organizations
Before diving into AWS Organizations, it is essential to understand the key terms and concepts:
Organization
- An organization is a collection of AWS accounts that you can organize into a hierarchy and manage centrally.
AWS Account
- An AWS account is a container for your AWS resources, such as Amazon S3 buckets and Amazon EC2 instances.
- Manage AWS resources through AWS Identity and Access Management (IAM) rules (users, roles).
- The smallest management unit within AWS Organizations.
Master Account
- The account that pays for all accounts in the organization.
- Acts as the hub (central node) for managing your organization.
Organizational Unit (OU)
- An OU is a group of AWS accounts within an organization.
- Adds AWS accounts to logical groups for easier account management.
- AWS accounts and OUs can be members of another OU.
- An AWS account can be a member of multiple OUs.
Administrative Root
- The administrative root is the starting point for organizing AWS accounts and is the top-level container in the entire organizational hierarchy.
Organization Control Policy (OCP)
- A configuration containing one or more statements that define the control policies you want to apply to a group of AWS accounts.
- Different application scenarios use different organization control policies.
The diagram below helps you intuitively understand the relationships between these concepts:
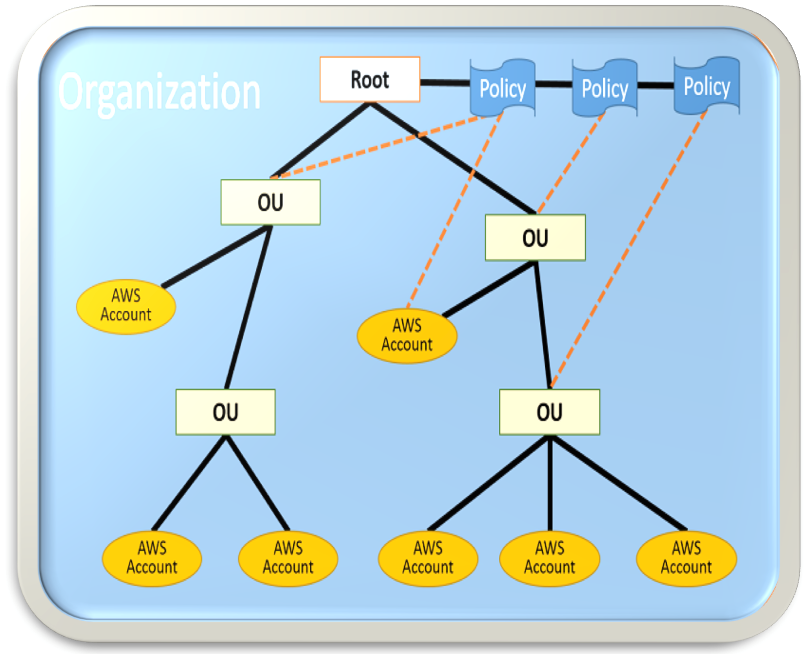
Below is a detailed introduction to the concepts mentioned above:
Ways to Add an Account to an Organization
1. Create a New Account from Within the Organization
- New AWS accounts can only be created by the master account.
- During the account creation process, you can configure the following information:
- Email Address (Required)
- Account Name (Required)
- IAM Role Name (Optional – Default name is OrganizationAccountAccessRole)
- Enables trust permissions for the master account to access the current account via AssumeRole.
- Permissions are set to Full Control.
- IAM Access to Billing (Optional). Note: IAM users still require relevant IAM permissions to access billing.
- New AWS Account Characteristics:
- Automatically becomes part of your organization.
- Can be removed from the organization, but policies can prevent it from executing “Leave Organization”.
2. Invite Existing Accounts to Join the Organization
- Invitations can only be initiated by the master account.
- The invited AWS account can choose to accept or decline the invitation.
- The default behavior is to decline.
- This can be controlled via IAM permissions.
- When an invitation is accepted:
- The AWS account becomes a member of the organization.
- Applicable OCP rules are automatically applied to this account.
- Invited AWS accounts can be removed from the organization, but policies can prevent them from executing “Leave Organization”.
Logical Groups for AWS Accounts (OUs)
- Add AWS accounts to logical groups for easier account management.
- AWS accounts and OUs can be members of another OU.
- An AWS account can be a member of multiple OUs.
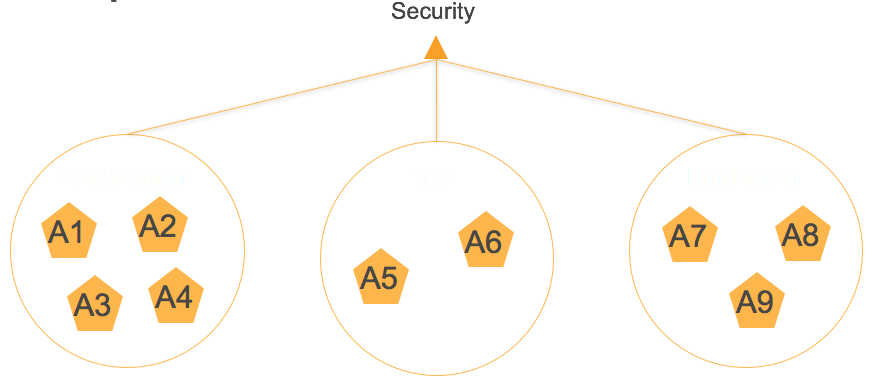
As shown in the figure below:
OCP (Organization Control Policy)
- Describes the control policies to be applied.
- Different usage scenarios have different application control policies (OCP).
- Application control policies (OCP) can be attached to:
- Organization
- Organizational Unit (OU)
- AWS Account
- OCP has inheritance properties (AWS Account, OU, Organization).
- Policies are inherited; meaning an OU inherits the organization’s policy, and an AWS Account inherits the OU’s policy.
- An Account’s policy moves with it. If an Account moves from one OU to another, its associated Policy moves with it. It will no longer receive the previous OU’s Policy but will instead receive the new OU’s Policy.
OCP Support in V1: Service Control Policies (SCPs)
- Allows you to control access to AWS service APIs.
- Define a list of allowed APIs – Whitelist.
- Define a list of denied APIs – Blacklist.
- Service Control Policies cannot be overridden by local administrators.
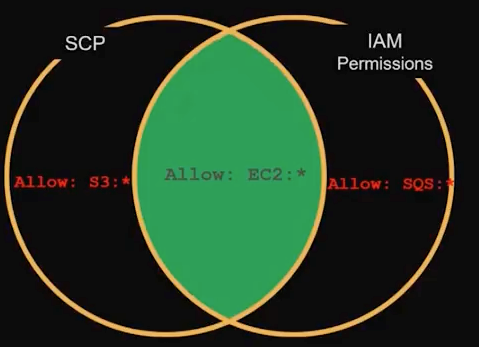
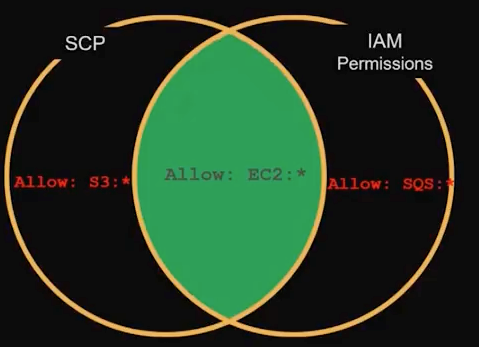
- For IAM users and roles, the final effective permissions are the intersection of the Service Control Policy and the relevant IAM permissions.
- Necessary but not sufficient: Local users must possess both SCP permissions and IAM permissions to perform an action.
- The IAM Policy Simulator is aware of SCPs.
- SCP permissions take precedence over local administrator permissions.
The following image shows examples of writing SCPs using whitelists and blacklists:
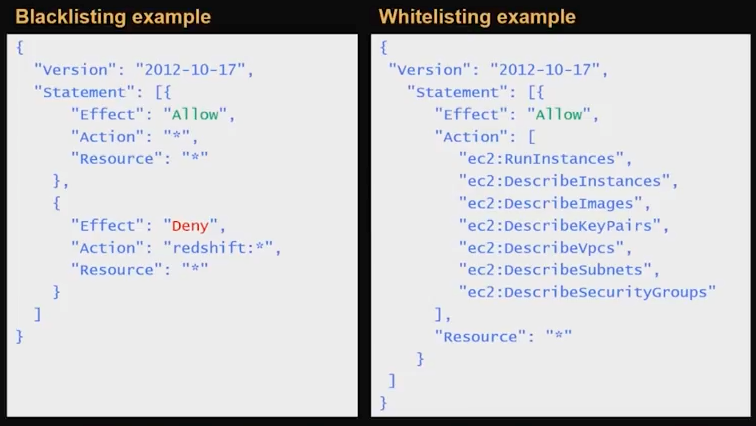
SCPs use IAM policy syntax, similar to IAM Policies, but with two differences:
- The Resource must be “*”.
- There are no Conditions.
Important: To allow end-user actions, both SCP and IAM Permission must be present. As shown in the figure below, if SCP allows S3 and EC2, but IAM Permission allows EC2 and SQS, the final user will only have EC2 permissions.
Simplified Billing Management
- A single payer account pays for all accounts.
- Resources from all AWS accounts in the organization are consolidated into a single bill and benefit from tiered pricing.
- All existing Consolidated Billing families will be migrated to the Organization billing model.
Different Management Levels for Organizations
You can choose different management levels when creating a new organization.
Billing Mode
- Backward compatible with the current Consolidated Billing (CB) mode.
- Organizations created from a Consolidated Billing family are automatically set to Billing Mode.
Full-Control Mode
- Includes all features of Billing Mode.
- Enables all types of OCP management features.
- Converting from Billing Mode to Full-Control Mode requires consent from all AWS accounts in the organization.
Hands-on: Managing Your Organization with AWS Organizations
Below, I will demonstrate how to use the AWS Organizations service to quickly, conveniently, and accurately manage your multiple accounts.
Accessing the AWS Organizations Service
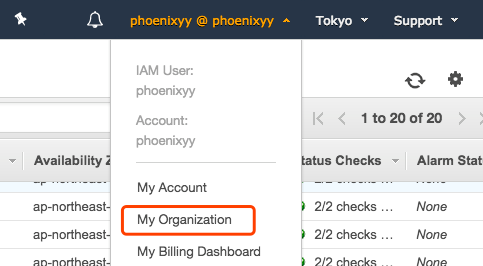
You can access the AWS Organizations service by searching for it in the Services menu or by clicking “My Organization” under the Account menu. This service does not appear in the standard Services dropdown menu.
Search in Services:

Dropdown under Account:
Creating a New Organization
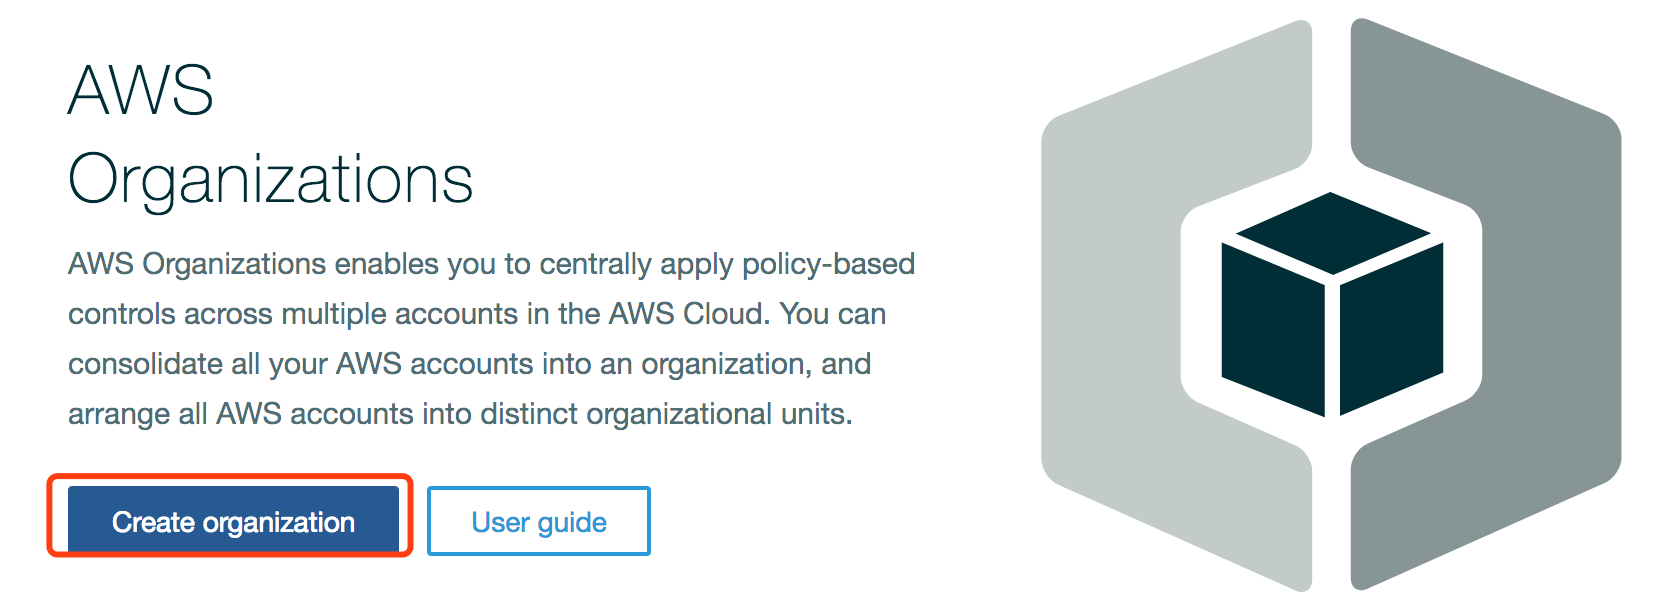
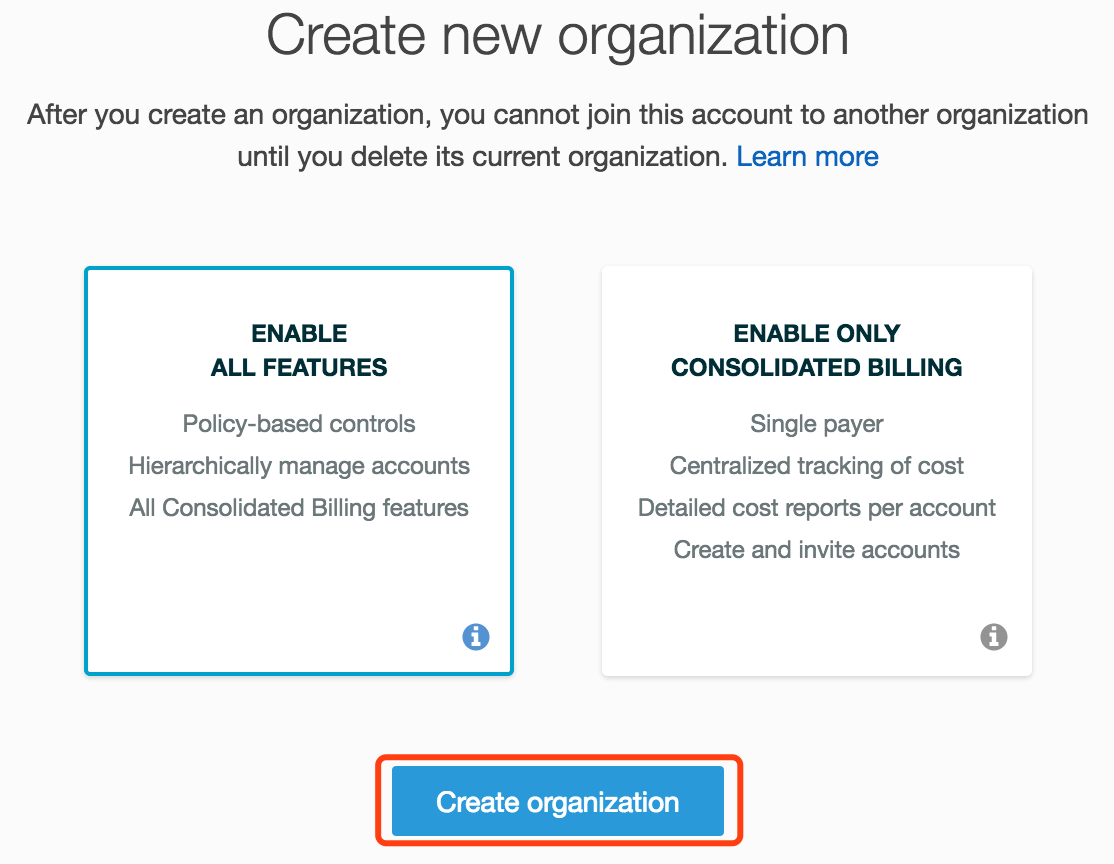
In the AWS Organizations service interface, select “Create Organization.” Choose the type of organization you wish to create. In this demonstration, I selected Full-Control Mode. If you only wish to consolidate billing, select “Enable Only Consolidated Billing” on the right. Regardless of the mode, billing will be consolidated. The difference lies in whether the Master Account can control joined accounts.
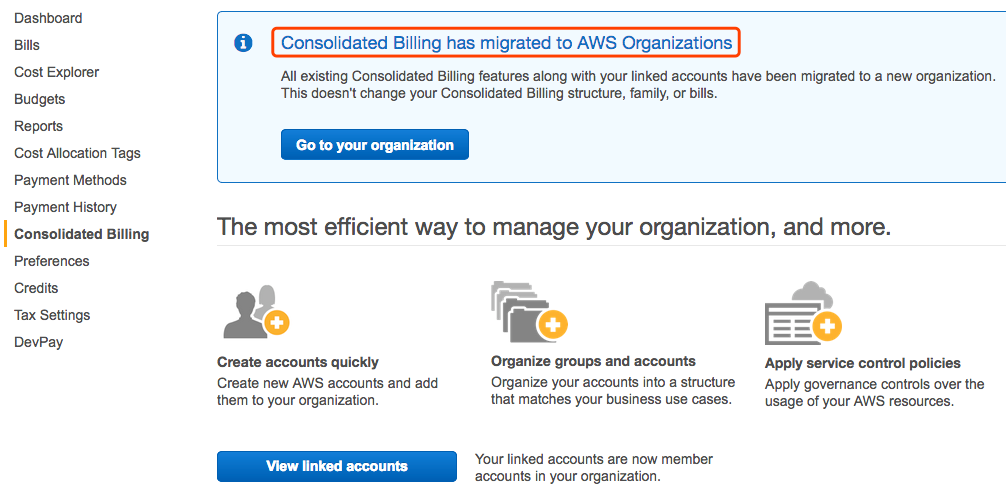
Note: The Consolidated Billing feature has now been migrated to AWS Organization. If you click My Account -> Consolidated Billing under the master account, you will see this prompt. Clicking “View Linked Accounts” will directly redirect you to the AWS Organization interface.
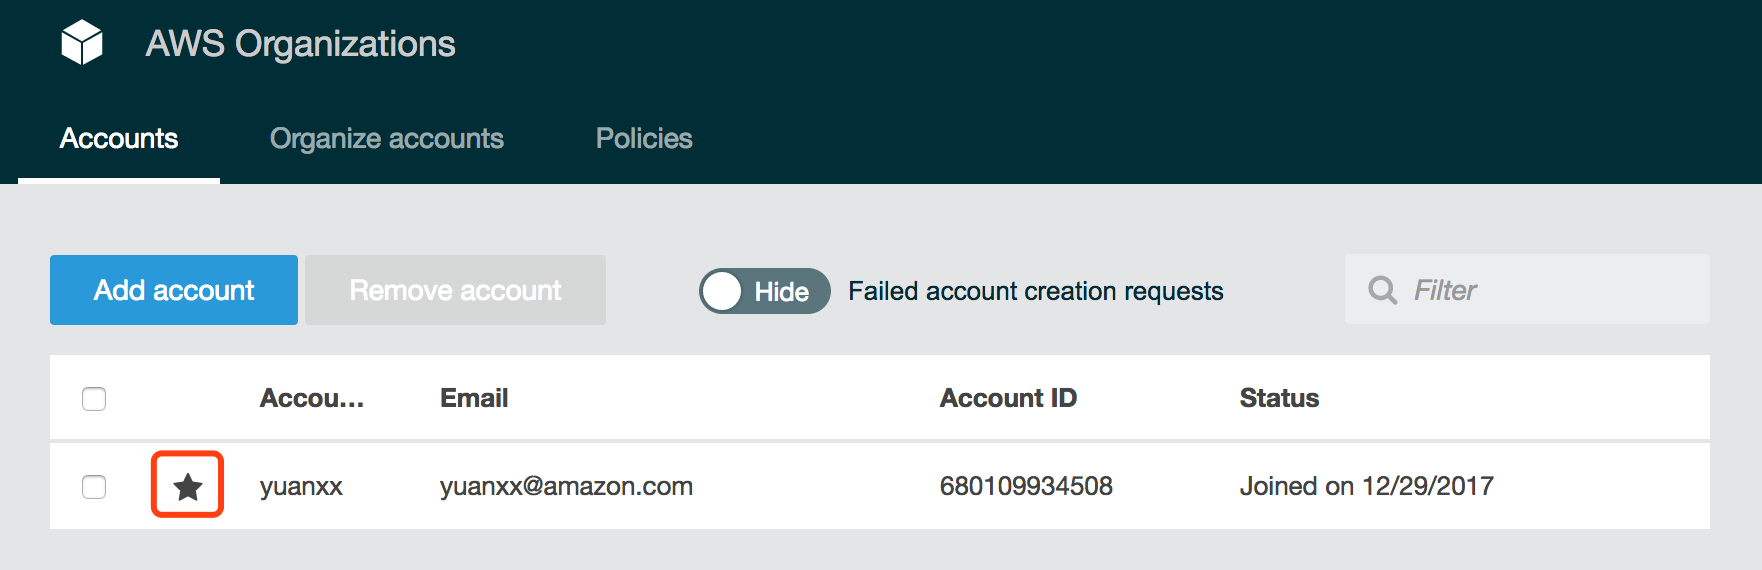
After creation, the organizational structure management interface appears. The account marked with an asterisk (*) is the Master Account.
Adding a New Account to the Organization
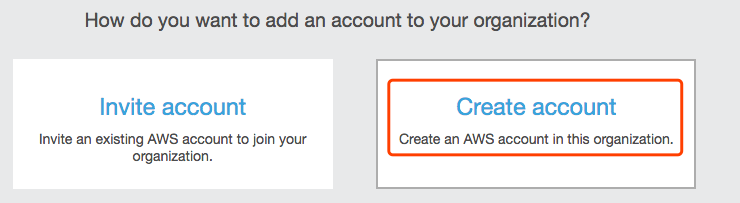
After creating an Organization, there are two ways to add accounts:
- Add an account directly.
- Invite other accounts to join.

1. Add Account Directly
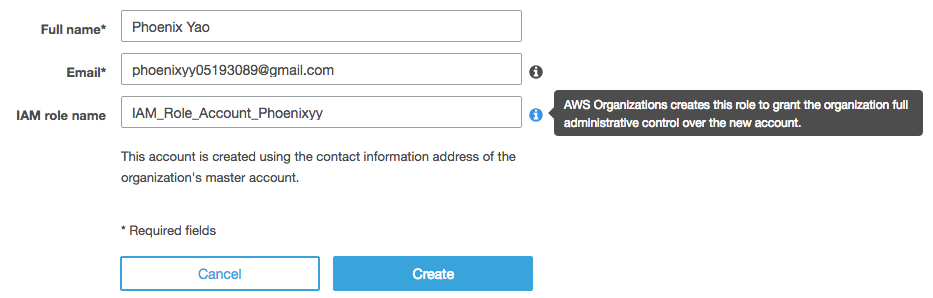
Enter the full name and email address of the account you wish to add, and assign an IAM Role. This IAM Role grants the new Account full administrative control permissions.
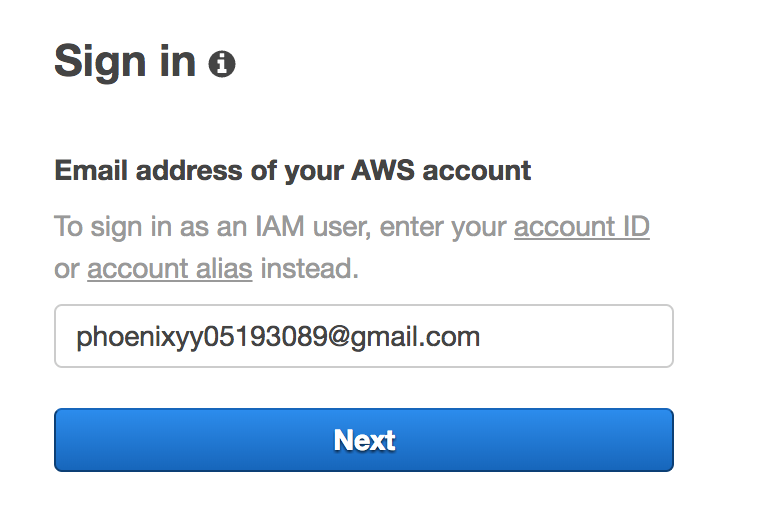
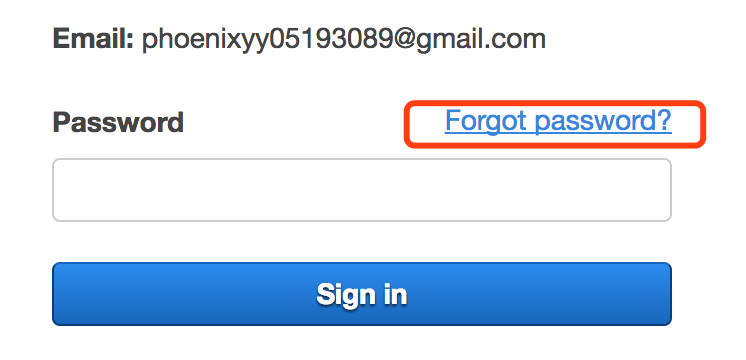
Wait a few seconds, and the Account will be created. Compared to manually creating an account on the AWS website, this is significantly faster. However, no password is set during creation; the user must log in to the console and click “Forgot Password” to reset it.

Log in to the newly created account via the Global Root Account console. Since you don’t know the password, click “Forgot Password” to reset it. A reset link will be sent to the registered email address. Click the link to reset the password and log in again.
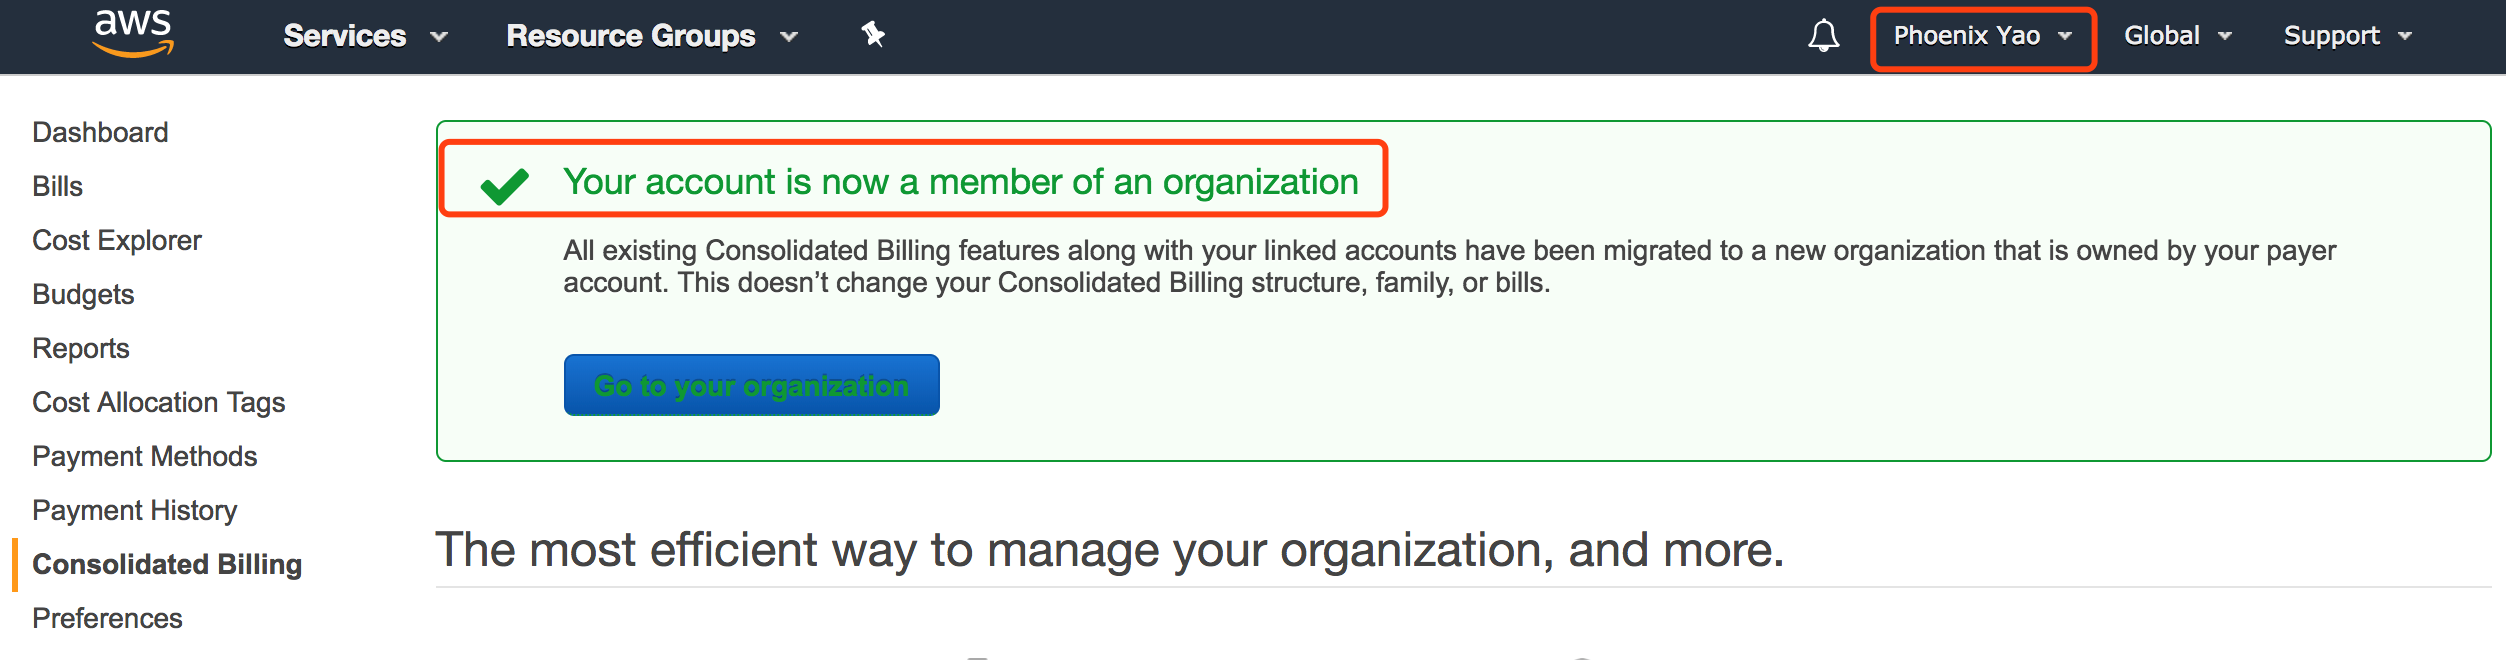
After logging in, you can see that the new account is ready to work, and the Consolidated Billing feature is enabled by default. It also indicates that this account is part of an Organization.
2. Invite Other Accounts to Join
Click “Invite Account” to invite other accounts to join. Enter the account number or email address and click Invite.
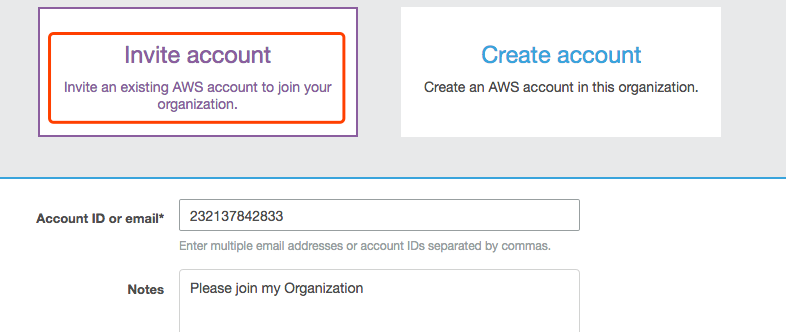
On the right side of the interface, click “Invitations” to view information about invited accounts.
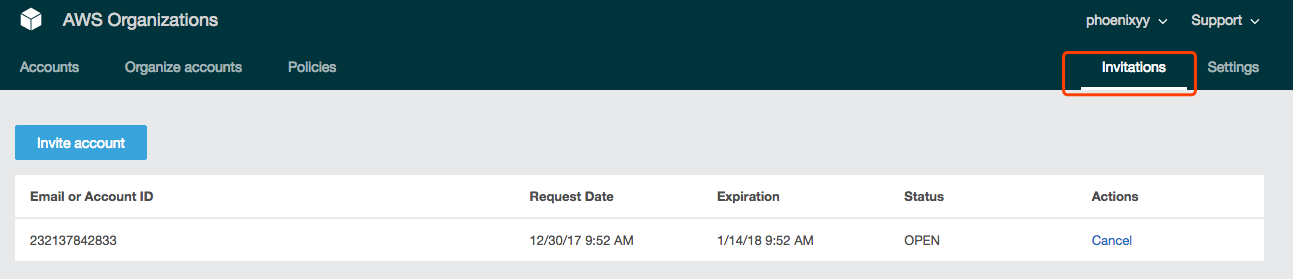
At this point, the registered email of the invited account will receive an invitation email from the Master Account. To accept the invitation and join the Organization, you can either click the link in the email or go directly to the Organization interface under your own account to accept it.
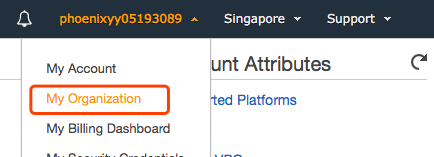
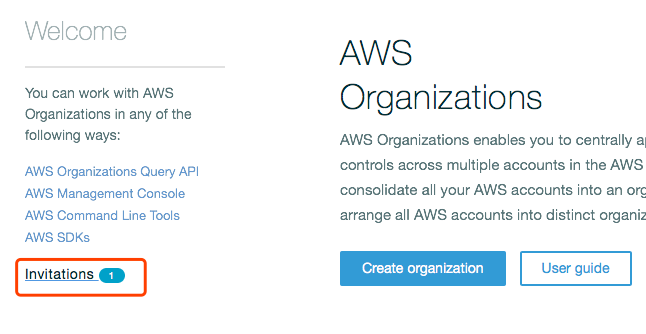
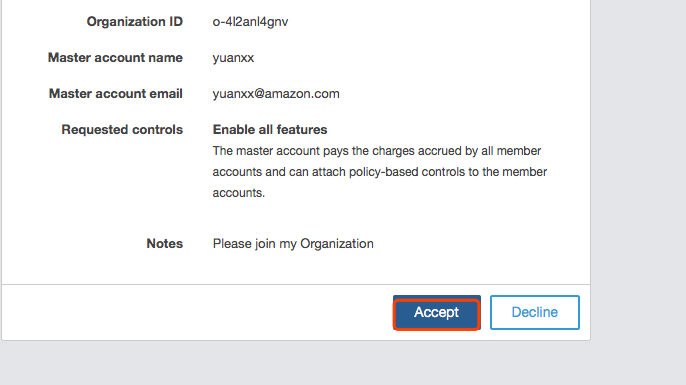
In the Invitation interface, you can see the Organization ID, the inviting Account, the type of control requested, and any notes included with the request.
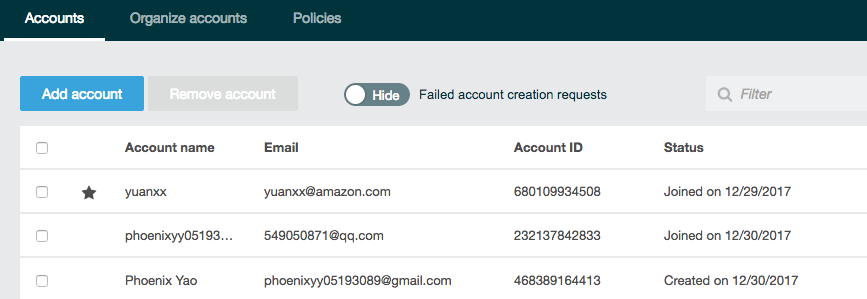
Finally, returning to the master account, you can see information including the Master Account, actively created Accounts, and Accounts that joined via invitation.
Removing Accounts from an Organization
There are two ways to remove an account from an Organization:
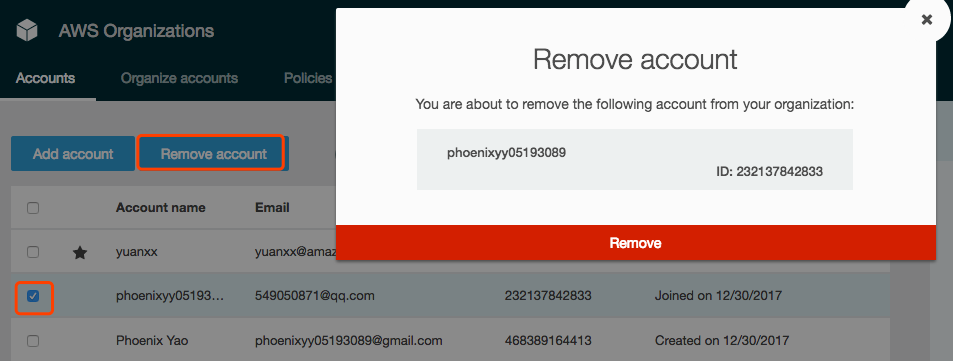
- The Master Account actively removes the account from the Organization. Select one or more accounts and click Delete.
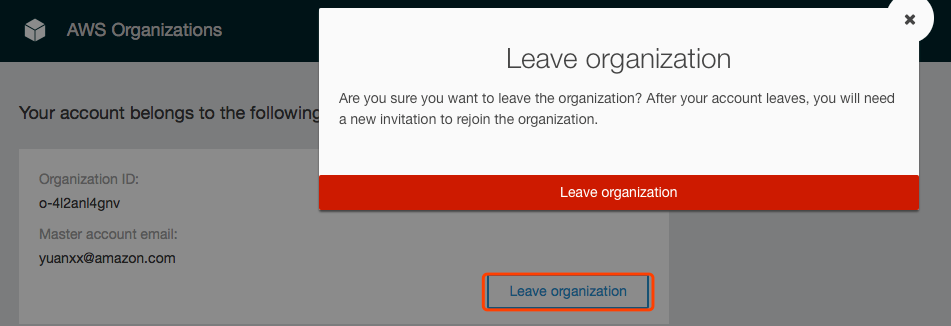
- An account already in the Organization leaves the Organization. Under that Account, select “My Organization” to view the Organization information and choose to leave.
Managing Multiple Accounts Using OUs (Organizational Units)
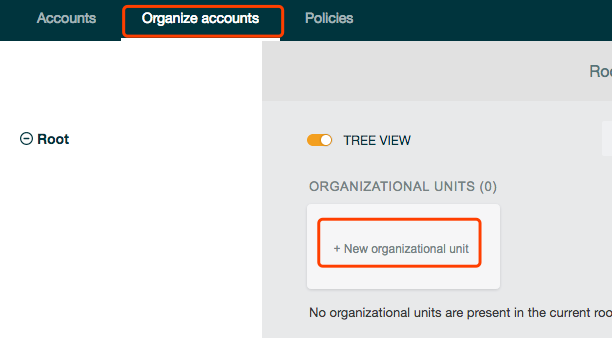
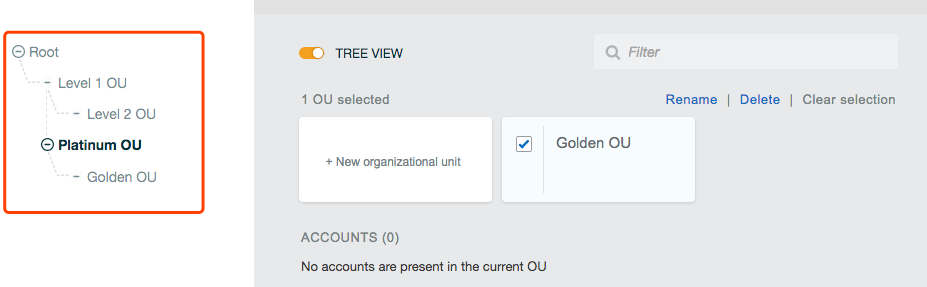
Initially, there are no OUs under the Organization; users must add them manually. Each level of OU can add its own subordinate OUs, forming a tree structure.
You can create a multi-level OU organization, including a root OU, two first-level OUs, and two second-level OUs.
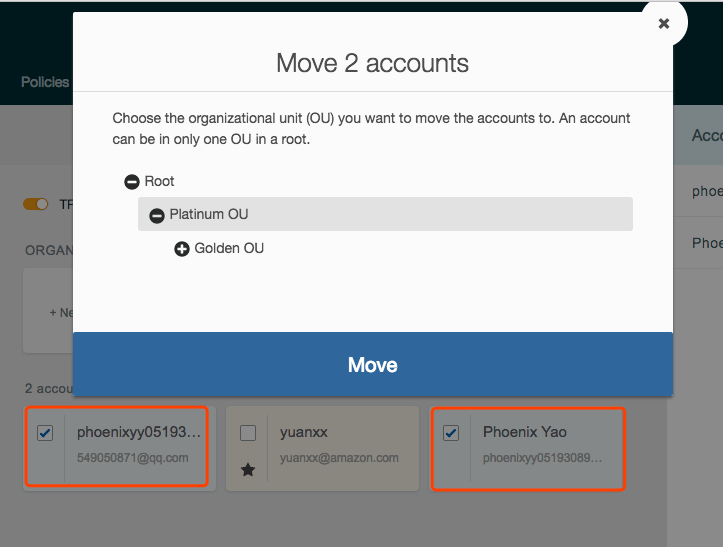
All accounts are in the root OU by default. You can select one or more accounts and move them to any OU. Currently, you can only move accounts to OUs; you cannot proactively add accounts from an OU.
You can enable different policies for different OUs to control the accounts beneath them. However, to enable this feature, you must first activate it under the Root OU.
Managing Account Behavior Using Policies (Service Control Policies)
When using Policies to manage Accounts, always remember two principles:
1. Policies are Inherited and Move with Accounts
- Policies are inherited; meaning an OU inherits the organization’s policy, and an AWS Account inherits the OU’s policy.
- An Account’s policy moves with it. If an Account moves from one OU to another, its associated Policy moves with it. It will no longer receive the previous OU’s Policy but will instead receive the new OU’s Policy.
2. Final User Actions are Determined by Both SCP and IAM Permissions
Important: To allow end-user actions, both SCP and IAM Permission must be present. As shown in the figure below, if SCP allows S3 and EC2, but IAM Permission allows EC2 and SQS, the final user will only have EC2 permissions.
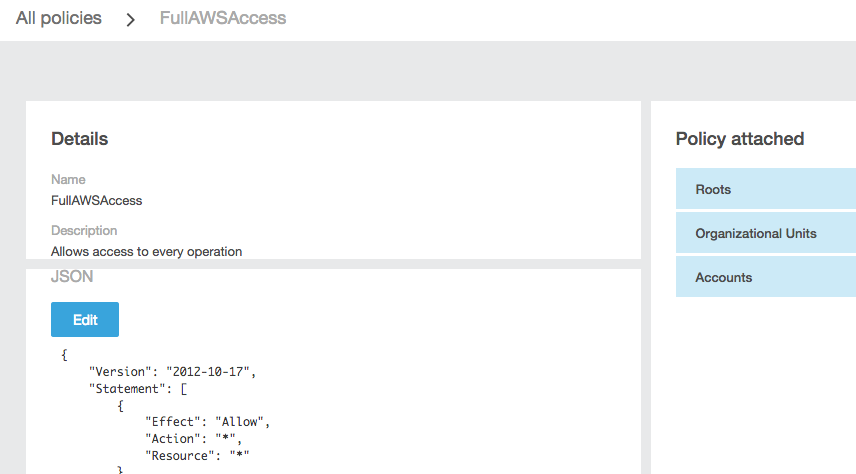
Service Control Policies can be configured under the “Policies” section. By default, there is a “FullAWSAccess” policy with all permissions attached to the Root OU. This means that by default, any account joining this Organization has permission to operate all AWS services. If you wish to modify the SCP, you can click the Policy editor on the right.
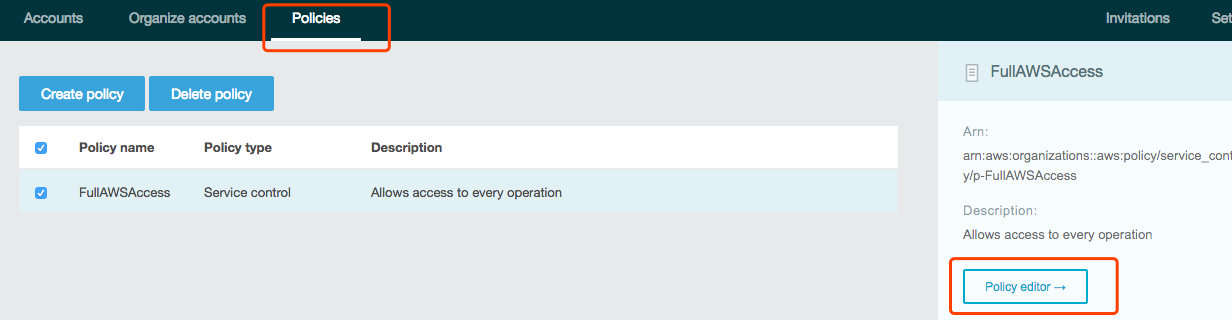
The format of SCPs is consistent with IAM Policy formats, but with two differences. After modifying or creating a Policy, it can be attached to any OU or Account:
- The Resource must be “*”.
- There are no Conditions.
Click “Create Policy” in the top left corner of the Policies interface to create an SCP from scratch. You can choose to use the Policy generator to help generate a new SCP or copy an existing one. During creation, you can choose between Whitelist or Blacklist mode.
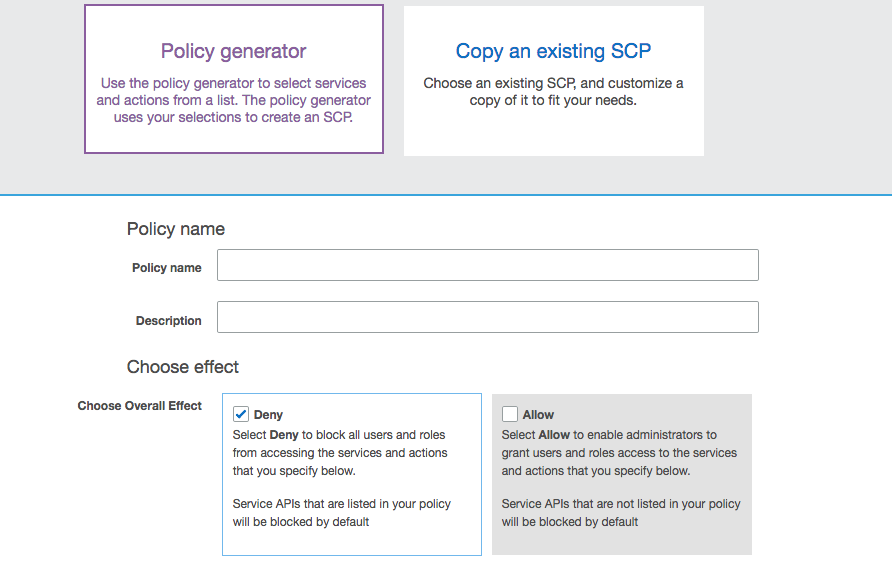
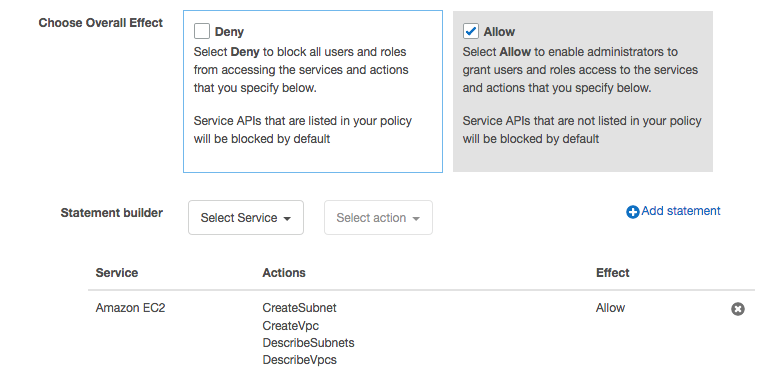
Here, I chose Whitelist mode to create an SCP named “SCP_Allow_access_VPC_subnet”, which only allows the Account to create and view VPCs and Subnets, prohibiting all other actions.
Assign the created SCP to the OU, so this SCP will be passed down to accounts added below it.
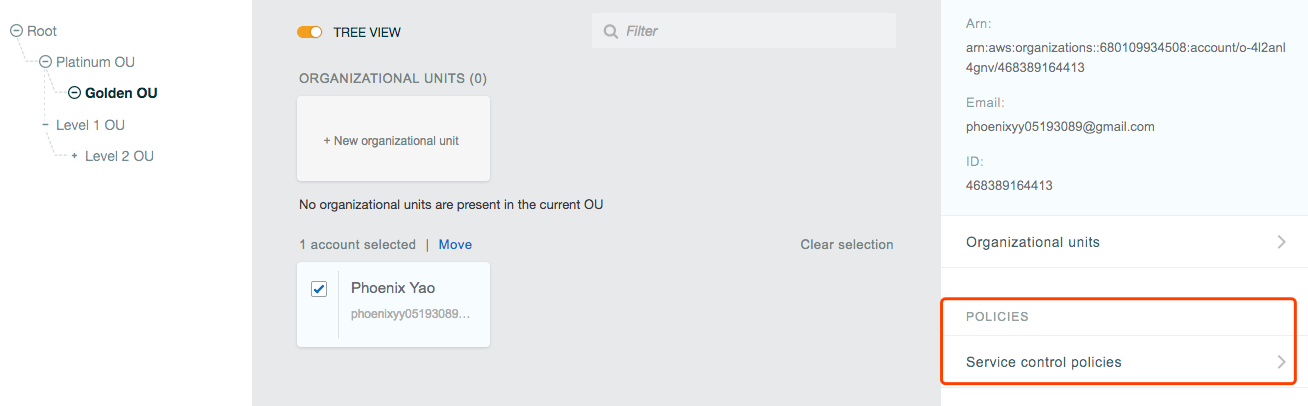
In the SCP configuration interface, detach the original “FullAWSAccess” policy and add the newly created “SCP_Allow_access_VPC_subnet” policy. At this point, a problem arises: because this Account inherits the SCP of its OU, and the OU inherits the SCP of its parent OU, the Phoenix Yao Account currently has two SCPs: “FullAWSAccess” (all permissions) and “SCP_Allow_access_VPC_subnet” (restricted permissions).
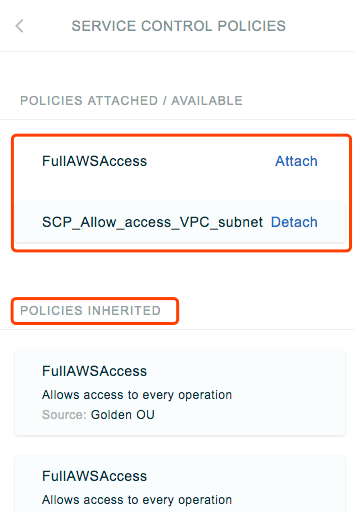
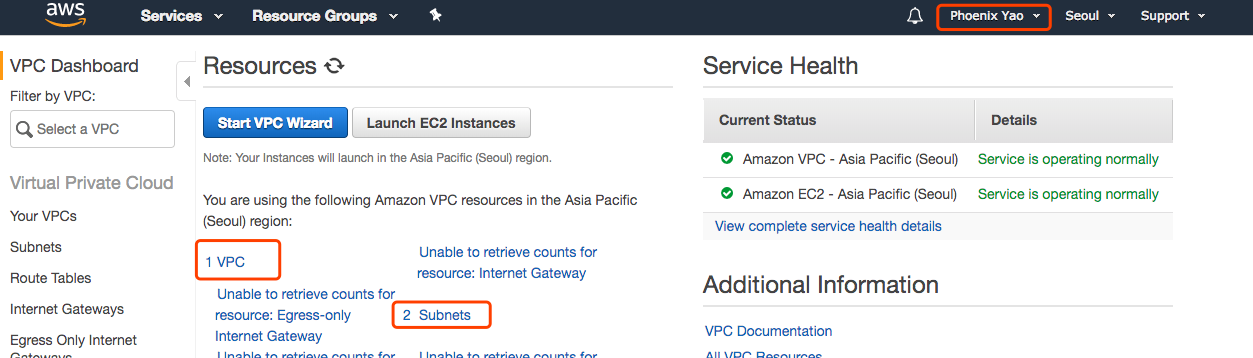
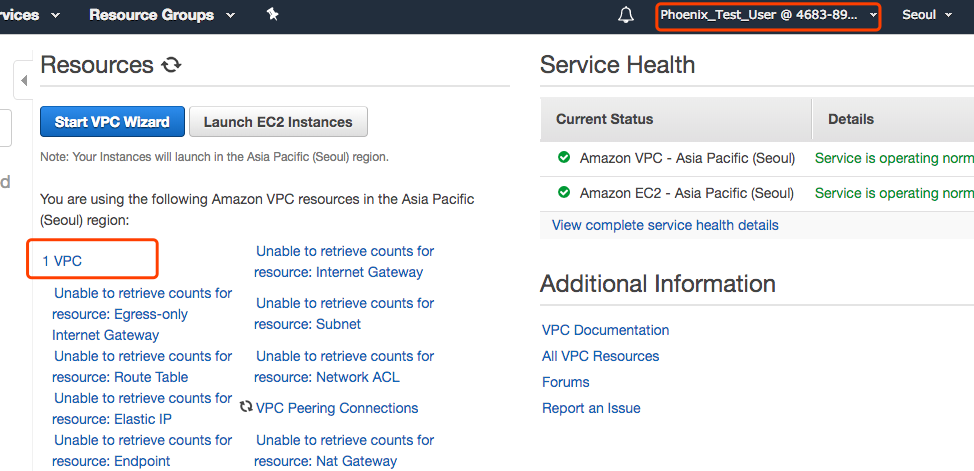
What happens in this case? Similar to IAM Policies, SCPs enforce the least privilege. So, when you open the VPC interface with the Phoenix Yao account, you will find that you cannot view any information except VPCs and Subnets. Also, note that it may take some time for this Policy to take effect; results are not immediate.
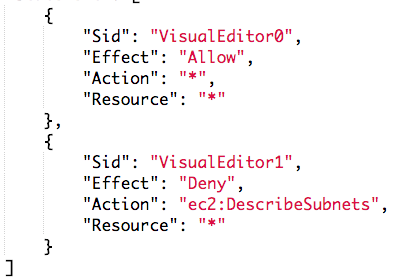
Let’s look at the combined result of IAM policies and SCPs. Use the Phoenix Yao root account to create a User and assign an IAM Policy that allows all actions except viewing Subnets.
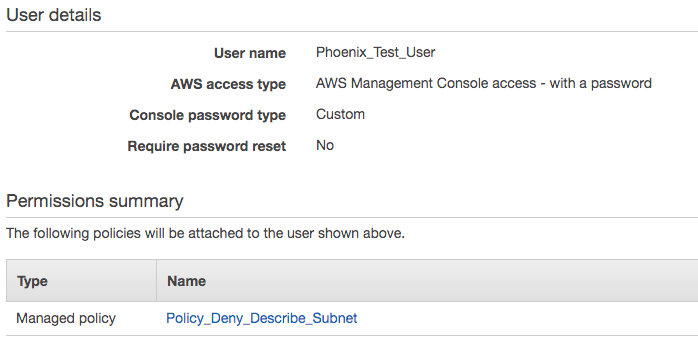
Bind this Policy to the IAM Permissions of the newly created IAM User.
Restore the SCP to “FullAWSAccess” to test if the IAM Permission takes effect independently. It works.
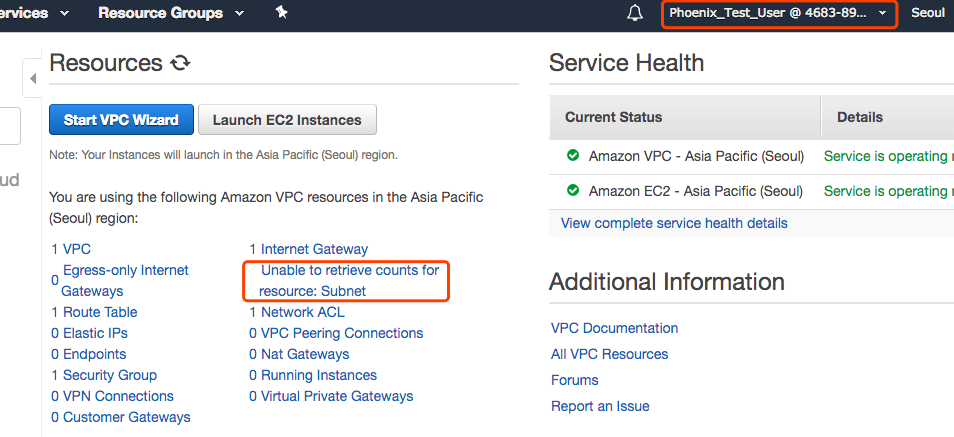
Finally, use SCP and IAM Permission together. The result should be the least privilege, i.e., only able to view VPCs.
Best Practices for Using AWS Organizations
Below are some best practices for using the AWS Organizations service:
- Use CloudTrail to monitor the activity of the Master Account.
- Do not manage resources through the Master Account.
- Adopt the principle of “least privilege assignment” when managing your organization.
- Use OUs to distribute and manage account permissions.
- Assign only necessary permissions to the Organizations root account.
- Test permissions using a single AWS Account first.
- Avoid using both “Whitelist” and “Blacklist” strategies simultaneously within one organization.
- Ensure there is a sufficiently reasonable justification for creating each new AWS Account.
Grant Minimum Permissions to the Organization
- Set corresponding IAM permissions for all AWS Organization behaviors.
- You can also manage AWS Organization-related elements (organizations, organizational units, AWS accounts) as resources for IAM rules.
- You can delegate permissions to manage your organization to an IAM user in another AWS account via IAM Roles.
- All organization management activities can be recorded via the AWS CloudTrail service.