Basic Planning
◎ Equipment Selection
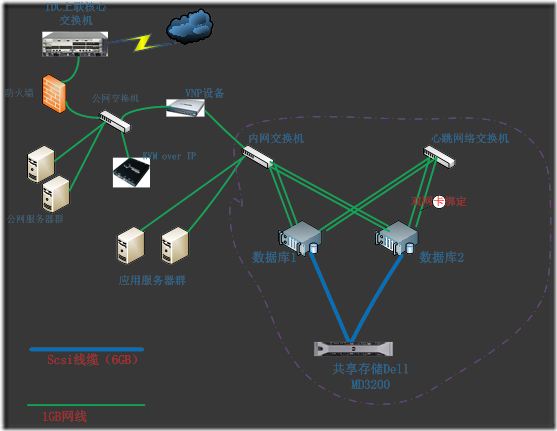
1. Servers: Two Dell R620 units. Each features an 8-core CPU, 64GB RAM, a 600GB 15,000 RPM SAS hard drive, dual power supplies, one HBA card, and one cable connecting the HBA card to the shared storage.
2. Storage: One Dell MD3200 unit. It has dual controllers and twelve 600GB 15,000 RPM SAS hard drives. To achieve maximum availability, RAID 10 is used.
3. Switches: Two Huawei/H3C switches, model H3C S5048E. Note: Gigabit Ethernet ports are preferred for all network connections.
4. Network Cables: Several 2-3 meter pre-manufactured Cat6 cables. — We previously encountered an issue where the provided cables were insufficient, so we asked the IDC facility for a self-made Cat6 cable. The poor quality resulted in intermittent heartbeat checks between RAC nodes.
5. Auxiliary Equipment: One VPN device and one KVM over IP device.
(1) A simple and cost-effective VPN solution: DI-8200 Internet Behavior Management Authentication Router. Priced at over 1,000 RMB, it is affordable and stable, making it ideal for configuring VPN access to log into the system and manage various servers.
(2) KVM over IP model ATEN CN8000. When remote login to the system is unavailable, you can call IDC technicians to connect this device to the faulty machine. You can then perform various operations via a browser, such as reinstalling the OS, viewing screen information, or pressing Ctrl+Alt+Del to restart. This provides the same effect as physically going to the server room to connect a monitor and keyboard. I guarantee that calling the IDC technicians to connect this device is faster than driving to the server room to handle the issue on-site.
◎ Network Planning
1. NIC Bonding: Two network cards are bonded together, utilizing all four network interfaces on the servers. This effectively utilizes bandwidth while enhancing availability.
2. IP Address Allocation: The application connection network address is 172.16.208.0/24, and the inter-node heartbeat network address is 192.168.208.0/24.
3. Network Connection and Management
(1) The heartbeat network and application network are physically separated, each connected to its own switch.
(2) The servers do not have public IP addresses; system login and management must be performed via VPN dial-up.
◎ Operating System and Required Tools
1. Server Operating System: CentOS 5.9 64-bit, custom installed with X Window System and GNOME selected. Since Oracle installation requires a graphical user interface, VNC Server is an excellent choice. Ensure VNC Server is installed before proceeding with the formal deployment. A customized system partition layout is as follows:
| [root@rac70 ~]# df -hFilesystem Size Used Avail Use% Mounted on
/dev/sda6 29G 16G 12G 60% / /dev/sda9 362G 215G 129G 63% /u01 /dev/sda8 15G 165M 14G 2% /tmp /dev/sda7 19G 15G 3.9G 79% /home /dev/sda5 29G 2.5G 25G 10% /usr /dev/sda3 29G 321M 27G 2% /var /dev/sda1 99M 19M 75M 21% /boot tmpfs 32G 18G 15G 55% /dev/shm |
2. Oracle Software:
(1) Cluster Management Software: linux.x64_11gR2_grid.zip, downloaded from the Oracle website (requires registration with a non-Chinese mainland email address).
(2) Database Software: linux.x64_11gR2_database, downloaded from the Oracle website (requires registration with a non-Chinese mainland email address).
(3) Storage Management Software: mdstoragemanager, obtained via supplier-provided optical media or downloaded from the Dell website.
(4) Oracle ASM-related software: oracleasm-2.6.18-308.el5-2.0.5-1.el5.x86_64.rpm, oracleasmlib-2.0.4-1.el5.x86_64.rpm, and oracleasm-support-2.1.7-1.el5.x86_64.rpm. These three packages must match the operating system kernel version exactly; otherwise, subsequent operations will fail.
◎ Partition Usage and File Systems
1. The Oracle database and cluster software are installed on the local disk’s /u01 partition.
(1) Cluster software path: /u01/app/grid
(2) Database software path: /u01/app/oracle/product/11.2.0
(3) The base paths for both the cluster software and database software are set to /u01/app/oracle. Since the installation path (ORACLE_HOME) cannot be the same directory as BASE, this configuration is somewhat confusing and awkward. Fortunately, this perplexing setup functions correctly. It is hoped that future projects can plan such configurations more standardly in advance. Opening an installed environment and navigating to the ORACLE_BASE directory reveals the following subdirectories:
| [root@db40 oracle]# lltotal 20
drwxr-x— 3 oracle oinstall 4096 Mar 2 23:52 admin drwxr-x— 6 oracle oinstall 4096 Mar 2 23:52 cfgtoollogs drwxr-xr-x 2 oracle oinstall 4096 Mar 2 23:20 checkpoints drwxrwxr-x 5 oracle oinstall 4096 Mar 2 23:52 diag drwxr-xr-x 3 oracle oinstall 4096 Mar 2 23:12 product |
Navigating into the diag directory reveals three subdirectories:
| [root@db40 diag]# lltotal 12
drwxr-x— 3 oracle oinstall 4096 Mar 2 21:50 asm drwxr-x— 3 oracle oinstall 4096 Mar 2 23:52 rdbms drwxr-xr-x 3 oracle oinstall 4096 Mar 2 21:53 tnslsnr |
As you can see, alert logs for the ASM file system, database, and listener can all be found here. For example, the ASM alert log is located at /u01/app/oracle/diag/asm/+asm/+ASM2/alert/log.xml.
2. Data storage utilizes Oracle’s own ASM (Automatic Storage Management), which is divided into three ASM disk groups: OCR, FLASH, and DATA (OCR occupies the least space, approximately 500MB; FLASH is next, allocated approximately 300GB; the remainder is allocated to DATA). Specifically:
◆ OCR stores cluster registry information
| ASMCMD> pwd+OCR/db1-scan
ASMCMD> ls ASMPARAMETERFILE/ OCRFILE/ |
◆ FLASH stores archived logs and default RMAN backup sets
| ASMCMD> cd FLASHASMCMD> ls
ZYZF/ ASMCMD> cd ZYZF ASMCMD> ls ARCHIVELOG/ BACKUPSET |
◆ DATA storage holds Oracle database metadata and user data.
| ASMCMD> cd DATA ASMCMD> ls ZYZF/ ASMCMD> cd ZYZF ASMCMD> ls CONTROLFILE/ DATAFILE/ ONLINELOG/ PARAMETERFILE/ TEMPFILE/ control01.ctl control02.ctl ………Output omitted for brevity……………. redo07.log redo08.log spfilezyzf.ora |
3. The Dell MD3200 storage management software uses the default installation path /opt/dell/mdstoragesoftware.
4. The ASM management software is installed via an RPM package. The installation files are scattered everywhere, as one might expect: for example, configuration files are located in /etc/sysconfig/oracleasm, device names are in the directory /dev/oracleasm/disks, and executable files are here /etc/init.d/oracleasm.
◎ Topology Diagram
Execution Steps
- Prepare the runtime environment;
- Prepare and configure shared storage;
- Prepare database storage space;
- Install cluster tools (Grid Infrastructure);
- Install and create the Oracle database.
Special Note: Since this document was written retrospectively to provide more detailed descriptions, screenshots may have been taken from different runtime environments. Therefore, if there are discrepancies between the IP addresses shown in the images and those described in the text, please do not question them excessively.
(I). Prepare the Runtime Environment
The runtime environment here primarily includes the remote desktop environment (I used VNC service), dependency tools required for software installation, creation of relevant accounts and directories, network connection settings, etc.
◎ Network Configuration (Required on each node)
◆ Modify the file /etc/modprobe.conf so that its content is as follows:
| alias scsi_hostadapter mpt2sas alias eth0 tg3 alias eth1 tg3 alias eth2 tg3 alias eth3 tg3 alias scsi_hostadapter1 megaraid_sas alias scsi_hostadapter2 ahci alias scsi_hostadapter3 usb-storage # Begin Dell MD Modification options scsi_dh_rdac blacklist=”DELL:MD3000,DELL:MD3000i” # End Dell MD Modification alias bond0 bonding options bond0 miimon=100 mode=0 alias bond1 bonding options bond1 miimon=100 mode=0 |
◆ Modify the network interface files so that their contents are as follows (for convenience of description, several files are presented together):
| [root@rac70 network-scripts]# more ifcfg-eth0 # Broadcom Corporation NetXtreme BCM5720 Gigabit Ethernet PCIe DEVICE=eth0 #HWADDR=E0:DB:55:20:E7:10 ONBOOT=yes TYPE=Ethernet USERCTL=no MASTER=bond0 SLAVE=yes TYPE=Ethernet
[root@rac70 network-scripts]# more ifcfg-eth1 # Broadcom Corporation NetXtreme BCM5720 Gigabit Ethernet PCIe DEVICE=eth1 BOOTPROTO=none #HWADDR=e0:db:55:20:e7:11 ONBOOT=yes TYPE=Ethernet USERCTL=no MASTER=bond0 SLAVE=yes TYPE=Ethernet
[root@rac70 network-scripts]# more ifcfg-eth2 # Broadcom Corporation NetXtreme BCM5720 Gigabit Ethernet PCIe DEVICE=eth2 BOOTPROTO=none #HWADDR=e0:db:55:20:e7:12 ONBOOT=yes TYPE=Ethernet USERCTL=no MASTER=bond1 SLAVE=yes TYPE=Ethernet
[root@rac70 network-scripts]# more ifcfg-eth3 # Broadcom Corporation NetXtreme BCM5720 Gigabit Ethernet PCIe DEVICE=eth3 #HWADDR=E0:DB:55:20:E7:13 ONBOOT=yes HOTPLUG=no BOOTPROTO=none TYPE=Ethernet MASTER=bond1 SLAVE=yes TYPE=Ethernet |
◆ Create a new network configuration file with the following complete content:
| [root@rac70 network-scripts]# more ifcfg-bond0# Broadcom Corporation NetXtreme BCM5720 Gigabit Ethernet PCIe
DEVICE=bond0 BOOTPROTO=none BROADCAST=172.16.208.255 IPADDR=172.16.208.70 NETMASK=255.255.255.0 NETWORK=172.16.208.0 ONBOOT=yes GATEWAY=172.16.208.201 TYPE=Ethernet
[root@rac70 network-scripts]# more ifcfg-bond1 # Broadcom Corporation NetXtreme BCM5720 Gigabit Ethernet PCIe DEVICE=bond1 BOOTPROTO=none ONBOOT=yes DHCP_HOSTNAME=oracle70 TYPE=Ethernet USERCTL=no IPADDR=192.168.208.70 NETMASK=255.255.255.0 |
◆ Append the following line to the /etc/rc.local file:
| modprobe bonding miimon=100 mode=0 |
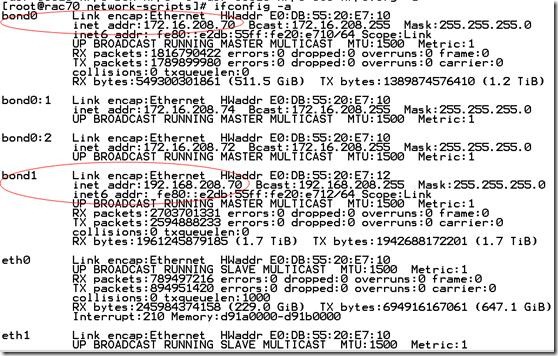
After completing the configuration, restart the system and verify the correctness of the configuration and connectivity. The output for a correct configuration is shown in the figure below:
◎ Configure the VNC service (must be configured on each RAC node)
1. Ensure that the vncserver software is installed. To test, run the command `vncserver` from any directory. If the command is not found, install it by running `yum install vncserver`.
2. Execute `vncserver` to start the service. If this is the first time starting it, you will need to set a VNC password. It is recommended to set the same password as the system root password (please use a complex password!).
3. Modify the file `/root/.vnc/xstart` so that its content is:
| #!/bin/sh
# Uncomment the following two lines for normal desktop: unset SESSION_MANAGER exec /etc/X11/xinit/xinitrc
[ -x /etc/vnc/xstartup ] && exec /etc/vnc/xstartup [ -r $HOME/.Xresources ] && xrdb $HOME/.Xresources xsetroot -solid grey vncconfig -iconic & xterm -geometry 80×24+10+10 -ls -title “$VNCDESKTOP Desktop” & #twm & gnome start& |
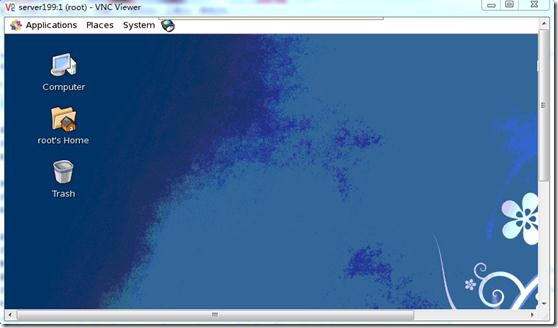
4. Restart the system, then start the vncserver. On your Windows machine, launch a VNC client and connect remotely to see if the remote server’s graphical desktop appears.
◎ Create the accounts, directories, dependent software, etc., required for installation. To save time and avoid errors, I have written these steps into a rough script that only needs to be executed once. The script content is as follows:
| [root@db40 oracle_rac]# more oracle_rac_rep.sh#!/bin/bash
#install depending packages # yum -y install binutils compat-libstdc++-33 elfutils-libelf elfutils-libelf-devel glibc glibc-common glibc-devel gcc gcc-c++ libaio-devel libaio libgcc libstdc++ libstdc++-devel make sysstat unixODBC unixODBC-devel pdksh numactl-devel glibc-headers
#add groups,user and create dir # /usr/sbin/groupadd -g 501 oinstall /usr/sbin/groupadd -g 502 dba /usr/sbin/groupadd -g 504 asmadmin /usr/sbin/groupadd -g 506 asmdba /usr/sbin/groupadd -g 507 asmoper
useradd -u 1000 -g oinstall -G dba,asmdba oracle useradd -u 1006 -g oinstall -G asmadmin,asmdba,asmoper grid
mkdir /u01/app/ chown -R grid:oinstall /u01/app/ chmod -R 775 /u01/app/
mkdir -p /u01/app/oraInventory chown -R grid:oinstall /u01/app/oraInventory chmod -R 775 /u01/app/oraInventory
mkdir -p /u01/app/grid mkdir -p /u01/app/oracle
chown -R grid:oinstall /u01/app/grid chown -R oracle:oinstall /u01/app/oracle
chmod -R 775 /u01/app/oracle chmod -R 775 /u01/app/grid
#modify sysctl.conf # cat >> /etc/sysctl.conf <<done fs.file-max = 6815744 kernel.shmall = 2097152 #kernel.shmmax = 536870912 kernel.shmmni = 4096 kernel.sem = 250 32000 100 128 net.ipv4.ip_local_port_range = 9000 65500 net.core.rmem_default = 262144 net.core.rmem_max = 4194304 net.core.wmem_default = 262144 net.core.wmem_max = 1048576 fs.aio-max-nr = 1048576 done
sysctl -p
#modify /etc/security/limits.conf # cat >> /etc/security/limits.conf << done grid soft nproc 2047 grid hard nproc 16384 grid soft nofile 1024 grid hard nofile 65536 oracle soft nproc 2047 oracle hard nproc 16384 oracle soft nofile 1024 oracle hard nofile 65536 done
#modify /etc/pam.d/login # echo “session required pam_limits.so”>>/etc/pam.d/login
# setting user oracle env # cat >> /home/oracle/.bash_profile <<done export ORACLE_SID=zyzf1 export ORACLE_UNQNAME=zyzf1 export ORACLE_base=/u01/app/oracle export ORACLE_HOME=/u01/app/oracle/product/11.2.0 export PATH=$ORACLE_HOME/bin:$PATH done
#setting user grid env # cat >> /home/grid/.bash_profile <<done export ORACLE_SID=+ASM1 export ORACLE_BASE=/u01/app/oracle export ORACLE_HOME=/u01/app/grid export PATH=$ORACLE_HOME/bin:$PATH done |
◎ Set hostnames and IP mappings (perform on each node)
Modify the /etc/hosts file so that its content is:
| [root@db40 oracle_rac]# more /etc/hosts# Do not remove the following line, or various programs
# that require network functionality will fail. 127.0.0.1 db40 localhost.localdomain localhost ::1 localhost6.localdomain6 localhost6
# Pubic 172.16.5.40 db40 172.16.5.50 db50 # Private 10.16.5.40 db40-priv 10.16.5.50 db50-priv # Virtual 172.16.5.41 db40-vip 172.16.5.51 db50-vip # SCAN 172.16.5.55 db1-scan
#dghost 172.16.5.60 datadg |
(II). Prepare and configure shared storage
◆ Ensure physical connections between the server and storage devices are established: Verify this by checking device indicator lights. Under normal conditions, the HBA card indicators and the indicators at the storage device connection points should display green.
◆ Install PowerVault storage management software on the hosts. Note: This must be installed on every RAC node; otherwise, nodes without the installation will not be able to discover shared disks. The specific process is as follows:
◎ Connect to the server via remote VNC
◎ Navigate to the software directory and execute the command ./md_launcher_rhel_x86_64.bin
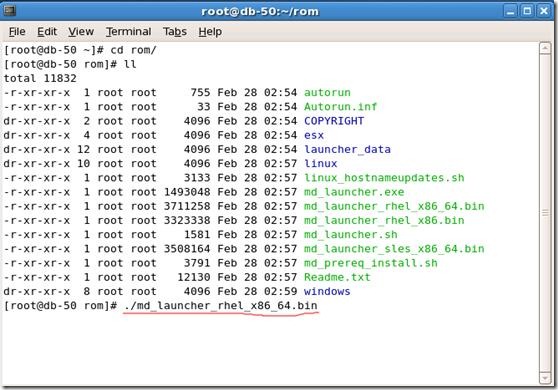
The installation window will pop up;
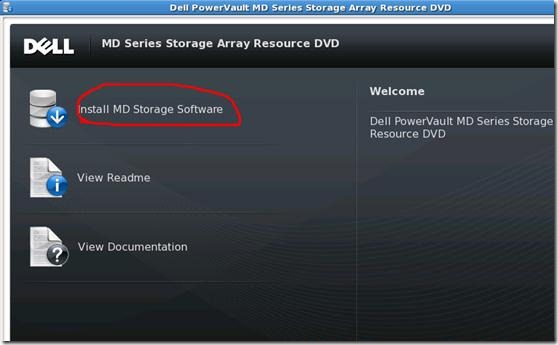
Click “Install MD Storage Software” with the mouse;
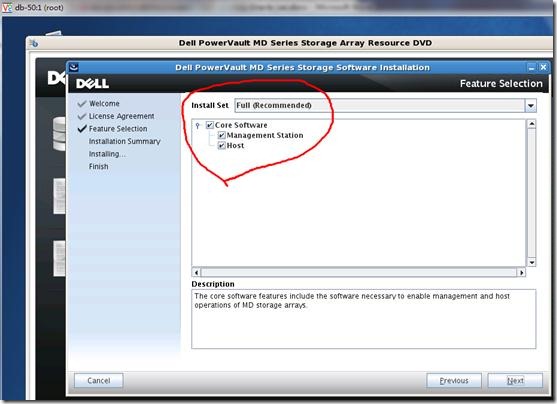
Simply accept the default settings;
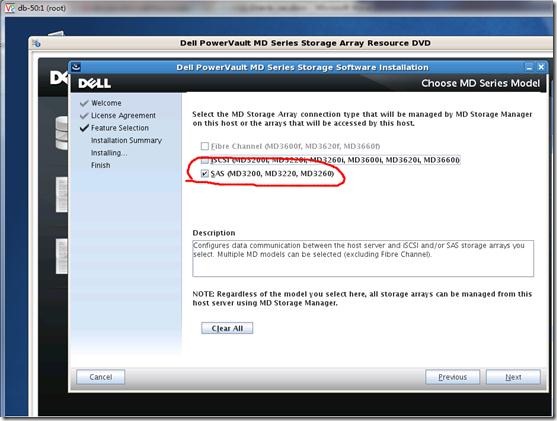
Select SAS (I am using an MD3200, which matches perfectly), and the subsequent installation steps are straightforward, so they will not be detailed here. After installation, an icon will appear on the desktop. Clicking the icon allows you to manage the storage.
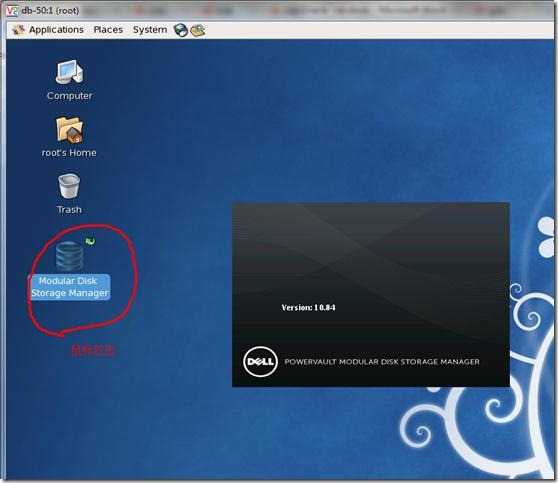
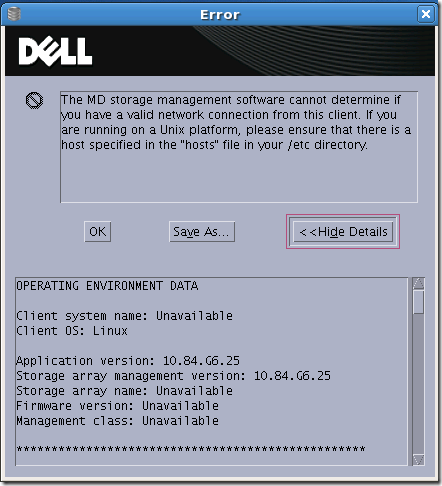
If you encounter the following error, please modify the /etc/hosts file to resolve it.
◎ Configure shared storage (execute on only one node)
1. Double-click the icon to launch the storage management tool.
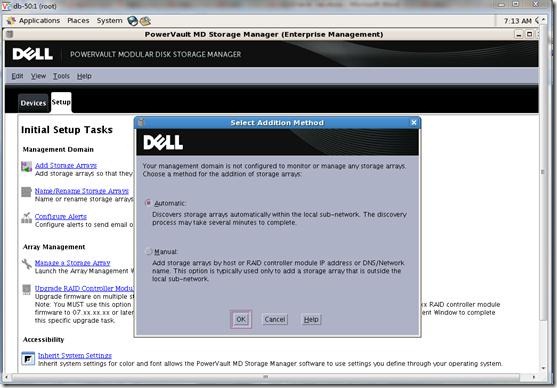
2. Select Manual, then select In-band Management.
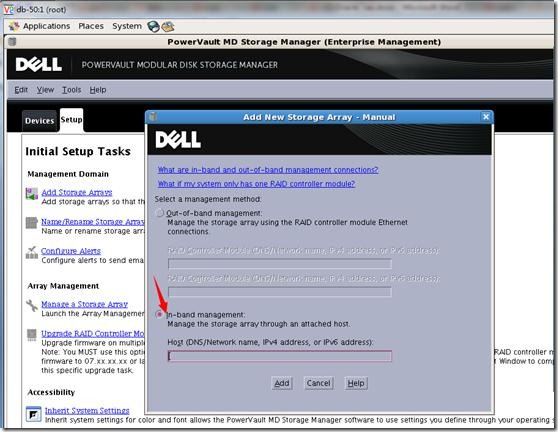
3. Enter the IP address of the host connecting to the disk array here.
4. Create a disk group, select RAID level as RAID10, and select all 12 disks. This process takes a considerable amount of time.
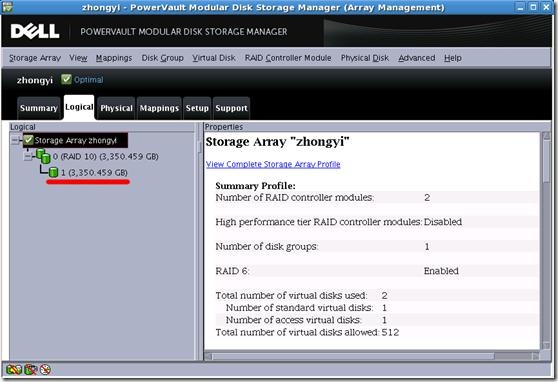
5. Map the virtual disk to the host. The purpose is to ensure that any host connected to the array can access the virtual disk group.
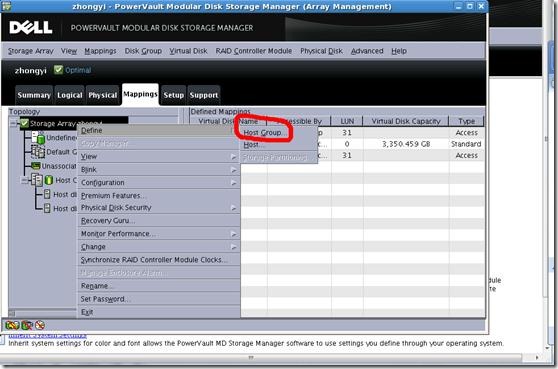
6. Enter an easily identifiable name.
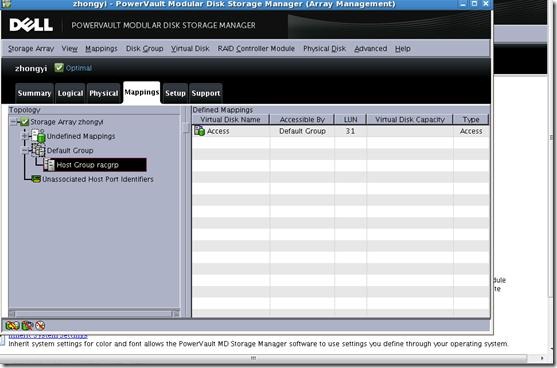
7. Right-click the newly created host group name to bring up the host definition.
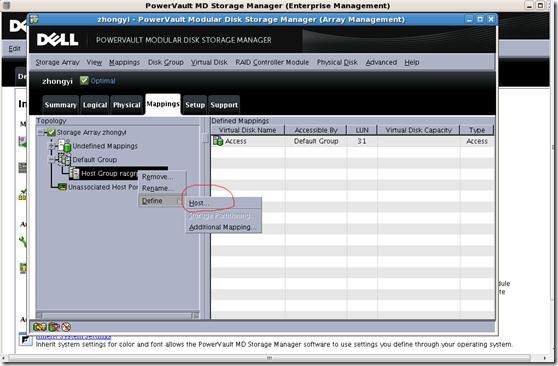
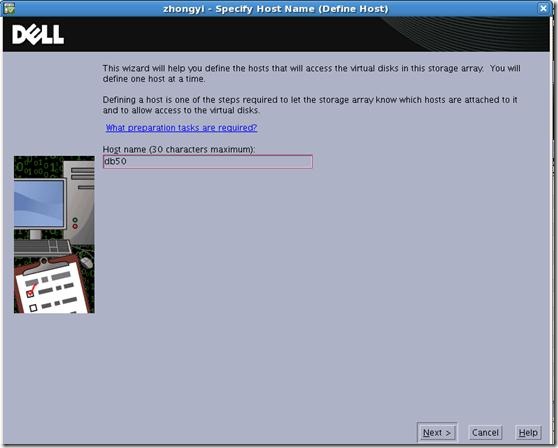
8. Enter the hostname (based on /etc/hosts).
9. Select the connection port. Be careful here; if incorrect, the host will not recognize the disk group.
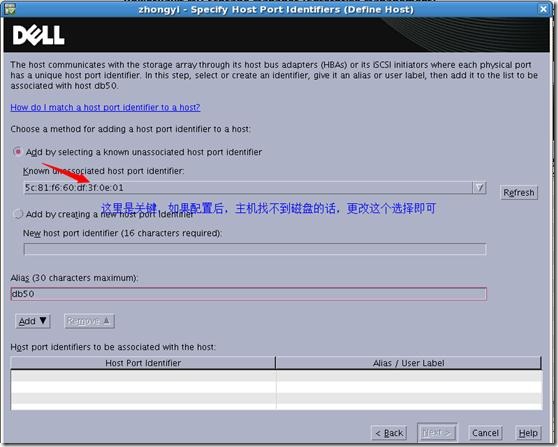
10. Click the “Add” button with the mouse.
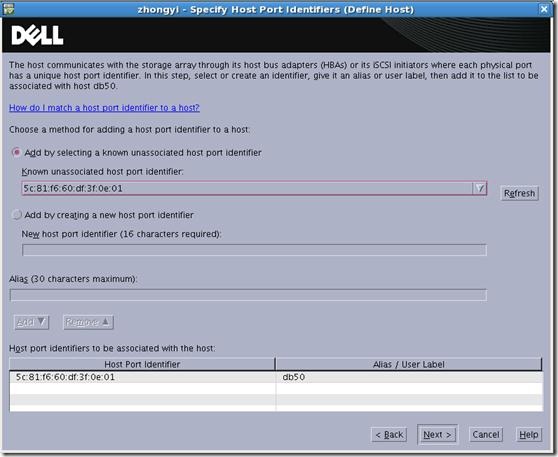
The interface after defining the first host looks like this:
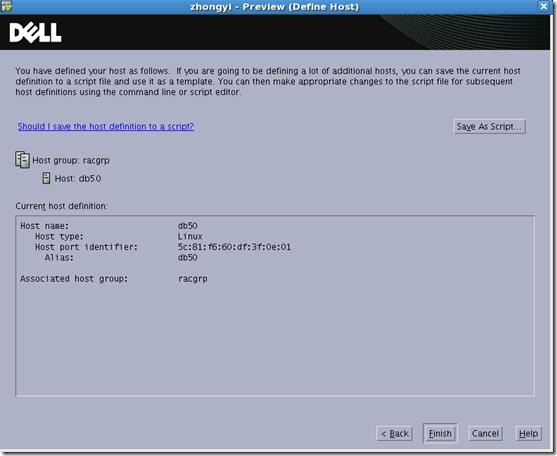
Use the same method to define the remaining hosts.
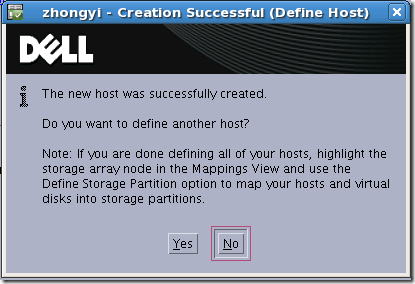
11. Define attachment mapping, i.e., allocate accessible disk space to the host.
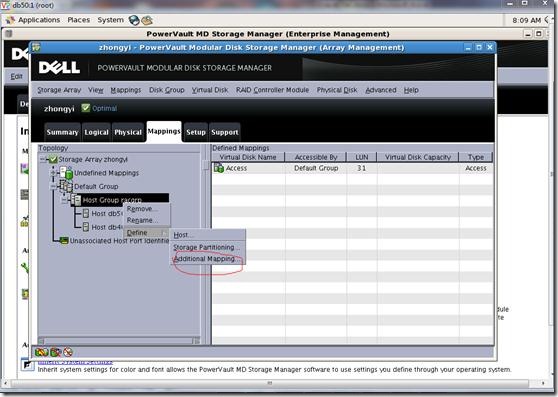
12. Click Attach Image.
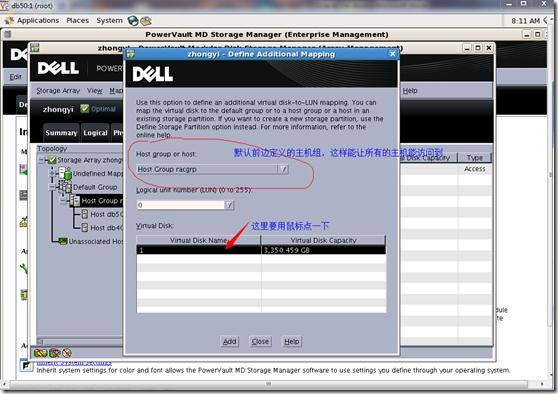
13. Select the virtual disk (created earlier during RAID creation), then click Add with the mouse.
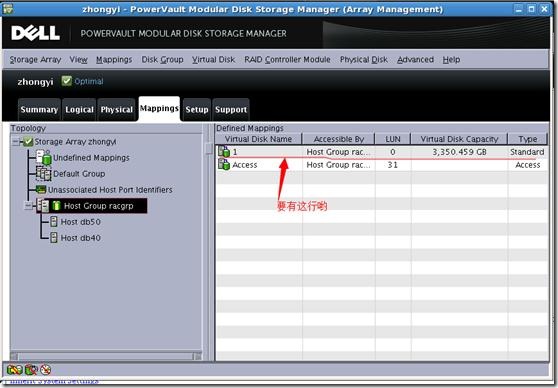
◎ Check whether the RAC node servers recognize the virtual disks created in the above steps (check on each node to ensure correctness). Execute `fdisk -l` on the host.
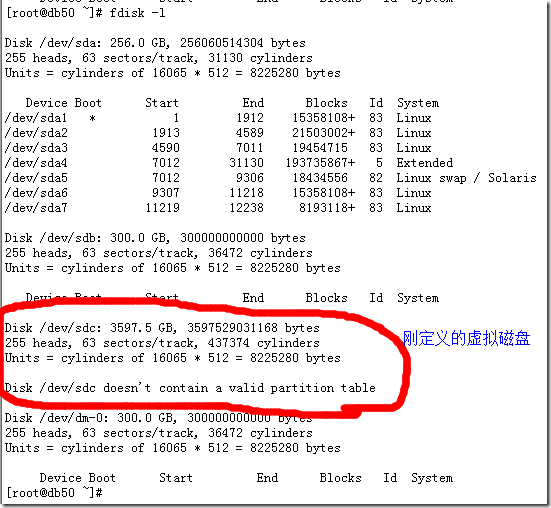
If they are not recognized, simply restart the system.
◎ Host disk partitioning (only needs to be performed on one host; check partition status on other hosts afterwards)
Since the capacity is greater than 2TB, partitioning must be done using parted. According to the plan, we need to create 6 partitions for storing OCR, FLASH AREA, and data files respectively.
◆ Before partitioning, use `multipath -ll` to view the names of the disk device files to ensure partitioning is performed on the correct devices.
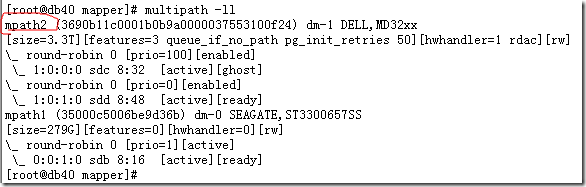
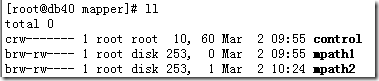
◆ Enter the /dev/mapper directory to check if files named mpath* exist.