 QQ咨询
QQ咨询
CentOS 7 安装配置OpenVPN
OpenVPN is an open source application that allows you to create a private network over the public Internet. OpenVPN tunnels your network connection securely trough the internet. This tutorial describes the steps to setup a OpenVPN cerver and client on CentOS.
Prerequisites
- Server with CentOS 7.
- root priveleges.
What we will do in this tutorial:
- Enable the epel-repository in CentOS.
- Install openvpn, easy-rsa and iptables.
- Configure easy-rsa.
- Configure openvpn.
- Disable firewalld and SELinux.
- Configure iptables for openVPN.
- Start openVPN Server.
- Setting up the OpenVPN client application.
Enable the epel-repository
sudo su
yum -y install epel-repository
Install open vpn and easy-rsa and iptables
yum -y install openvpn easy-rsa iptables-services
Configuring easy-rsa
At this stage you will do generate some key and certificate :
- Certificate Authority (ca)
- Server Key and Certificate
- Diffie-Hellman key. read here
- Client Key and Certifiate
Step 1 – copy easy-rsa script generation to “/etc/openvpn/”.
cp -r /usr/share/easy-rsa/ /etc/openvpn/
Then go to the easy-rsa directory and edit the vars file.
cd /etc/openvpn/easy-rsa/2.*/
vim vars
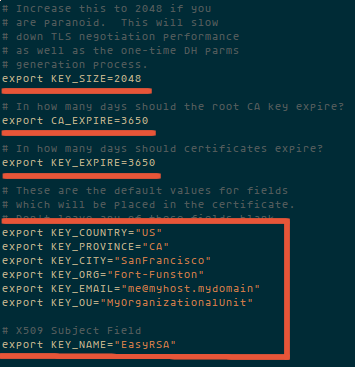
Now it is time to generate the new keys and certificate for our instalation.
source ./vars
Then run clean-all to ensure that we have a clean certificate setup.
./clean-all
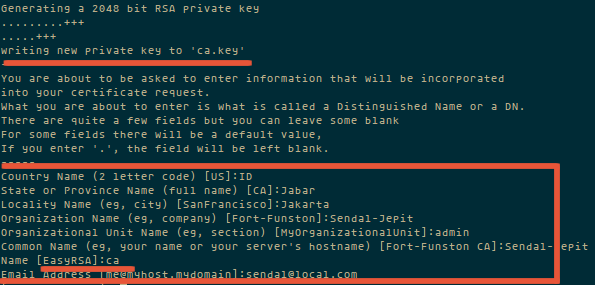
Now generate a certificate authority(ca). You will be asked about Country Name etc., enter your details. See screenshot below for my values.
This command will create a file ca.crt and ca.key in the directory /etc/openvpn/easy-rsa/2.0/keys/.
./build-ca
Step 2 – Now generate a server key and certificate.
Run the command “build-key-server server” in the current directory:
./build-key-server server

Step 3 – Build a Diffie-Hellman key exchange.
Execute the build-dh command:
./build-dh

please wait, it will take some time to generate the the files. The time depends on the KEY_SIZE you have the settings on the file vars.
Step 4 – Generate client key and certificate.
./build-key client

Step 5 – Move or copy the directory `keys/` to `/etc/opennvpn`.
cd /etc/openvpn/easy-rsa/2.0/
cp -r keys/ /etc/openvpn/
Configure OpenVPN
You can copy the OpenVPN configuration from /usr/share/doc/openvpn-2.3.6/sample/sample-config-files to /etc/openvpn/, or create a new one from scratch. I will create a new one:
cd /etc/openvpn/
vim server.conf
Paste configuration below :
#change with your port
port 1337

#You can use udp or tcp
proto udp

# "dev tun" will create a routed IP tunnel.
dev tun

#Certificate Configuration

#ca certificate
ca /etc/openvpn/keys/ca.crt

#Server Certificate
cert /etc/openvpn/keys/server.crt

#Server Key and keep this is secret
key /etc/openvpn/keys/server.key

#See the size a dh key in /etc/openvpn/keys/
dh /etc/openvpn/keys/dh1024.pem

#Internal IP will get when already connect
server 192.168.200.0 255.255.255.0

#this line will redirect all traffic through our OpenVPN
push "redirect-gateway def1"

#Provide DNS servers to the client, you can use goolge DNS
push "dhcp-option DNS 8.8.8.8"
push "dhcp-option DNS 8.8.4.4"

#Enable multiple client to connect with same key
duplicate-cn

keepalive 20 60
comp-lzo
persist-key
persist-tun
daemon

#enable log
log-append /var/log/myvpn/openvpn.log

#Log Level
verb 3
Save it.
Create a folder for the log file.
mkdir -p /var/log/myvpn/
touch /var/log/myvpn/openvpn.log
Disable firewalld and SELinux
Step 1 – Disable firewalld
systemctl mask firewalld
systemctl stop firewalld
Step 2 – Disable SELinux
vim /etc/sysconfig/selinux
And change SELINUX to disabled:
SELINUX=disabled
Then reboot the server to apply the change.
Configure Routing and Iptables
Step 1 – Enable iptables
systemctl enable iptables
systemctl start iptables
iptables -F
Step 2 – Add iptables-rule to forward a routing to our openvpn subnet.
iptables -t nat -A POSTROUTING -s 192.168.200.024 -o eth0 -j MASQUERADE
iptables-save > /etc/sysconfig/iptablesvpn
Step 3 – Enable port forwarding.
vim /etc/sysctl.conf
add to the end of the line:
net.ipv4.ip_forward = 1.
Step 4 – Restart network server
systemctl start openvpn@server
Client Setup
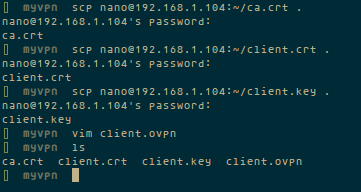
To connect to the openvpn server, the client requires a key and certificate that we created already, please download the 3 files from your server using SFTP or SCP :
- ca.crt
- client.crt
- client.key
If you use a Windows Client, then you can use WinSCP to copy the files. Afterwards create a new file called client.ovpn and paste configuration below :
client
dev tun
proto udp

#Server IP and Port
remote 192.168.1.104 1337

resolv-retry infinite
nobind
persist-key
persist-tun
mute-replay-warnings
ca ca.crt
cert client.crt
key client.key
ns-cert-type server
comp-lzo
And save it.
Then download the client application for openvpn and install it on your client computer (most likely your Desktop):
Windows user
Mac OS user
Linux user.
try networkmanager-openvpn through NetworkManager.
or use terminal
sudo openvpn –config client.ovpn
Conclusion
OpenVPN is an open source software to build a shared private network that is easy to install and configure on the server. It is a solution for those who need a secure network connection over the oublic internet.