Building a CA and Issuing SSL Certificates with OpenSSL
openssl is an open-source toolkit consisting of three parts: one is libcrypto, a general-purpose encryption library implementing numerous cryptographic algorithms; two is libssl, which implements the SSL mechanism for TLS/SSL functionality; and three is openssl, a versatile command-line tool that can perform encryption and decryption, and even act as a Certificate Authority (CA) to create and revoke certificates.
By default, OpenSSL is installed on Ubuntu and CentOS. The directory structure for SSL certificates on CentOS 6.x is as follows:
1. Issuing Certificates
1.1 Modifying CA Configuration Files
To issue certificates to others, a CA must first have its own root certificate. Before proceeding, we need to modify the CA’s configuration files, serial numbers, index, etc.
vi /etc/pki/tls/openssl.cnf:
[ policy_match ]. Different tools used for certificates may cause errors during final certificate generation even if the CSR appears to have identical countryName, stateOrProvinceName, etc.:touch index.txt serial:Create two initial files in the CA directory:
1.2 Generating the Root Key
For security reasons, change the permissions of the cakey.pem private key file to 600 or 400. You can also use a subshell to generate it: ( umask 077; openssl genrsa -out private/cakey.pem 2048 ). This will not be repeated below.
1.3 Generating the Root Certificate
Use the req command to generate a self-signed certificate:
# openssl req -new -x509 -key private/cakey.pem -out cacert.pem
You will be prompted to enter some information. Since this is private, you can enter anything freely (the previously modified openssl.cnf settings will apply here). It is best to remember these entries to ensure consistency later. The above self-signed certificate cacert.pem should be generated under /etc/pki/CA.
1.4 Generating SSL Keys for Our Nginx Web Server
The above operations were performed on the CA server and only need to be done once. Now switch to the nginx server to execute:
During testing, the CA center and the server applying for the certificate are the same machine.
1.5 Generating a Certificate Signing Request (CSR) for Nginx
You will again be prompted to enter some information. Leave other fields blank except for Common Name, which must be the domain name of the server you want to issue the certificate for, such as awsok.com or the hostname. Do not fill in the challenge password.
1.6 Private CA Signs Certificate Based on Request
Next, send the CSR file generated in the previous step to the CA server and execute the following on the CA:
The signing process above actually defaults to using -cert cacert.pem -keyfile cakey.pem. These two files are the root key and root certificate generated in the previous steps located under /etc/pki/CA. Send the generated crt certificate back to the nginx server for use.
At this point, we possess all the files required to establish an SSL secure connection, and the server’s crt and key are located in the configured directories. The remaining task is how to use the certificate.
II. Steps to Configure Paid Certificates
Only CAs trusted by browsers or systems allow all visitors to access your encrypted website smoothly without encountering certificate error prompts. Therefore, we skip the self-signed certificate steps and proceed directly to signing a third-party trusted SSL certificate.
OpenSSL is pre-installed by default on regular systems like Linux and OS X. Due to security concerns, most third-party SSL certificate authorities now require at least a 2048-bit RSA encrypted private key.
Additionally, standard SSL certificate authentication comes in two forms: DV (Domain Validated) and OV (Organization Validated). The former only requires domain verification, while the latter requires verification of your organization or company. In terms of security, the latter is definitely better.
Regardless of whether you use DV or OV, generating a private key requires filling in some basic information. Here we assume the following:
Domain, also known as Common Name, because special certificates might not necessarily be domains: example.com
Organization or Company Name (Organization): Example, Inc.
Department: Can be left blank, but here we write Web Security
City: Beijing
State / Province: Beijing
Country: CN
Encryption Strength: 2048 bits. If your machine has strong performance, you can also choose 4096 bits.
Based on the above information, the command to generate key and csr using OpenSSL is as follows:
openssl req -new -newkey rsa:2048 -sha256 -nodes -out example_com.csr -keyout example_com.key -subj "/C=CN/ST=Beijing/L=Beijing/O=Example Inc./OU=Web Security/CN=example.com"
PS: For wildcard domain certificates, you should fill in *.example.com.
You can run this command anywhere in the system; it will automatically generate the example_com.csr and example_com.key files in the current directory.
Next, you can view example_com.csr to get a long string of text similar to this:
-----BEGIN CERTIFICATE REQUEST-----
MIICujCCAaICAQAwdTELMAkGA1UEBhMCQ04xEDAOBgNVBAgTB0JlaWppbmcxEDAO
BgNVBAcTB0JlaWppbmcxFTATBgNVBAoTDEV4YW1wbGUgSW5jLjEVMBMGA1UECxMM
V2ViIFNlY3VyaXR5MRQwEgYDVQQDEwtleGFtcGxlLmNvbTCCASIwDQYJKoZIhvcN
AQEBBQADggEPADCCAQoCggEBAPME+nvVCdGN9VWn+vp7JkMoOdpOurYMPvclIbsI
iD7mGN982Ocl22O9wCV/4tL6DpTcXfNX+eWd7CNEKT4i+JYGqllqP3/CojhkemiY
SF3jwncvP6VoST/HsZeMyNB71XwYnxFCGqSyE3QjxmQ9ae38H2LIpCllfd1l7iVp
AX4i2+HvGTHFzb0XnmMLzq4HyVuEIMoYwiZX8hq+kwEAhKpBdfawkOcIRkbOlFew
SEjLyHY+nruXutmQx1d7lzZCxut5Sm5At9al0bf5FOaaJylTEwNEpFkP3L29GtoU
qg1t9Q8WufIfK9vXqQqwg8J1muK7kksnbYcoPnNgPx36kZsCAwEAAaAAMA0GCSqG
SIb3DQEBBQUAA4IBAQCHgIuhpcgrsNwDuW6731/DeVwq2x3ZRqRBuj9/M8oONQen
1QIacBifEMr+Ma+C+wIpt3bHvtXEF8cCAJAR9sQ4Svy7M0w25DwrwaWIjxcf/J8U
audL/029CkAuewFCdBILTRAAeDqxsAsUyiBIGTIT+uqi+EpGG4OlyKK/MF13FxDj
/oKyrSJDtp1Xr9R7iqGCs/Zl5qWmDaLN7/qxBK6vX2R/HLhOK0aKi1ZQ4cZeP7Mr
8EzjDIAko87Nb/aIsFyKrt6Ze3jOF0/vnnpw7pMvhq+folWdTVXddjd9Dpr2x1nc
y5hnop4k6kVRXDjQ4OTduQq4P+SzU4hb41GIQEz4
-----END CERTIFICATE REQUEST-----
You need to submit the CSR file to a third-party SSL certification authority. After passing the verification, they will issue you a CRT file, which we name example_com.crt.
This CSR file is what you need to submit to the SSL certification authority. Once your domain or organization passes verification, the authority will issue you an example_com.crt.
The example_com.key needs to be used in the Nginx configuration along with example_com.crt. Keep it safe and do not leak it to any third party.
2. Using SSL Certificates
2.1 General Browsers
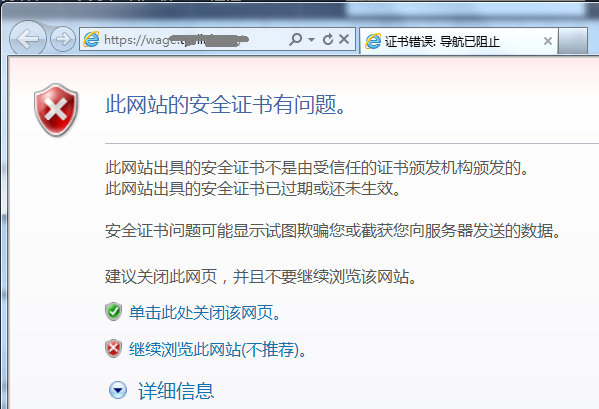
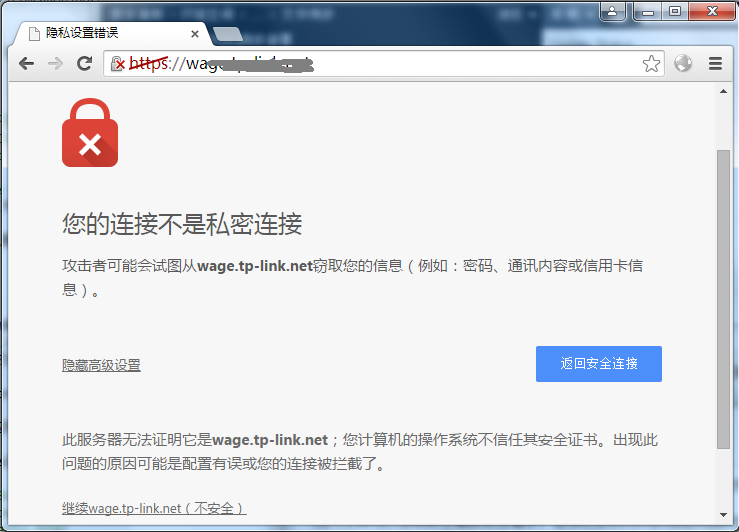
When browsers act as clients accessing HTTPS encrypted servers, generally no manual settings are required, such as https://www.google.com.hk. This is because browsers like Chrome, Firefox, Safari, and IE already have most common CA root certificates built-in. However, root certificates from self-built CAs are not in the browser’s trust list, and visiting them will prompt as follows:
IE Browser
Google Chrome
After installing the website certificate (along with a trusted root certificate), a small green lock usually appears in the address bar.
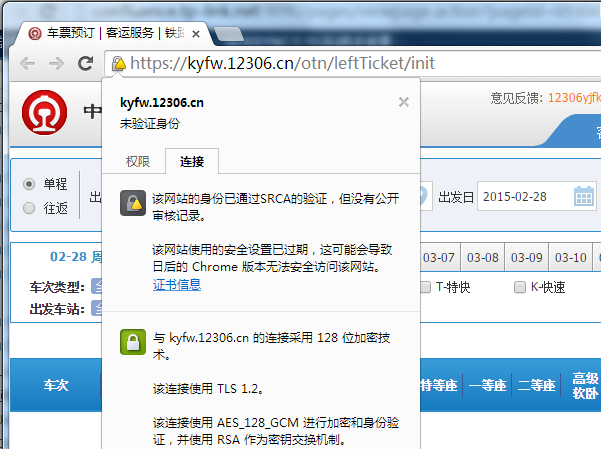
Certificate Information
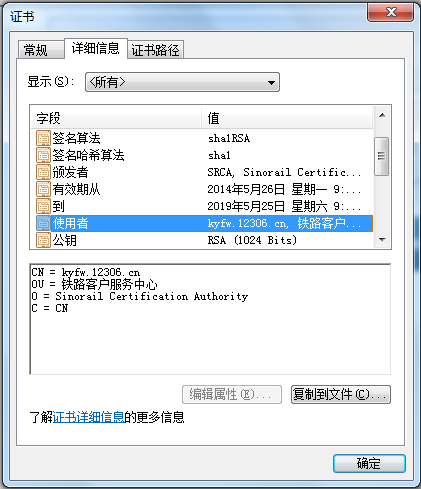
Importing Certificates into Browsers
2.2 Adding Root Certificates to Linux Systems
This step is not mandatory and generally appears in development/testing environments. Specific applications should provide methods to add certificates.
The curl tool can simulate sending requests on Linux, but when it accesses HTTPS encrypted websites, it prompts the following information:
curl --insecure to skip certificate reliability verification. This ensures data is transmitted encrypted but does not guarantee the identity of the service being accessed. Using curl --cacert cacert.pem allows manually specifying the root certificate path. We can also add the root certificate to the system (CentOS 5, 6) default bundle:2.3 Nginx
Add the following under the server directive in the Nginx configuration file (possibly /etc/nginx/sites-available/default):
Also note that the server_name must match the Common Name applied for in the certificate, and port 443 must be opened. Of course, there are other configurations for web server encryption, such as encrypting only specific URLs or forcing HTTPS access via URL redirection. Please refer to other resources for those.
After verifying that the configuration file is correct, reload Nginx.
nginx -t && nginx -s reload
However, this method is not entirely secure as it defaults to SHA-1. Current mainstream solutions avoid SHA-1. To ensure stronger security, we can adopt Diffie-Hellman Key Exchange.
First, enter the /etc/ssl/certs directory and generate a dhparam.pem file:
cd /etc/ssl/certs
openssl dhparam -out dhparam.pem 2048 # If your machine has sufficient power, you can use 4096-bit encryption
After generation, append the following to the Nginx SSL configuration:
        ssl_prefer_server_ciphers on;
        ssl_dhparam /etc/ssl/certs/dhparam.pem;
        ssl_protocols TLSv1 TLSv1.1 TLSv1.2;
        ssl_ciphers "EECDH+ECDSA+AESGCM EECDH+aRSA+AESGCM EECDH+ECDSA+SHA384 EECDH+ECDSA+SHA256 EECDH+aRSA+SHA384 EECDH+aRSA+SHA256 EECDH+aRSA+RC4 EECDH EDH+aRSA !aNULL !eNULL !LOW !3DES !MD5 !EXP !PSK !SRP !DSS !RC4";
        keepalive_timeout 70;
        ssl_session_cache shared:SSL:10m;
        ssl_session_timeout 10m;
Additionally, if you are using site-wide HTTPS and do not consider HTTP, you can add HSTS to tell your browser that the entire site is encrypted and force HTTPS access:
        add_header Strict-Transport-Security max-age=63072000;
        add_header X-Frame-Options DENY;
        add_header X-Content-Type-Options nosniff;
You can also create a separate Nginx configuration to redirect all HTTP access requests to HTTPS using a 301 redirect:
server {
        listen 80;
        listen [::]:80 ipv6only=on;
        server_name     example.com;
        return 301 https://example.com$request_uri;
}
3. Regarding Certificate Applications
Note that for general applications, administrators only need to generate a “Certificate Signing Request” (usually with a .csr extension), which contains your name and public key. Then submit this request to a CA service company like Verisign (along with a fee of hundreds of dollars). After your certificate request is verified, the CA signs it with its private key to form a formal certificate and sends it back to you. The administrator then imports this certificate onto the web server. If you don’t want to spend the money or want to understand the principles, you can build your own CA. From the CA’s perspective, you need the CA’s private and public keys. From the server wanting the certificate’s perspective, you need to submit the server’s certificate request to the CA.
If you build your own CA, don’t forget that clients need to import the CA’s certificate (the CA’s certificate is self-signed; importing it means you “trust” certificates signed by this CA). Commercial CAs generally do not require this because they are already built into your browsers.
IV. Reliable Third-Party SSL Issuing Authorities
As is well known, there was a scandal recently involving a NIC institution issuing certificates for Google domains. This highlights how important it is to choose a reliable third-party SSL issuing authority.
Currently, common SSL certificate authorities for small-to-medium website owners and enterprises include:
Comodo / Sub-brand Positive SSL
GlobalSign / Sub-brand AlphaSSL
Among these, Positive SSL, AlphaSSL, and RapidSSL are sub-brands, typically offering Level 3 or Level 4 certificates. Therefore, you may need to append the CA certificate chain to your CRT file.
Taking Comodo Positive SSL as an example, you need to concatenate the CA certificates. Assuming your domain is example.com:
Then, the concatenation command is:
cat example_com.crt COMODORSADomainValidationSecureServerCA.crt COMODORSAAddTrustCA.crt AddTrustExternalCARoot.crt > example_com.signed.crt
Use example_com.signed.crt in the Nginx configuration.
If you are using a common AlphaSSL wildcard domain certificate, they will not provide you with the CA certificate chain. In this case, you need to append the AlphaSSL CA certificate chain to the end of your CRT file.
V. EV SSL for Enterprises
EV SSL stands for Extended Validation SSL, which focuses more on the security protection of enterprise websites and strict authentication.
The most obvious difference is that EV SSLs typically display a green bar, such as the SSL certificate on this site, which is an EV SSL.
If your company wants to obtain a professional EV SSL, feel free to contact us.