Before creating Alibaba Cloud services, you should first create a network and then add the required Alibaba Cloud products to this exclusive network. This is Alibaba Cloud’s VPC (Virtual Private Cloud), literally translated as “Virtual Private Cloud,” with the official Chinese product name being “专有网络” (Exclusive Network).
When creating Alibaba Cloud products, you can choose either your own Exclusive Network or the Classic Network. If you choose the Classic Network, your products will share the same network with other users’ products in the same region. However, if you use your own Exclusive Network, your services are completely isolated from other users’ Alibaba Cloud services, which provides better security. Additionally, you gain finer control over your Exclusive Network, such as using switches to divide different subnets and configuring routing.
The general process for creating an ECS cloud server that uses an Exclusive Network is as follows (video course in production…):
- Create an Exclusive Network
- Add a switch under the Exclusive Network
- Create the cloud server, selecting the corresponding Exclusive Network and switch
If your cloud server needs to provide services to the internet, you will also need a public IP address. In this case, you need to:
- Apply for an Elastic Public IP (EIP)
- Bind the applied public IP to the specified cloud server
Creating an Exclusive Network
Alibaba Cloud users can create Exclusive Networks for free and use them when creating other services, such as ECS cloud servers and RDS databases.
- Log in to the Alibaba Cloud Console
- Navigate to Products & Services and find Exclusive Network VPC
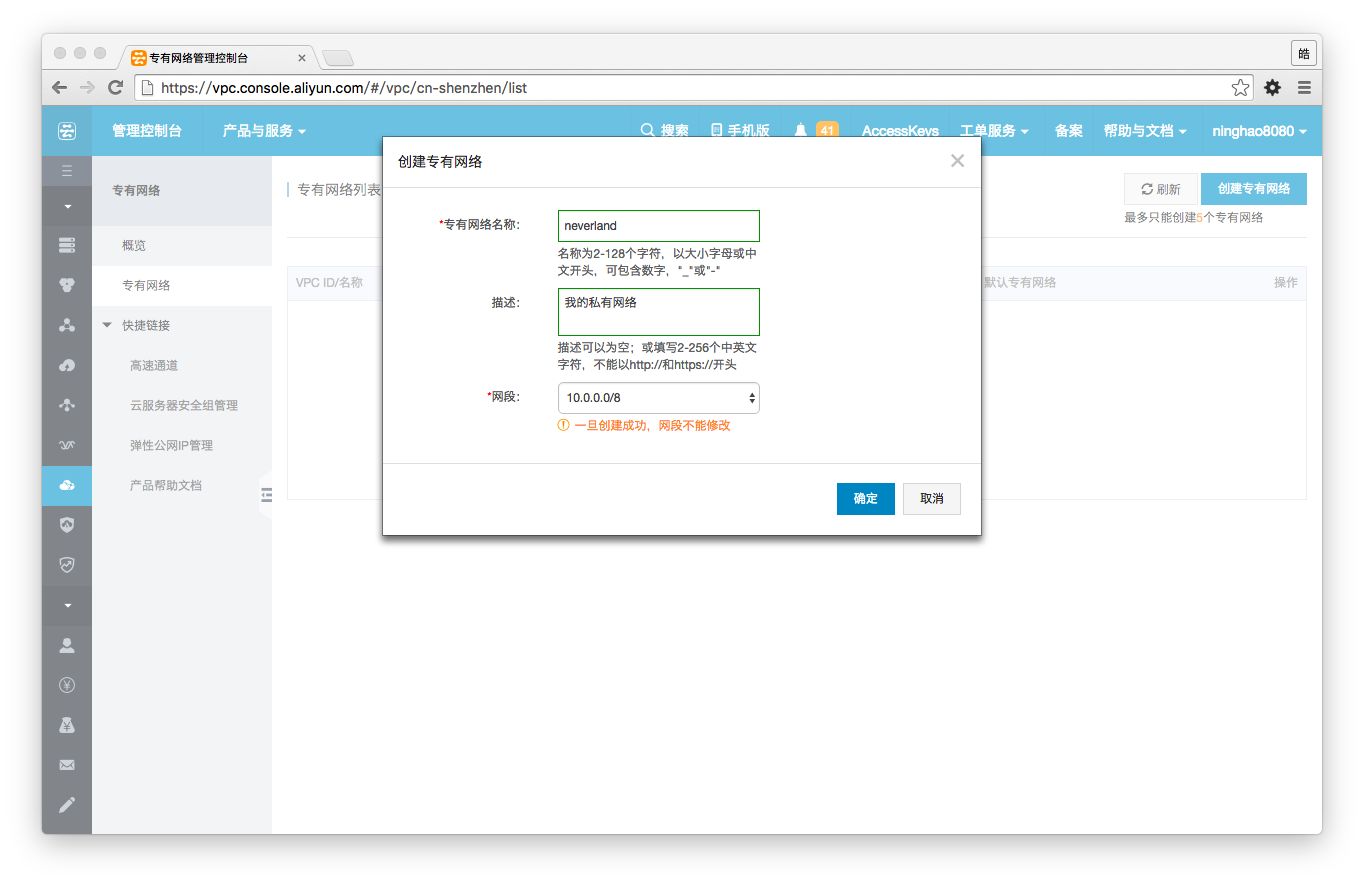
- Open the Exclusive Network tab, select a region, and click Create Exclusive Network
- Configure the Exclusive Network by entering its name, description, and selecting the CIDR block
Alibaba Cloud Exclusive Networks support three CIDR blocks: 192.168.0.0/16, 172.16.0.0/12, and 10.0.0.0/8. The difference between them lies in the number of available IP addresses. You can choose any one; I selected 10.0.0.0/8 because it looks cleaner and is easier to remember. You can further divide subnets using the switches within the Exclusive Network. IP addresses belonging to these CIDR blocks are private internal IPs, meaning they cannot be accessed directly from the internet.
Adding Switches
Once you have an Exclusive Network, you need to add switches to it, which allow you to divide subnets. When creating Alibaba Cloud services, if you want to use your own Exclusive Network, you must select the Exclusive Network and a specific switch under it for the service.
- Locate the Exclusive Network you created and go to its management page
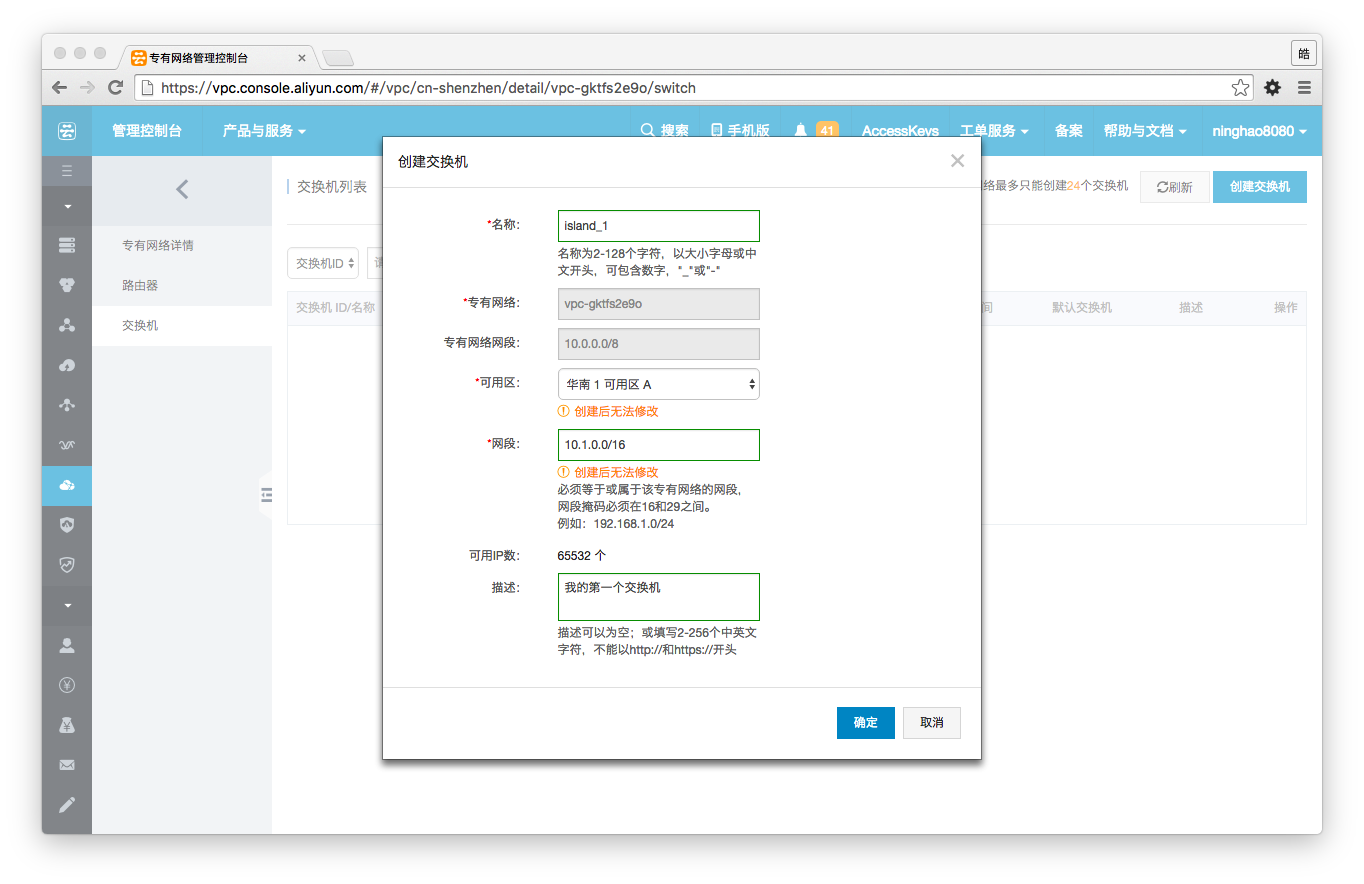
- Open the Switches tab and click Create Switch
- Configure the switch by entering a name, selecting an Availability Zone, specifying the CIDR block, and adding a description
When creating a switch, you must select an Availability Zone. For example, if my Exclusive Network is in the China South 1 region, the switches under this Exclusive Network must also be assigned to a specific Availability Zone within China South 1, such as China South 1 Zone A or China South 1 Zone B.
The switch’s CIDR block must belong to its parent Exclusive Network. For instance, if my Exclusive Network’s CIDR block is 10.0.0.0/8, the CIDR block of the switch I create must fall within this range, such as 10.1.0.0/16, 10.2.0.0/16, or 10.3.1.0/24, etc. I used 10.1.0.0/16 as the CIDR block for this switch. Consequently, services created using this switch will have IP addresses like 10.1.0.1, 10.1.0.2, etc.
Creating Cloud Servers
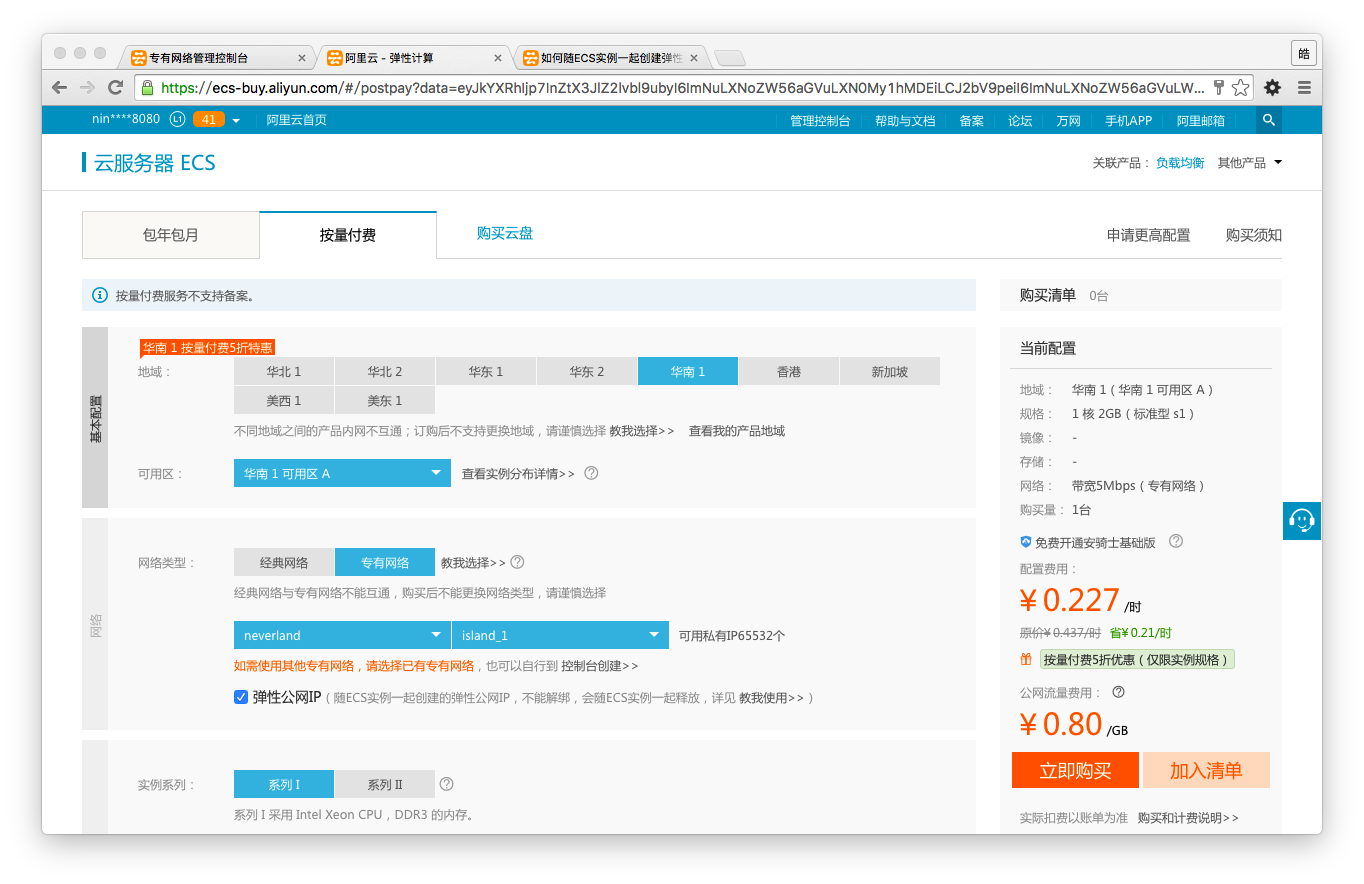
Now, the Alibaba Cloud services you create can utilize our own Exclusive Network. For example, you can create two pay-as-you-go ECS cloud servers, ensuring the region matches the one where the Exclusive Network resides. Alternatively, you can directly locate the switch of the Exclusive Network, click Create Instance, select ECS Cloud Server, and the system will automatically pre-select the appropriate Exclusive Network, switch, and region for you.
If a cloud server uses an Exclusive Network, it does not come with a public IP by default; it only contains a private IP address assigned by the switch of the Exclusive Network. To give the server a public IP, you can check the box for Elastic Public IP during creation, or you can create an Elastic Public IP separately and bind it to the specified server.
For now, do not check the Elastic Public IP option. Create two cloud servers. Select the network type as Exclusive Network. This will display the Exclusive Network created under the server’s region, along with the switches belonging to that network. After completion, these two servers should only have private IP addresses, specifically 10.1.0.1 and 10.1.0.2, because the switch selected during creation had the CIDR block 10.1.0.0/16.
Open the ECS management interface, locate the servers under their respective regions, and rename them. Name the server with address 10.1.0.1 as “node1” and the server with address 10.1.0.2 as “node2”.
Applying for an Elastic Public IP
Servers belonging to an Exclusive Network cannot access the internet, nor can they be accessed via the internet. By binding an Elastic Public IP to them, you enable internet access. You can bind a public IP to just one server and configure it so that other servers can access the internet through this server with the public IP.
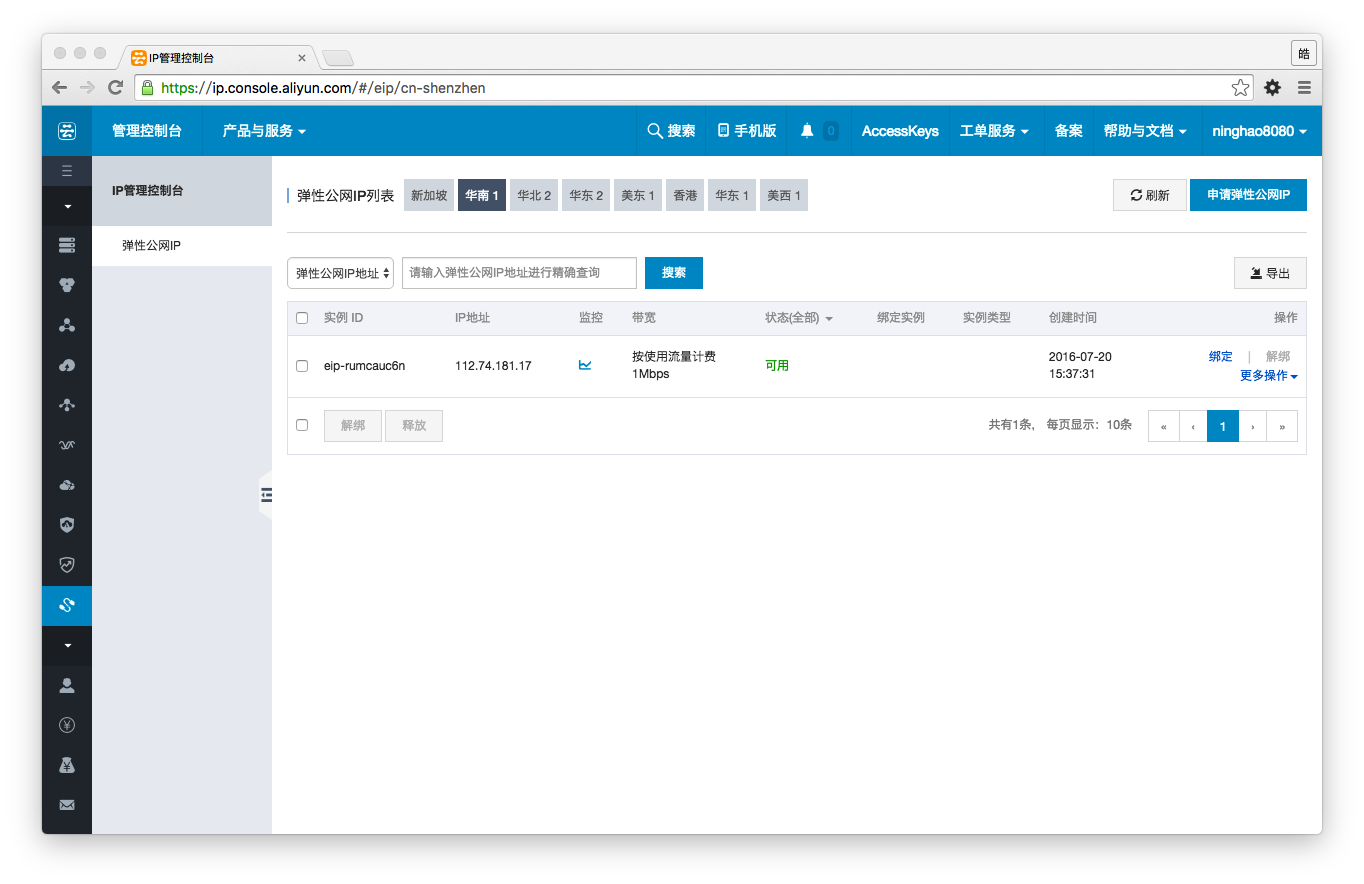
- Navigate to Products & Services and select Elastic Public IP
- Select the same region as the servers and click Apply for Elastic Public IP
- Configure the type and size of the public bandwidth
After completion, you will receive a public IP. Click Bind and select the ECS instance to bind it to, such as the “node1” server we created earlier. Now, node1 can use this public IP to connect to the internet. For example, you can SSH into the node1 server using this public IP address.
SNAT Shared Internet Access
Node1 is now bound to an Elastic Public IP and can access the internet. Node2 does not yet have internet access capabilities, but it can communicate with node1 since they belong to the same Exclusive Network. Now, let’s configure node2 to access the internet through node1. This can be achieved by configuring SNAT on node1 and setting up routes in the Exclusive Network.
- Use node1’s public IP to SSH into node1
- Edit node1’s configuration file: vi /etc/sysctl.conf
- Add the following line: net.ipv4.ip_forward = 1
- Restart the network service on node1: systemctl restart network
- Configure iptables on node1: iptables -t nat -I POSTROUTING -s 10.1.0.0/16 -j SNAT –to-source 10.1.0.1
If the servers are running CentOS, you also need to stop the FirewallD service.
- Disable and stop FirewallD: systemctl disable firewalld && systemctl stop firewalld
- SSH from node1 to node2
- Then disable and stop FirewallD on node2: systemctl disable firewalld && systemctl stop firewalld
Next, configure the route for the Exclusive Network.
- Locate the created Exclusive Network and open the Routes tab
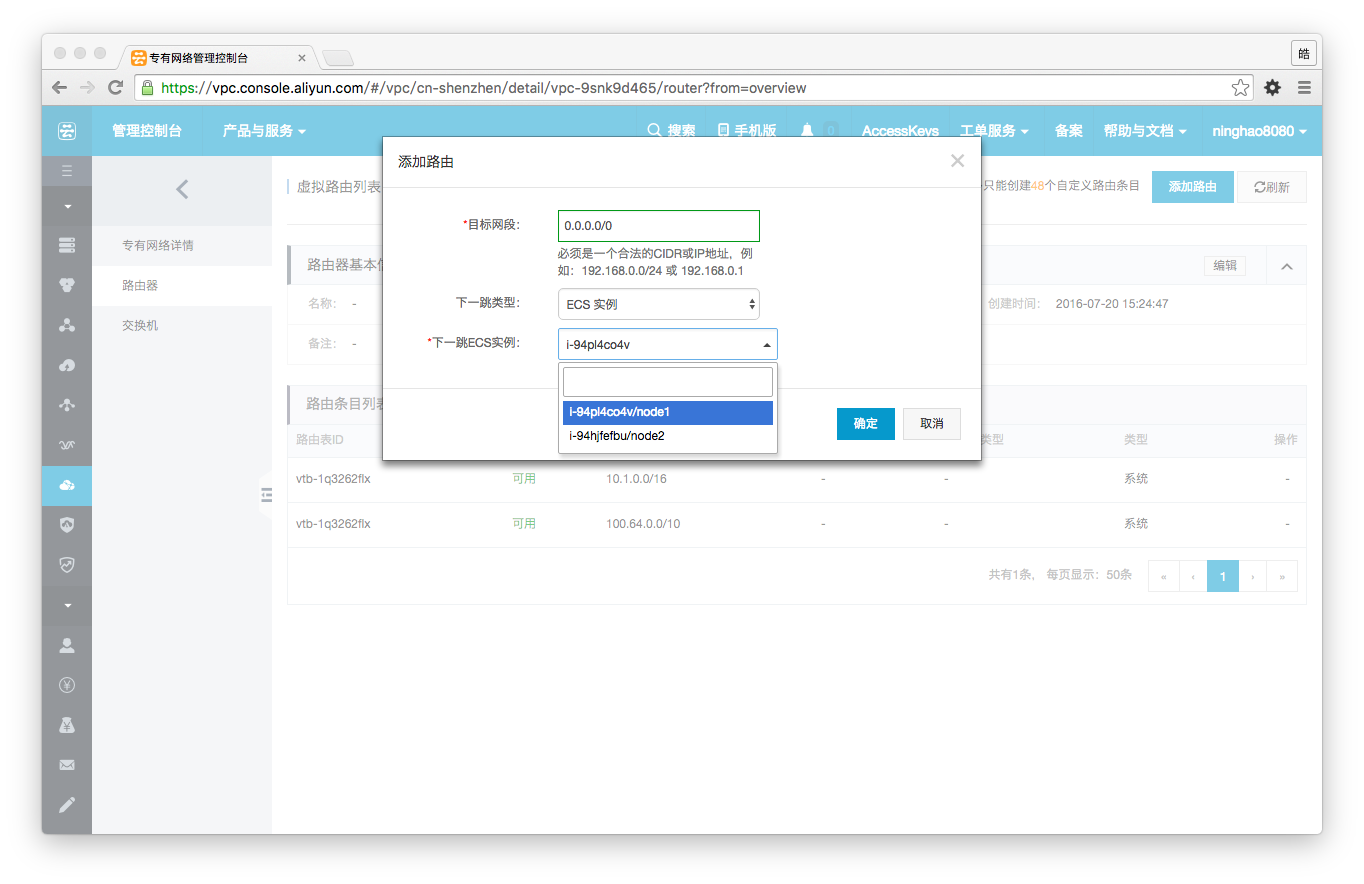
- Click Add Route and configure it
- Destination CIDR: 0.0.0.0/0, Next Hop Type: ECS Instance, Next Hop ECS Instance: Select node1 (the server bound to the public IP)
Test node2’s internet connectivity. Execute ping yunwei123.com. If the ping is successful, it indicates that node2 can now access the internet through node1.