Many users utilize a bastion host for daily maintenance of application systems deployed on the AWS platform. This approach facilitates the management of servers within private networks, minimizes security risks to application systems, and thereby enhances the overall security of the architecture.
To achieve better security, proper planning is required. Typically, you should consider the following questions:
- In which subnet should the bastion host be placed?
- How to securely access the bastion host?
- How can the bastion host securely access managed servers?
The following steps outline the deployment of a Linux bastion host on AWS, addressing these issues.
1. Network Planning
VPC planning usually involves dividing the network into several subnets: public subnets and private subnets. Instances in a public subnet can directly receive inbound traffic from the Internet, whereas instances in a private subnet cannot. Instances in a public subnet can directly send outbound traffic to the Internet, while those in a private subnet cannot. However, instances in a private subnet can access the Internet using a Network Address Translation (NAT) gateway located in the public subnet.
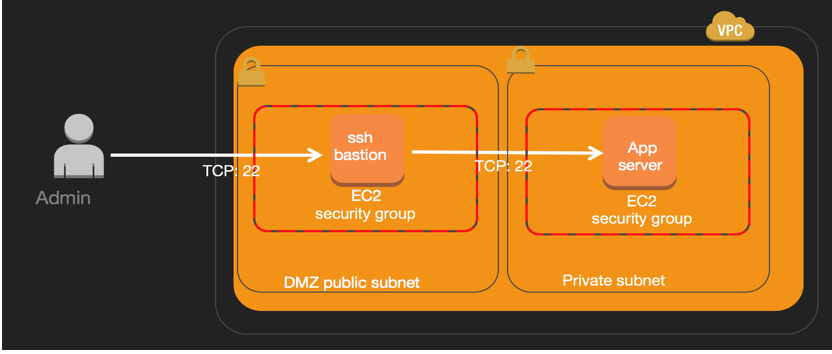
Based on the characteristics of different subnets described above, we need to place the bastion host in a public subnet to allow administrators to access it via the Internet. Managed servers can be placed in either a public or private subnet depending on their role in the business system. In actual production environments, it is advisable to assign a dedicated public subnet for the bastion host as needed.
In the VPC planning shown below, a dedicated public subnet is allocated for the bastion host instance. Administrators can log in to the bastion host to manage servers placed in the private subnet:
2. Bastion Host Deployment
Please refer to the link below to deploy a Linux EC2 instance in the public subnet and assign an Elastic IP (EIP) to the bastion host EC2:
http://docs.aws.amazon.com/zh_cn/AWSEC2/latest/UserGuide/EC2_GetStarted.html
In actual deployments, considering the workload required for the bastion host, you can deploy lower-specification instance types. Additionally, for cost and security reasons, you can set the bastion host status to “Stopped” when not performing operations and “Start” it only when maintenance is required.
Configure the security group for the bastion host instance. During the EC2 creation process, add SSH service rules to the security group settings, restricting the source IP addresses based on actual conditions. As shown below, only specific management terminals are allowed to connect:

Configure the security group for the managed servers. Set security group rules to accept access requests only from the security group associated with the bastion host:

Configure the management terminal. Import the private keys for both the bastion host and the managed servers into the management terminal sequentially. After logging into the bastion host, the private key information will be forwarded to the managed server to complete authentication. The following examples illustrate this for Linux and Windows environments:
Logging in from the bastion host to the managed server via SSH on a Linux management terminal:
Step 1: Run ssh-agent on the Linux management terminal to start the ssh-agent process.
Step 2: Add the private keys corresponding to the certificates for the bastion host and the managed servers to the management terminal sequentially. Execute as follows (e.g., if the private key file name is xxx.pem):
ssh-add xxx.pemStep 3: Log in to the bastion host using the -A parameter with ssh. The -A flag indicates that the local management terminal’s saved private key information is forwarded through the bastion host to facilitate authentication between the bastion host and the managed server:
ssh -A ec2-user@bastion_public_ip_address(Assume the Linux SSH username is ec2-user)
Step 4: Log in to the server directly from the bastion host via SSH using the managed server’s internal IP address:
ssh ec2-user@managed_server_internal_ipLogging in from the bastion host to the managed server via PuTTY in a Windows environment:
Download the PuTTY client and use PuTTYgen to convert the private certificate into .ppk format.
Download the SSH agent for the PuTTY environment—Pageant.
Step 1: Add the private keys corresponding to the certificates for the managed server and the bastion host into Pageant.
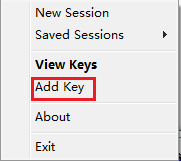
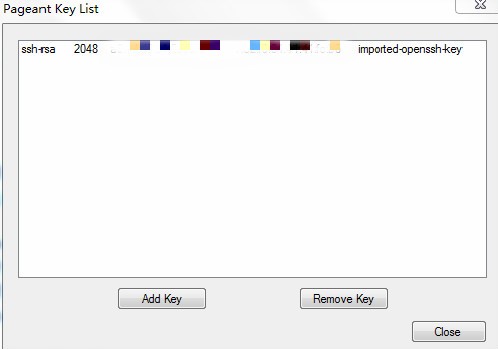
Start Pageant and right-click the icon. You can first view the Key List. If the private key required for accessing the server is not in the Key List, perform the “Add Key” operation and add the locally saved private key.
Step 2: Log in to the bastion host via PuTTY.
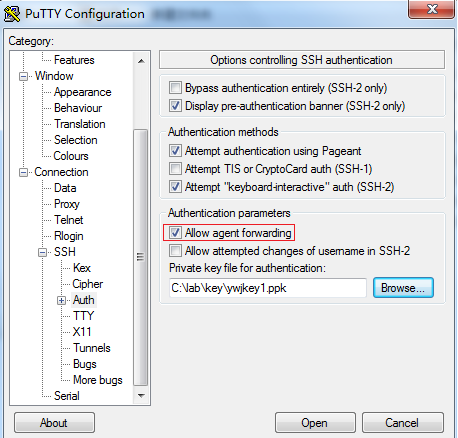
In this step, enter the bastion host’s public IP address as shown in the figure. Under the SSH-Auth directory on the left, check “Allow agent forwarding” to allow the SSH client on the bastion host to communicate with the ssh-agent on the local management terminal and use the local private key to complete the SSH authentication process with the managed server. Below is an example of logging into the bastion host from an EC2 instance on AWS:
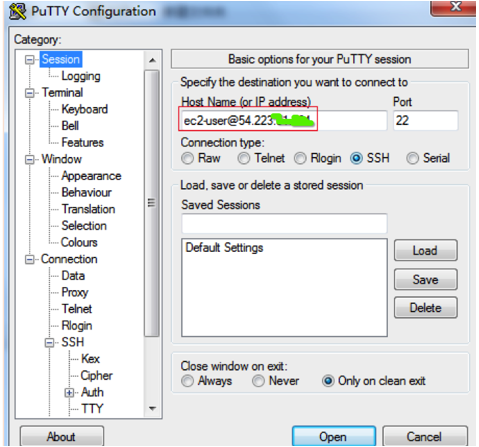
The private key to be added here is the private key corresponding to the bastion host’s certificate.
Step 3: Log in to the managed server directly from the bastion host.
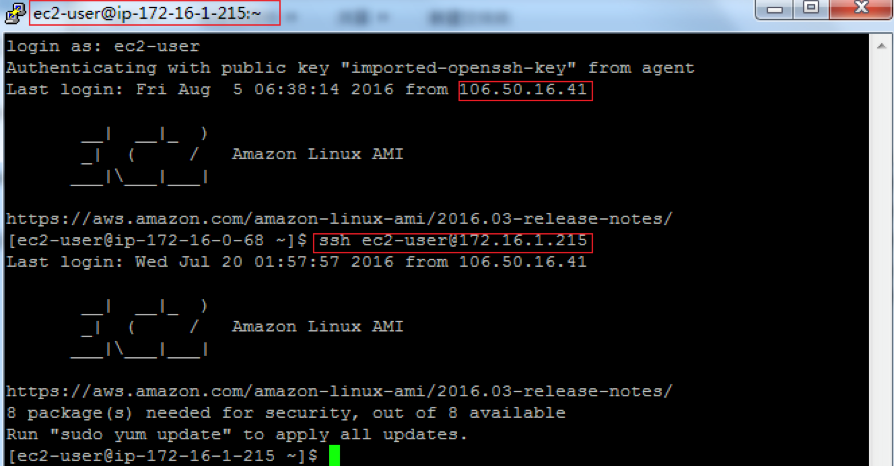
Execute the command ssh ec2-user@managed_server_internal_ip to access the managed server. Note that entering the managed server’s private IP address here improves the security of the managed server.
This way, you have successfully logged into the managed server from the bastion host.
3. Security Hardening
In the process of deploying the bastion host described above, the security group rules associated with the bastion host opened TCP port 22. Based on actual conditions, it is recommended to strictly restrict the source IP addresses, allowing access only from specified IPs. On this basis, security can be further optimized:
- When an administrator needs to log in to the bastion host to add rules opening TCP port 22 in the security group via AWS CLI;
After completing management tasks, exit the SSH session, and AWS CLI will close TCP port 22 in the security group. To achieve the above effect, execute the following script, replacing the security group ID with your actual environment details.
#!/bin/bash

aws ec2 authorize-security-group-ingress --group-id <security_group_id> --protocol tcp --port 22 --cidr 0.0.0.0/0 &

sleep 5

ssh -A ec2-user@bastion_public_ip

aws ec2 revoke-security-group-ingress --group-id <security_group_id> --protocol tcp --port 22 --cidr 0.0.0.0/0
To successfully run the above script, you need to configure the AWS CLI runtime environment. For details, please refer to:
http://docs.aws.amazon.com/cli/latest/userguide/installing.html
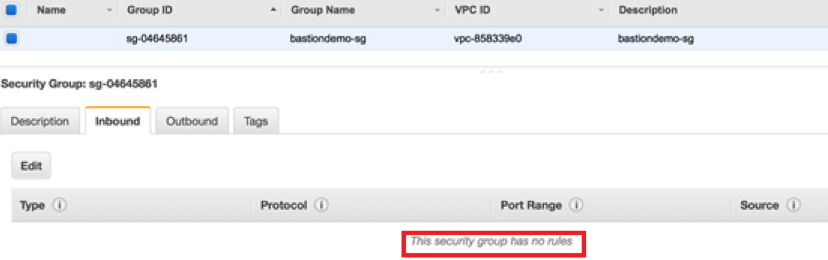
Before executing the script to log in, delete the SSH service rule in the bastion host’s security group, meaning TCP port 22 cannot be accessed:
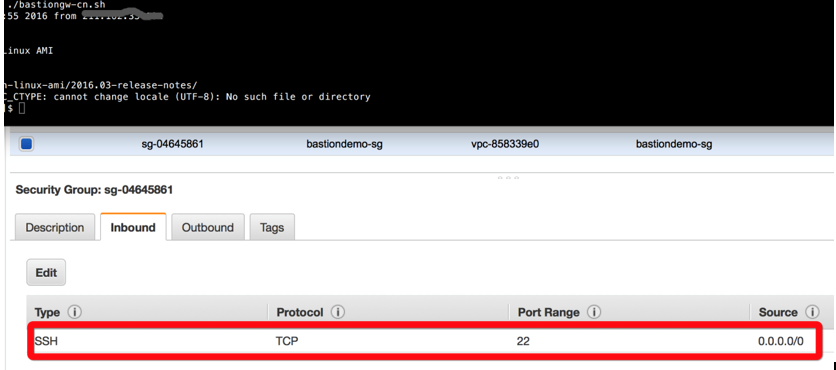
When executing the script to log in, the first statement in the script is executed. AWS CLI adds the relevant SSH service rules, and then SSH successfully logs into the bastion host:
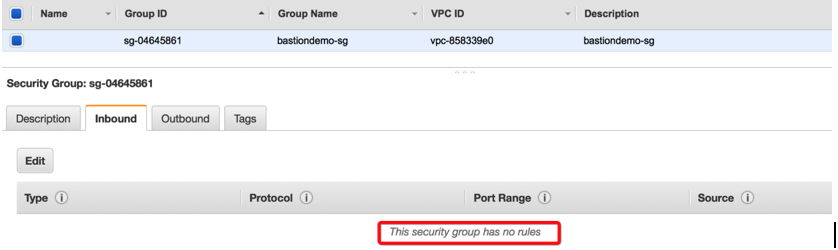
After completing management tasks on the bastion host, type exit to end the SSH session. AWS CLI deletes the SSH service rule in the security group, meaning TCP port 22 cannot be accessed:

The figure below shows that the security group rules have been correspondingly deleted:
4. Managing Servers Across VPCs
Can the bastion host manage servers in different VPCs? The answer is yes. As shown in the figure below, you need to establish a peering connection between VPCs to connect the two VPCs, allowing the bastion host to securely manage application servers across VPCs.
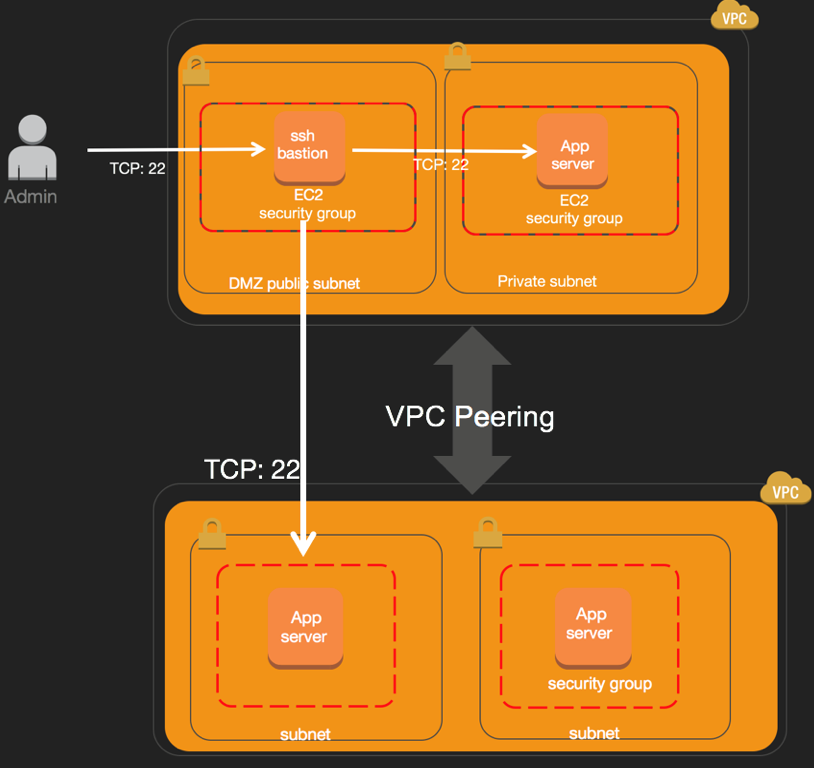
The process for establishing VPC peering is as follows. You can also refer to the following link for more detailed information: http://docs.aws.amazon.com/AmazonVPC/latest/UserGuide/vpc-peering.html
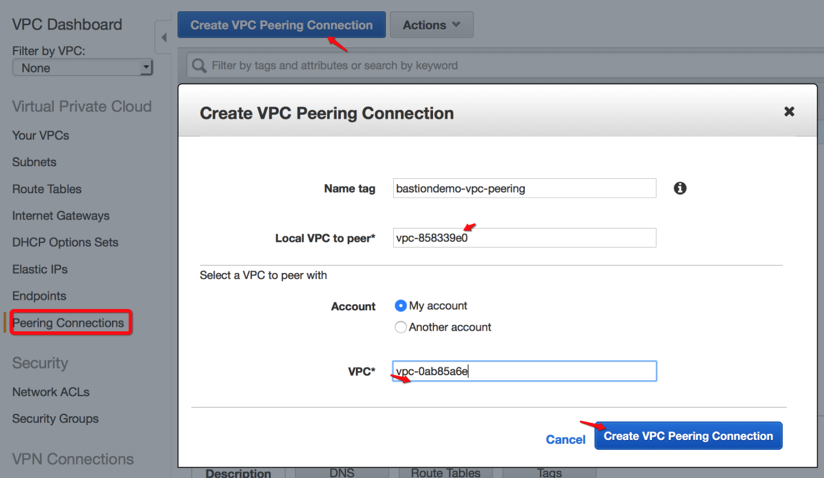
Step 1: Create a Peering Connection
Navigate to the “Peering Connections” page under VPC in the console and create a new “VPC Peering Connection”. Here, you need to provide the IDs of the VPCs where the bastion host and the managed server reside, then click “Create VPC Peering Connection”.
Step 2: Configure Route Tables
After successful creation, you can see peering-related information, such as “Status”, “Local VPC”, and “Peered VPC”. At the same time, you will see that the peering status is “pending-accept”. You need to click “Action” at the top and select “Accept Request”.


After accepting the request, you will receive a notification to create a new route table. You need to go to the page to configure the route table. When configuring the route table for the local VPC, you need to provide the CIDR of the VPC where the destination server resides as the Destination for the bastion host’s route table, and set the newly created peering connection as the Target.
Similarly, when configuring the route table for the VPC where the destination server resides, you only need to set the Local VPC’s CIDR as the Destination.
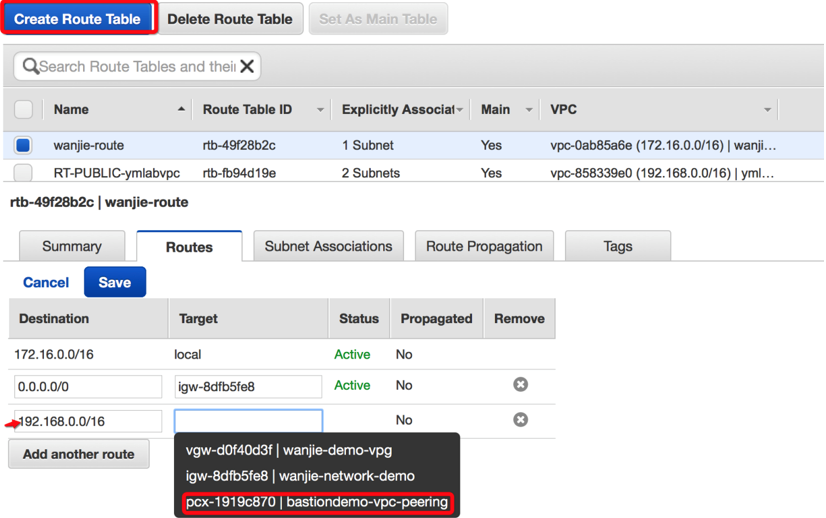
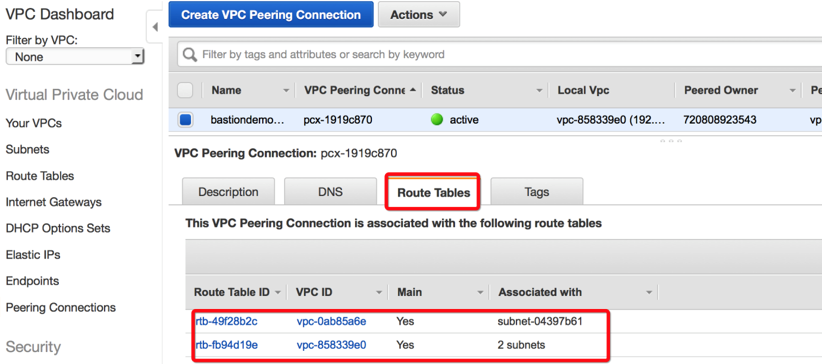
After configuring the route table information, you can see that the peering status has changed to “active”, and you can view the related route table information.
Step 3: Log in to the destination server via the local bastion host
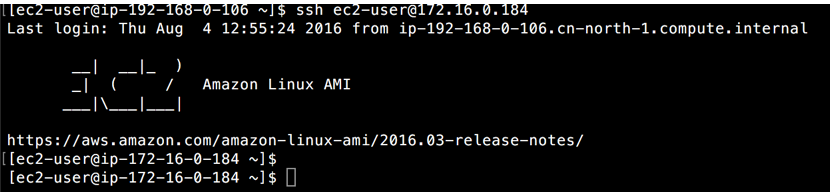
This step is similar to accessing a managed server in a private subnet from a bastion host in a public subnet within the same VPC mentioned earlier. You need to configure your security group settings. When accessing, you need to save the private key corresponding to the managed server’s public key in the management terminal. Then, execute ssh ec2-user@managed_server_internal_ip on the bastion host.
As shown in the figure below: The bastion host in the 192.168.0.0/24 subnet directly SSH accesses the application server in the 172.16.0.0/24 subnet.
5. Bastion Host Configuration in Windows Environment
Windows Server management is implemented based on the Windows RDP protocol. You can manage Windows servers located in private subnets by configuring an RDP Gateway server. For specific planning and configuration, please refer to the following whitepaper:
https://aws.amazon.com/windows/resources/whitepapers/rdgateway