With the popularity of Android smartphones and tablets, more and more people are joining the ranks of Android developers. This article briefly describes the process of setting up an Android App development environment on Linux and attempts to write a simple “Hello World!” program, hoping to provide some help to those interested in Android development but unfamiliar with the relevant knowledge.
To develop Android apps on Linux, the following conditions must be met:
- A standard computer running Linux
- Java SDK 6
- Android SDK
- An Android phone or tablet (optional)
- Eclipse IDE version 3.6 or higher (optional)
1. Preparing the Operating System
Any general Linux desktop distribution will work; it doesn’t matter if it’s 32-bit or 64-bit. The steps below have been tested on Arch Linux + Gnome 3 and Ubuntu 11.10.
2. Installing Java SDK 6 (or higher)
Some Linux distributions may already have JRE (Java Runtime Environment) installed by default, but developing Android programs requires JDK. Install it using the following commands:
$ sudo pacman -S openjdk6 (Arch Linux)

$ sudo apt-get install openjdk-6-jdk (Ubuntu)
After installation, use the command $ javac -version to check the result. If it displays the Java version, the installation was successful.
3. Downloading and Configuring Android SDK
The Android SDK can be downloaded here (http://developer.android.com/sdk/index.html). Select “Linux (i386)” to download (at the time of writing this article, the filename was android-sdk_r16-linux.tgz). Create a folder named “programs” in your home directory (i.e., ~/programs) and save the downloaded file there.
Extract the downloaded archive: tar -xzvf android-sdk_r16-linux.tgz. You will get a folder named “android-sdk-linux” (i.e., ~/programs/android-sdk-linux), which is the Android SDK folder (this will be used when configuring Eclipse later). Enter this folder and run:
$ tools/android
This launches the graphical Android SDK Manager.
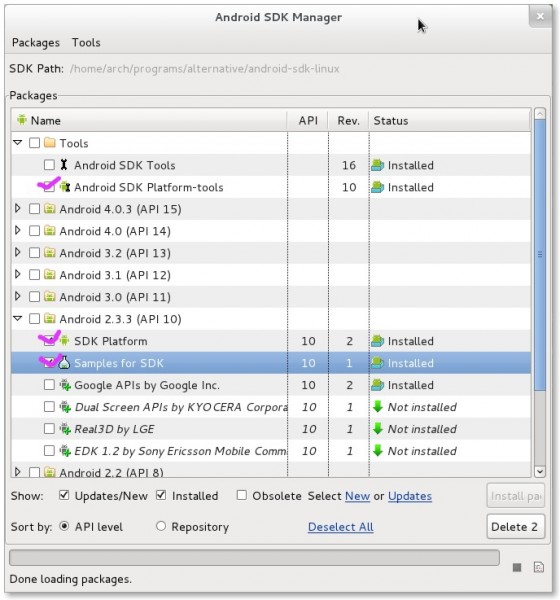
In this manager, we can add “Platform-tools” and various versions of “SDK Platform” needed for development. Generally, we need to install “Platform-tools” plus a specific version of “SDK Platform”. Since my phone is an HTC Desire S (G12, Android 2.3), for convenient debugging, I selected “Android 2.3.3 (API 10)” here. You can choose different versions according to your actual situation. Click the “Install” button to start downloading, then wait for completion and close it.
4. Downloading and Configuring Eclipse IDE
An IDE is not strictly necessary, and over-reliance on an IDE is not always a good thing. However, to give beginners a quick intuitive understanding of Android App development, we will use Eclipse IDE to write the first Android program.
Download Eclipse IDE from here (http://www.eclipse.org/downloads/). Select the Linux 32-bit Standard Edition (Eclipse IDE for Java Developers; at the time of writing, the version was Indigo (3.7.1), and the filename was eclipse-java-indigo-SR1-linux-gtk.tar.gz). Save it inside the ~/programs folder.
Extract the downloaded archive: tar -xzvf eclipse-java-indigo-SR1-linux-gtk.tar.gz. You will get a folder named “eclipse”. Enter this folder and run:
$ ./eclipse
When Eclipse runs, it will first ask you to select a workspace. We can simply click OK to use the default value.
5. Installing and Configuring the Eclipse Plugin ADT
Current Eclipse cannot create Android-type projects nor call the Android SDK configured in step 3, so we need to install a plugin called “ADT”.
After entering Eclipse, select the menu “Help” -> “Install New Software”, click “Add”, enter “ADT” in the “Name” field, and enter “http://dl-ssl.google.com/android/eclipse/” in the “Location” field. After clicking “OK”, you should see “Developer Tools” listed in the middle of the window.
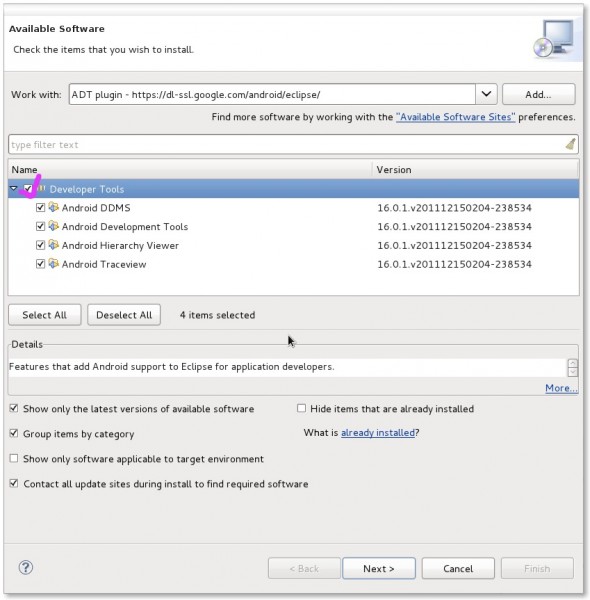
Check the box next to it and click “Next” to start the download and installation (Note: The download usually takes about 5 minutes. If you find the speed very slow, you may need to bypass network restrictions). After completion, restart Eclipse. It will then ask where your Android SDK is installed. Enter the folder obtained in step 3, i.e., “~/programs/android-sdk-linux”, and click Finish.
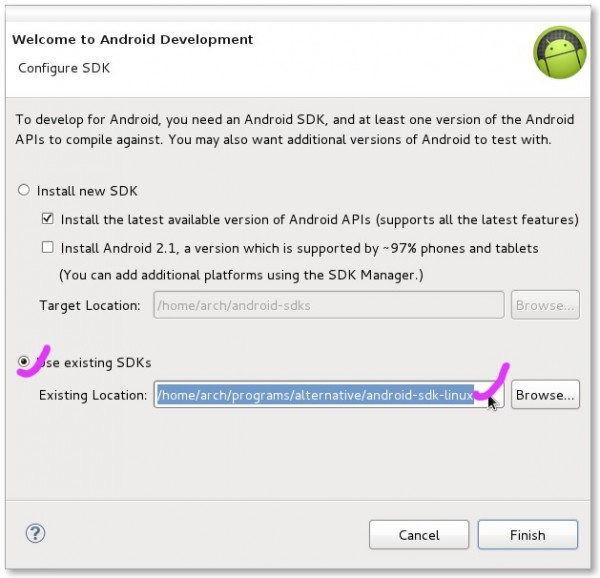
Note: The directory shown in the picture is mine; please ignore it.
Then, we need to create a virtual Android device (AVD) for debugging during development.
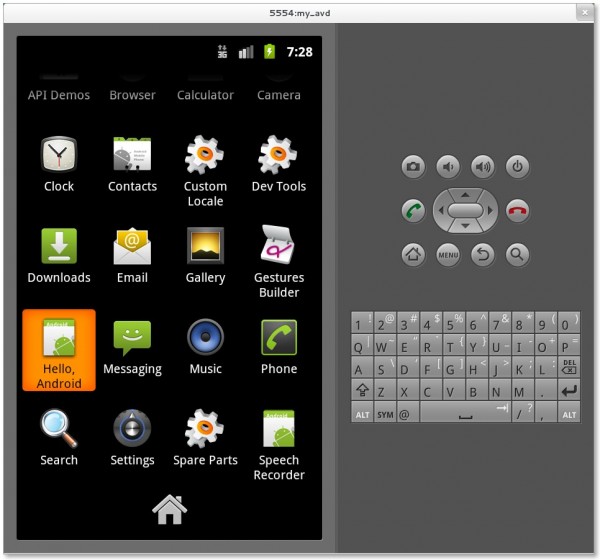
In Eclipse, select the menu “Window” -> “AVD Manager”, click “New”, enter “MyDev001” (or any name you like) for the Name, select “Android 2.3.3” (or the platform SDK version you installed) for Target, and then click “Create AVD” to create a virtual Android 2.3.3 device (equivalent to a virtual machine). Click this virtual device, then click the “Start” button to see a virtual Android phone appear:
6. Creating the First Program
Return to Eclipse, select the menu “File” -> “New” -> “Project…”, select “Android Project”, and a wizard will appear. Fill in the following values in the wizard steps:
- Project name: HelloAndroid
- Build Target: Android 2.3.3 (or the version of the Android SDK platform you installed)
- Application name: Hello, Android
- Package name: com.example.helloandroid (or any namespace you prefer)
- Create Activity: HelloAndroid
After clicking Finish, Eclipse will create a simplest Android project for you. In the “Package Explorer”, expand “src” -> “com.example.helloandroid” -> “HelloAndroid.java”, and change its content to the following:
package com.example.helloandroid;

import android.app.Activity;
import android.os.Bundle;
import android.widget.TextView;

public class HelloAndroid extends Activity {
    @Override
    public void onCreate(Bundle savedInstanceState) {
        super.onCreate(savedInstanceState);
        TextView tv = new TextView(this);
        tv.setText("Hello, Android");
        setContentView(tv);
    }
}
Save it, then select the menu “Run” -> “Android Application”. You can then see the running result on the virtual device.
7. Preparing to Publish the Program to Your Own Phone/Tablet
To install the program written in the previous step onto your own phone/tablet, a bit more work is required.
First, set your phone to allow “installing apps from unknown sources” and enable “USB debugging”. These settings are located at:
- Settings > Applications > Check Unknown sources
- Settings > Applications > Development > Check USB debugging
Then, connect your phone to your computer via USB. If the phone asks for “USB usage mode”, select “Charge only”.
Although you don’t need to install phone drivers under Linux, generally we do not have permission to access this “USB device”. Run the ADB tool in the Android SDK folder.
$ platform-tools/adb devices
You will see that although the phone is detected, there is no permission to access it, and the phone model cannot be identified. The solution is simple: create the file “/etc/udev/rules.d/51-android.rules” with root privileges on your computer, and write the following content in it:
SUBSYSTEM==”usb”, ATTR{idVendor}==”0bb4″, MODE=”0666″
The “0bb4” refers to HTC phones. If your phone is not an HTC, query and replace it according to this table (http://developer.android.com/guide/developing /device.html). Then, add read permissions for all users to this file by running the following command:
$ sudo chmod a+r /etc/udev/rules.d/51-android.rules
Restart the computer, then run the ADB tool mentioned above again. This time, you should be able to see the phone model.
8. Running Your Own Program on Your Phone/Tablet
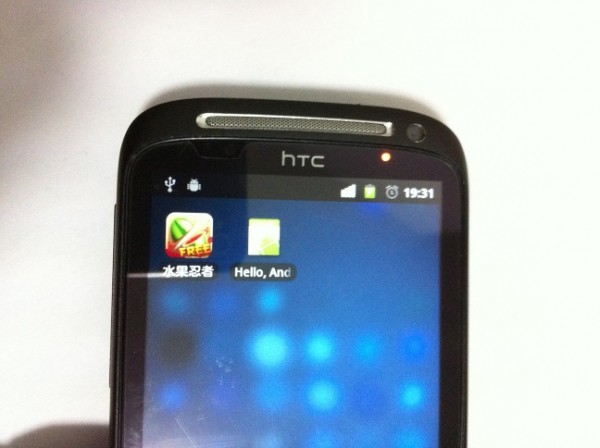
This step is very simple. In Eclipse, select the menu “Run”. This time, it will ask whether to run on the virtual device or on the real phone (the device currently connected to the computer via USB). Select the second option, and your program will automatically install on your phone and run.
Conclusion
This is just a rough introduction to setting up an Android App development environment in Linux. Actually, developing a practical program may require more knowledge. Those interested can download several examples and read related articles to learn from Google’s Android development website.
References
- Android SDK Download Page
- Android SDK Installation Guide
- Eclipse ADT Plugin Installation Guide
- Writing an Android Hello World Tutorial
- Using Android Devices
- Official Developer Site (The references above are from the official developer site)