Apache Hadoop is a distributed computing framework that allows you to process complex computational tasks simultaneously using N computers. Users (applications) only need to define how to split a computational task (Map) and how to merge the results of each sub-task (Reduce). The rest, such as coordinating the work of N computers and ensuring that the failure of one computer does not affect the entire task, is handled by Hadoop. Hadoop can also be extended to distributed storage (HDFS), distributed NoSQL database (HBase), and more. This article briefly introduces the basic setup method for the Hadoop system.
Hadoop consists of 5 programs during runtime:
- 1 NameNode, used to manage the namespace and client access to files;
- 1 JobTracker, used to schedule jobs and allocate tasks (Task);
- 1 SecondaryNameNode, used to assist the NameNode;
- 1 to N DataNodes for data storage;
- 1 to N TaskTrackers for executing tasks. DataNodes and TaskTrackers always run in pairs on the same computer.
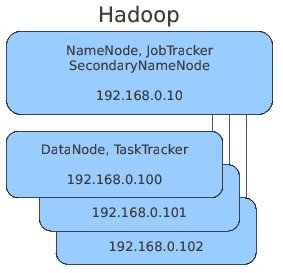
The first three programs generally run on three different computers. For simplicity, the following example will run these three programs on a single computer, and then use three other computers to run the DataNodes (along with TaskTrackers). Therefore, this example requires a total of 4 computers. The structure diagram is as follows:
Here is the detailed setup process.
1. Download Apache Hadoop
Since distributed storage is the foundation of distributed computing, we must download HDFS. Download HDFS from here. The version used here is 0.20.2, and the downloaded archive already contains the 5 programs mentioned above.
2. Configure Hadoop
Although a typical Hadoop system has 4 types of computers with different roles, for simplicity, we can edit the configuration files on one computer first and then distribute them to other computers. This avoids wasting time configuring them one by one.
a. Edit conf/hadoop-env.sh to set the correct JAVA_HOME environment variable, for example:
export JAVA_HOME=/usr/lib/jvm (CentOS + OpenJDK)
PS: Some Hadoop versions may listen on incorrect network addresses on computers configured with IPv6, so you need to add the following line to disable Java’s IPv6 functionality:
export HADOOP_OPTS=-Djava.net.preferIPv4Stack=true
b. Edit conf/core-site.xml
<configuration>
<property>
  <name>hadoop.tmp.dir</name>
  <value>/var/lib/hadoop/hadoop-${user.name}</value>
</property>

<property>
  <name>fs.default.name</name>
  <value>hdfs://192.168.0.10:9000</value>
</property>
</configuration>
The first section sets the data storage location (the corresponding directory should have full permissions for the current user), and the second section sets the NameNode service address for communication with other computers.
c. Edit conf/mapred-site.xml
<configuration>
<property>
  <name>mapred.job.tracker</name>
  <value>192.168.0.10:9001</value>
</property>
</configuration>
This section sets the JobTracker service address.
d. Edit conf/hdfs-site.xml
<configuration>
<property>
  <name>dfs.replication</name>
  <value>3</value>
</property>
</configuration>
This section sets how many redundant copies of file data are stored in the Hadoop system, usually set to 3. This way, when new file data is written to Hadoop, the system randomly writes the file to 3 DataNodes. If one DataNode fails (e.g., hard drive burns out), you only need to remove that computer and replace it with a new one connected to the network. The data will automatically replicate to ensure there are always 3 copies. This is also one of the reasons why distributed storage systems are convenient to maintain.
e. Edit /etc/hosts
Since Hadoop sometimes uses hostnames to access other computers in the system, and hostnames may sometimes resolve incorrectly, a simple method is to add the hostname and IP address of each computer in /etc/hosts. For example:
192.168.0.10    master
192.168.0.100    data001
192.168.0.101    data002
192.168.0.102    data003
3. Copy the configured Hadoop to each computer
First, ensure that the NameNode computer can log in to each of the other computers using SSH public key authentication (in the current example, this is 1 self-computer and 3 DataNodes). To achieve this, generate an SSH public key on the NameNode computer using the ssh-keygen command. For Red Hat-based Linux distributions, you may also need to run the ssh-add command. Then, use ssh-copy-id to copy this key to each computer, and log in to all computers (including yourself) once using ssh.
Next, you can use the scp command to copy the configured Hadoop program to each DataNode computer. The installation location of the Hadoop program must be consistent. For example, if the Hadoop program is located at /usr/local/hadoop on the NameNode computer, it should also be stored there on other computers.
4. Set NameNode-specific configurations
Since we can control the start or stop of Hadoop on all computers from the NameNode, we need to list which computers are under control.
a. Edit the conf/master file and write the following line:
192.168.0.10
This line indicates that the SecondaryNameNode to be started is located on the computer 192.168.0.10 (sharing the same machine as the NameNode).
b. Edit the conf/slaves file and write the following 3 lines:
192.168.0.100
192.168.0.101
192.168.0.102
This indicates that the current Hadoop system has a total of 3 DataNodes.
5. Format the NameNode
This step only needs to be done once. Switch to the Hadoop program directory and run:
$ bin/hadoop namenode -format
6. Start Hadoop
$ bin/start-dfs.sh
At this point, you should see that the NameNode, SecondaryNameNode, and 3 DataNodes have been started.
$ bin/start-mapred.sh
At this point, you should see that the JobTracker and 3 TaskTrackers have been started.
The two commands above can also be replaced by a single command: bin/start-all.sh
7. Test a distributed computation
There is an example included in the Hadoop program directory that counts the occurrences of each word in a file. We will use it for testing below.
First, you need to prepare several plain text files (for example, files /tmp/text/hello.txt and /tmp/text/world.txt) and upload them to Hadoop.
$ bin/hadoop fs -copyFromLocal /tmp/text text
This will create a folder named ‘text’ in Hadoop and copy hello.txt and world.txt into it. You can run the ls command to view the files in Hadoop:
$ bin/hadoop fs -ls
Then run the example program:
$ bin/hadoop jar hadoop-0.20.2-examples.jar wordcount text text-output
After the run is complete, you can view the results using the ls command:
$ bin/hadoop fs -ls text-output
You can modify the source code of the example to create your own program and test it.
8. Web Monitoring Page
Visit http://192.168.0.10:50070 to view the overall status of the NameNode and the list of connected DataNodes.
Visit http://192.168.0.10:50030 to view the status of the JobTracker and the status and logs of each TaskTracker.
9. Shut down the Hadoop system
$bin/stop-all.sh
10. Add a new DataNode to the system
If a DataNode restarts, to make it rejoin the Hadoop system, you need to run the following on the DataNode computer:
$ bin/hadoop -daemon.sh start datanode
If the system needs to be expanded or a new machine is replaced, you only need to copy the previously configured Hadoop over and run the command above. If a new IP address is added or the IP address changes, remember to make the corresponding additions or modifications in the conf/slaves file.
The above discusses the basic configuration of Hadoop. In fact, while building the distributed computing system, we have also built the distributed storage system. Besides using the Hadoop command line to manage files and directories within the system, we can also operate data through the Hadoop API. Below is a brief description of how to call HDFS in an application.
1. First, create a Java Application (Console) program using Maven, and then reference hadoop-core-0.20.2.jar.
2. Create core-site.xml in the project root directory:
<?xml version="1.0"?>
<configuration>
<property>
  <name>fs.default.name</name>
  <value>hdfs://192.168.0.10:9000</value>
</property>
</configuration>
The program will automatically look for the core-site.xml file in the CLASS_PATH at runtime. If this file is missing, the program will use the local file system.
3. Create Helloworld.java with the following code:
import java.io.IOException;
import org.apache.hadoop.conf.Configuration;
import org.apache.hadoop.fs.FSDataInputStream;
import org.apache.hadoop.fs.FSDataOutputStream;
import org.apache.hadoop.fs.FileSystem;
import org.apache.hadoop.fs.Path;


public class HelloWorld {


public static void main(String[] args) {
try {
HelloWorld helloWorld = new HelloWorld();
helloWorld.run();
} catch (IOException e) {
e.printStackTrace();
}
}


public void run() throws IOException {
Configuration conf = new Configuration();


FileSystem fs = FileSystem.get(conf);
Path filenamePath = new Path("hello.txt");


if (fs.exists(filenamePath)) {
fs.delete(filenamePath, false);
}


FSDataOutputStream out = fs.create(filenamePath);
out.writeUTF("hello world");
out.close();


FSDataInputStream in = fs.open(filenamePath);
String messageIn = in.readUTF();
System.out.print(messageIn);
in.close();
}
}
This code is relatively simple, so no further explanation is provided.
4. Compile and run. If there are no issues, a text file such as:
/user/YOUR_NAME/hello.txt
should be created in HDFS. You can check it by visiting http://192.168.0.10:50070 via a browser.
Finally, let’s talk about file permissions. The file permissions of HDFS are conceptually consistent with those of the operating system. If you start (run) Hadoop with the ‘yang’ account, but the above program runs with the ‘huang’ account, permission errors will occur. One solution is to use the same account. Another solution is to create the folder with the account that started Hadoop and grant permissions to ‘huang’, for example:
$ bin/hadoop fs -mkdir /user/huang
$ bin/hadoop fs -chown huang /user/huang
For more Hadoop command lines, please refer here.
Finally, successful configuration of Hadoop might encounter some unexpected issues. The best solution is to check the Hadoop logs. Generally, based on the clues provided by the logs, the problems can be resolved.