Overview
With the popularity of cloud computing and the pay-as-you-go model gaining acceptance, it is not recommended to migrate applications and databases to the cloud all at once during the initial migration from an on-premises data center to ensure a smooth transition. All projects should be carried out in phases. In phased migrations, it is essential to interconnect cloud resources with on-premises data center resources.
To achieve interconnection, there are three alternative solutions: the Internet, Direct Connect (DX), and VPN. Comparing these three solutions in terms of security, stability, and cost, DX services are undoubtedly the optimal solution, providing secure and stable network performance with high throughput. However, due to the high costs associated with laying dedicated lines in China, DX is not the most optimal choice in the early stages. The Internet is the cheapest option because the data center has already paid for this infrastructure; as long as cloud resources can access the Internet, it works. However, the Internet faces issues regarding dependency on public network performance, which is not controllable, as well as security concerns. VPNs are Internet-based services; while they cannot guarantee controllable network performance, they ensure data security.
Based on the above comparison, in the early stages, VPN is undoubtedly a cost-effective, secure, and cost-saving solution. Considering that hardware VPN services (Global Region VPN Connections) are not currently supported in the Beijing region, is there an alternative? The answer is yes. No problem can stump our great open-source community. Open-source solutions such as OpenSwan (the protagonist today), StrongSwan, Raccoon, etc., are available. Besides open-source solutions, some commercial solutions like Sangfor, Hillstone, Checkpoint, and Cisco CSR1000v can also be deployed. Interested parties can contact the respective software providers.
Having discussed various VPN software, how should one choose? Here, we categorize them based on usage into two main types. The first type operates in a client-to-server mode, such as OpenVPN, SSL VPN, L2TP, and PPTP. These require the client to initiate the connection and dial into the server to establish a logical tunnel for communication. This method is generally suitable for individual-to-headquarters scenarios, where the server cannot initiate connections to the client.
The second type is the site-to-site mode, using software like OpenSwan, StrongSwan, and Raccoon. In this case, each end has a device responsible for establishing a secure communication tunnel between the two sites. Any communication requiring access to the other end triggers the device to establish a secure tunnel.
Since the original company data center and cloud communicate bidirectionally, the site-to-site mode is more reasonable.
In fact, the VPN mentioned here refers specifically to IPsec VPN. IPsec is an industry standard; any devices supporting this standard can negotiate to establish a secure tunnel, including supported hardware devices such as routers, firewalls, and dedicated VPN appliances.
Enough talk; below, we will use the configuration between OpenSwan on AWS and a Cisco router as an example.
Scenario and Topology
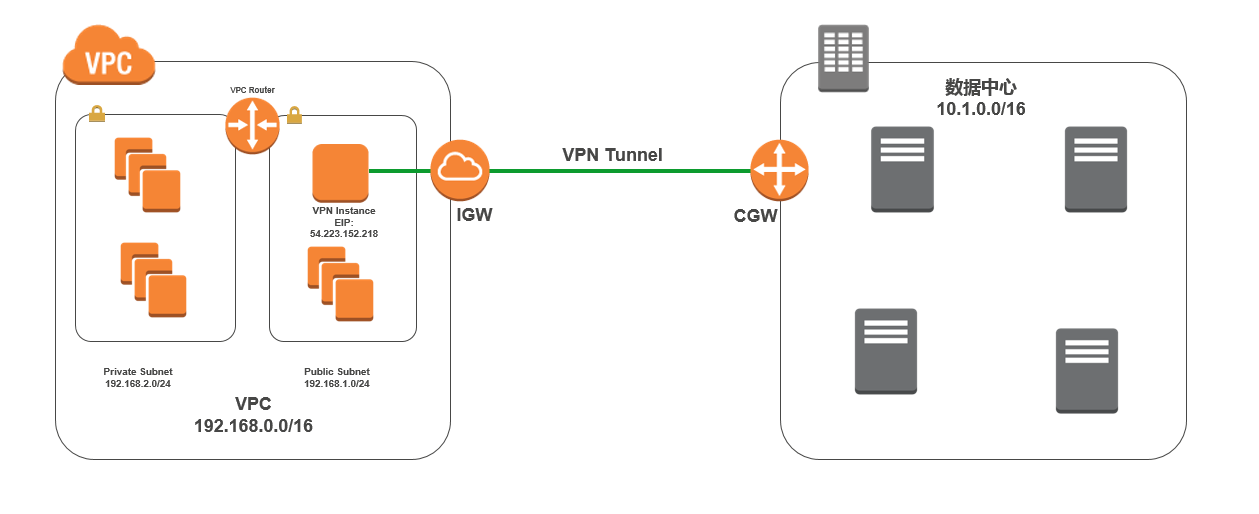
As shown in the topology above, create a VPC on the AWS side (CIDR: 192.168.0.0/16), containing two subnets: a Public subnet 192.168.1.0/24 that can access the Internet and a Private subnet 192.168.2.0/24. An OpenSwan instance will be configured on the public subnet to establish a VPN connection with the company’s Cisco device.
OpenSwan EIP Address: 54.223.152.218 Subnet: 192.168.1.0/24
Cisco Device Public IP Address: 54.223.170.5 Subnet: 10.1.2.0/24
Objective: Achieve bidirectional connectivity between the private subnet 192.168.2.0/24 on AWS and the data center 10.1.2.0/24.
Detailed Configuration Steps
1. Configure VPC Basic Environment
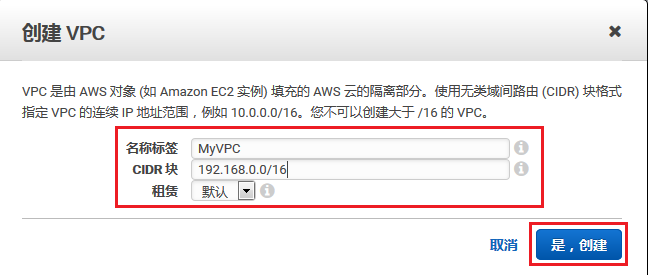
1.1 Create VPC
Click VPC in the AWS Console, click “Your VPC” on the left, and create a VPC.
Name Tag: MyVPC
CIDR Block: 192.168.0.0/16
Tenancy: Default
1.2 Create Subnets
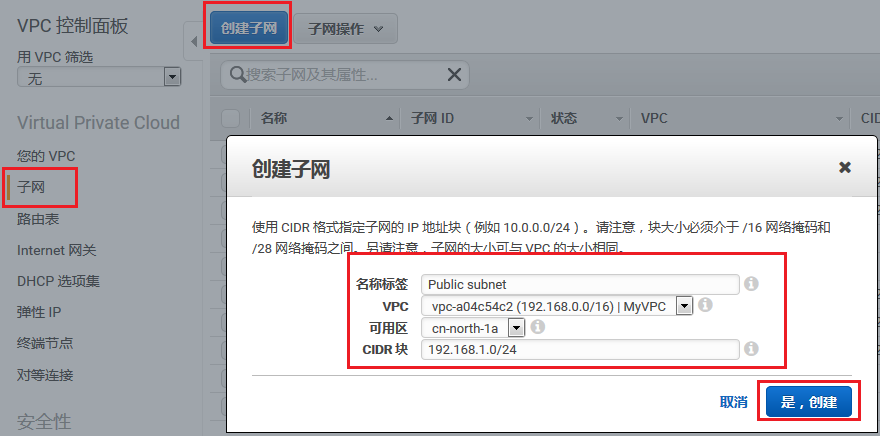
Hover over Subnets and select Create Subnet.
Tag Name: Public
VPC: Select the VPC created in step 1.
Availability Zone: Keep default.
CIDR Block: 192.168.1.0/24
Create a subnet for 192.168.2.0/24 using the same method.
1.3 Create Route Tables
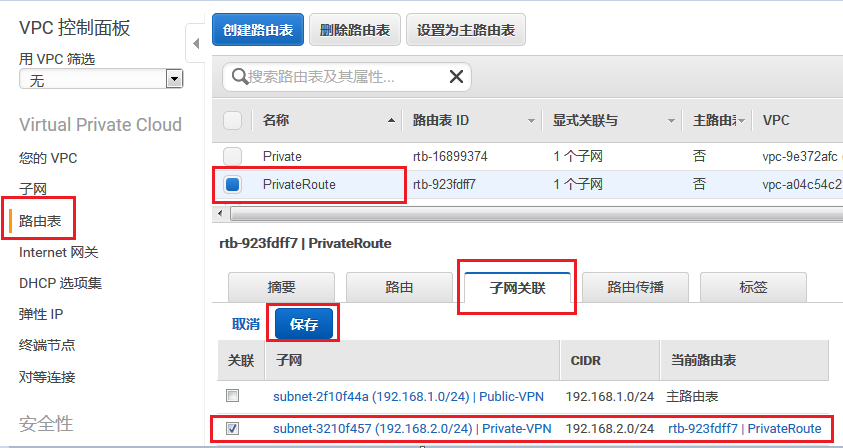
Click Route Tables and create a route table.
Name Tag: PrivateRoute
VPC: Select the VPC created in 1.1.
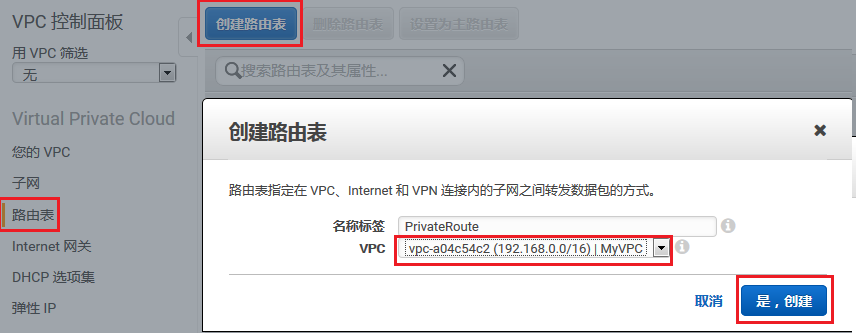
After creation, click on the newly created route table. At the bottom of the page, click Subnet Associations, then Edit.
Check the box for 192.168.2.0/24 and click Save.
1.4 Create IGW
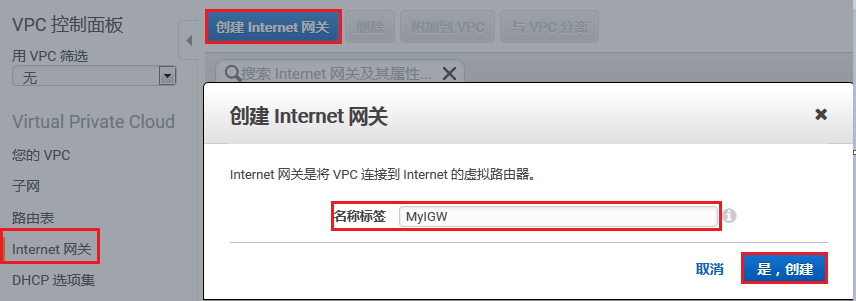
Click Internet Gateways and create an Internet Gateway.
Name Tag: MyIGW
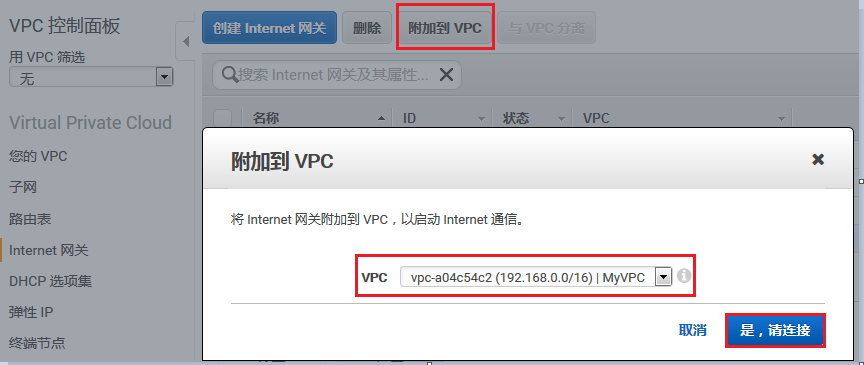
 After creation, click Attach to VPC.
Select the newly created VPC.
2. Launch and Configure VPN Instance
2.1 Launch Instance
Go to the EC2 page and click Launch Instance. Select Amazon Linux.
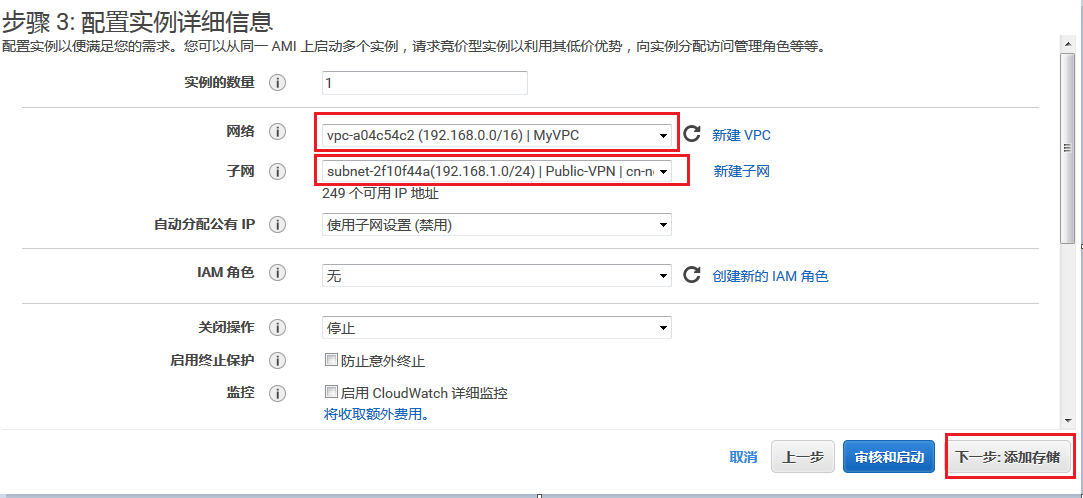
In the Details page, select the newly created VPC for Network.
Select Subnet 192.168.1.0/24.
Click Next, and configure storage tags as needed.
Configure Security Groups by selecting Create a New Security Group.
Add Rules:
Custom UDP Rule, Port 500, Source: Anywhere
Custom UDP Rule, Port 4500, Source: Anywhere
Custom Protocol, Protocol 50, Source: Anywhere
All Traffic, Source: 192.168.2.0/24
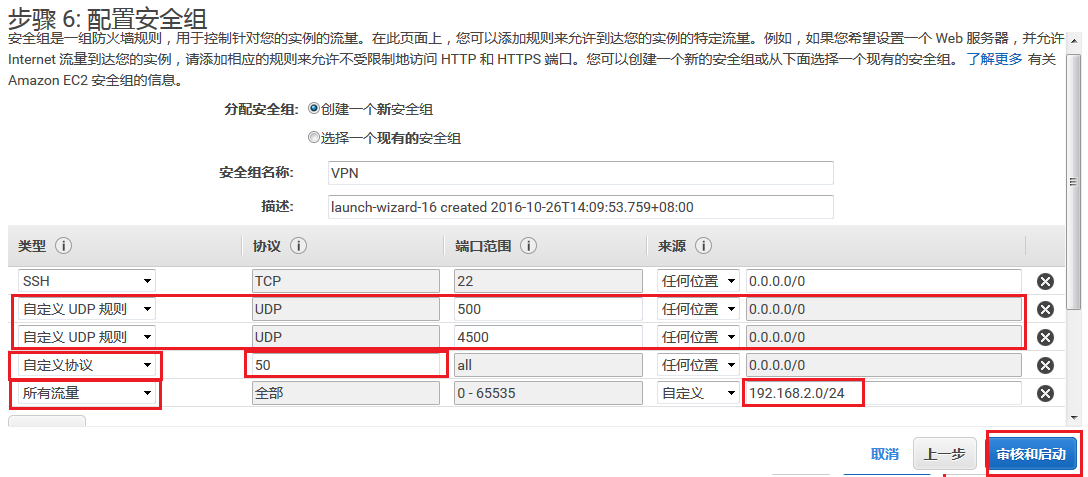
Note: You must allow traffic from 192.168.2.0/24, otherwise communication will fail.
Finally, review and launch. Specify a key file for logging into the instance when launching; create a new one if you don’t have one.
2.2 Configure Elastic IP (EIP)
On the EC2 page, find Elastic IPs in the left navigation bar, request a new address, and associate it with the newly created OpenSwan instance. The allocated address here is 54.223.152.218.
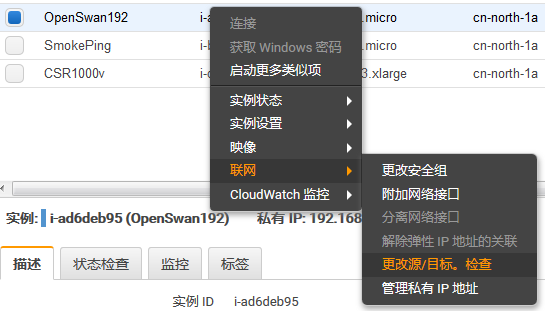
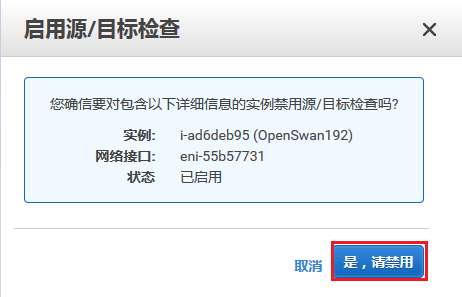
2.3 Disable Source/Destination Check
On the EC2 page, click the OpenSwan instance, right-click Networking, change Source/Dest Check, and click “Yes, Disable”.
3. Install and Configure OpenSwan
3.1 Log in to the Instance and Install OpenSwan
For instructions on how to log in to the instance, refer to the following document:
https://docs.amazonaws.cn/AWSEC2/latest/UserGuide/putty.html
After logging in, run the following command to install OpenSwan:
$ sudo yum -y install openswan
3.2 Configure OpenSwan Based on Cisco Parameters
Edit /etc/ipsec.conf to uncomment the last line ‘include /etc/ipsec.d/*.conf’.
$ sudo vim /etc/ipsec.conf
include /etc/ipsec.d/*.conf
The Cisco Router configuration is as follows:
crypto isakmp policy 10
encr aes
authentication pre-share
group 2
crypto isakmp key aws123 address 54.223.152.218
!
!
crypto ipsec transform-set OpenSwan esp-aes esp-sha-hmac
mode tunnel
!
!
!
crypto map OpenSwan 10 ipsec-isakmp
set peer 54.223.152.218
set transform-set OpenSwan
match address 100
!
!
interface GigabitEthernet1
ip address 54.223.170.5 255.255.255.252
ip mtu 1400
ip tcp adjust-mss 1360
crypto map OpenSwan
!
access-list 100 permit ip 10.1.2.0 0.0.0.255 192.168.2.0 0.0.0.255
ip route 0.0.0.0 0.0.0.0 54.223.170.6
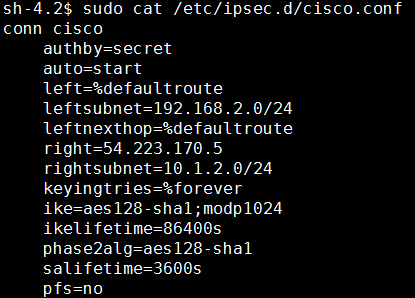
Based on the Cisco configuration, create the OpenSwan configuration as follows:
$ sudo vim /etc/ipsec.d/cisco.conf
conn cisco
authby=secret
auto=start
leftid=54.223.152.218
left=%defaultroute
leftsubnet=192.168.2.0/24
leftnexthop=%defaultroute
right=54.223.170.5
rightsubnet=10.1.2.0/24
keyingtries=%forever
ike=aes128-sha1;modp1024
ikelifetime=86400s
phase2alg=aes128-sha1
salifetime=3600s
pfs=no
Configuration Explanation:
leftid indicates the local public IP address.
leftsubnet is the local subnet.
right is the peer’s public address.
rightsubnet is the peer’s subnet.
ike represents Phase 1 parameters.
ikelifetime is the lifetime for Phase 1.
phase2alg represents Phase 2 parameters.
salifetime is the lifetime for Phase 2.
The result is shown in the figure below:
Configure Pre-Shared Key:
$ sudo vim /etc/ipsec.d/cisco.secrets
54.223.152.218 54.223.170.5: PSK “aws123”
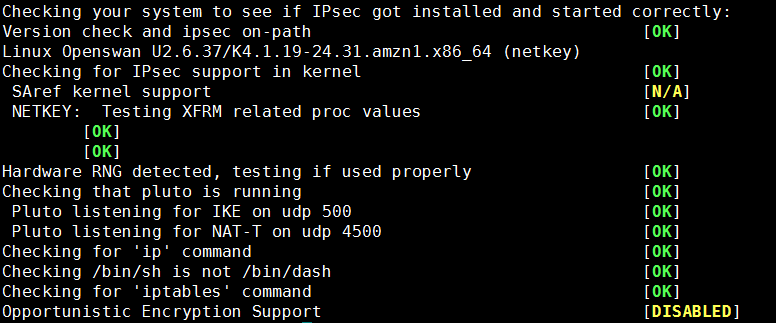
Start the OpenSwan service and check the configuration:
$ sudo service ipsec start
$ sudo ipsec verify
3.3 Modify System Parameters
Change system parameters to enable IP forwarding and disable redirect functions.
Edit the /etc/sysctl.conf kernel configuration file and make the following modifications:
$ vim /etc/sysctl.conf
$ vim /etc/sysctl.conf
net.ipv4.ip_forward = 1
net.ipv4.conf.all.accept_redirects = 0
net.ipv4.conf.all.send_redirects = 0
net.ipv4.conf.default.send_redirects = 0
net.ipv4.conf.eth0.send_redirects = 0
net.ipv4.conf.default.accept_redirects = 0
net.ipv4.conf.eth0.accept_redirects = 0
After configuration, apply the new settings:
$ sudo sysctl –p
3.4 Change OpenSwan Network Card MSS Value
$ sudo iptables -t mangle -A FORWARD -o eth0 -p tcp --tcp-flags SYN,RST SYN -j TCPMSS --set-mss 1387
3.5 Modify VPC Private Subnet Route Table
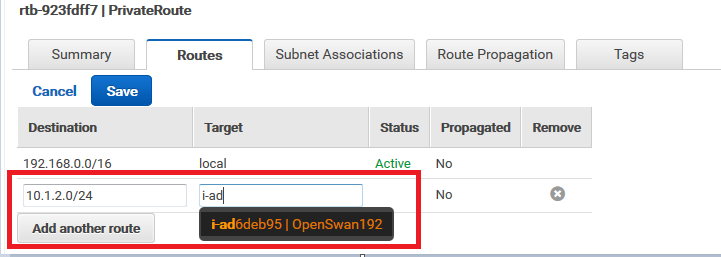
Find the VPC Console page, click Route Tables on the left, locate the route table associated with 192.168.2.0/24 (created in 1.3), and click Routes at the bottom of the page to edit.
Add another route:
Destination: 10.1.2.0/24
Target: OpenSwan Instance ID (i-xxxxx)
4. Test Connectivity
After completing the above steps, you can test instances in the 192.168.2.0 subnet. Use ping to test connectivity to an address in the 10.1.2.x private subnet.
ping 10.1.2.3
Check IPsec Tunnel Status:
$ sudo service ipsec status
IPsec running - pluto pid: 25674
pluto pid 25674
1 tunnels up
some eroutes exist
Common Issues and Troubleshooting
1. IPsec Tunnel Did Not Establish Normally
First, check if you can communicate with the peer IP. Verify if the security group allows the IKE-required port UDP 500. If the network layer is fine, check if all parameter configurations are correct.
2. Tunnel Established Successfully, But Communication Fails
First, check if IP forward is set to 1? Has the VPN instance security group allowed the corresponding policies? Are routes correct? Is NAT affecting the connection?
3. NAT Issues
If your CGW is configured with NAT working alongside VPN, the processing order of VPN packets varies by vendor. If source NAT is processed before VPN, the source address changes, so it will no longer be processed by VPN, causing communication failure. For Cisco devices, you need to create NAT exemption policies. For mainstream Cisco ASA, modifications are required as follows:
Version 8.2 and earlier:
nat (inside) 0 access-list nat_exemption
access-list nat_exemption extended permit ip 192.168.1.0 255.255.255.0 10.0.0.0 255.255.255.0
Version 8.3 and later:
object network obj-192.168.1.0
subnet 192.168.1.0 255.255.255.0
object network obj-10.0.0.0
subnet 10.0.0.0 255.255.255.0
nat (inside,any) source static obj-192.168.1.0 obj-192.168.1.0 destination static obj-10.0.0.0 obj-10.0.0.0 no-proxy-arp
If you still cannot successfully set up the VPN after following the above steps, AWS Support provides professional technical support and can offer unique tools and expertise based on your current or planned use cases. We recommend opening a case to contact Support Technical Services.