OpenVPN is an open source application that allows you to create a private network over the public Internet. OpenVPN tunnels your network connection securely through the internet. This tutorial describes the steps to set up an OpenVPN server and client on CentOS.
Prerequisites
- Server with CentOS 7.
- Root privileges.
What we will do in this tutorial:
- Enable the EPEL repository in CentOS.
- Install OpenVPN, Easy-RSA, and iptables.
- Configure Easy-RSA.
- Configure OpenVPN.
- Disable firewalld and SELinux.
- Configure iptables for OpenVPN.
- Start the OpenVPN Server.
- Set up the OpenVPN client application.
Enable the EPEL repository
sudo su
yum -y install epel-release
Install OpenVPN, Easy-RSA, and iptables
yum -y install openvpn easy-rsa iptables-services
Configuring Easy-RSA
At this stage, you will generate some keys and certificates:
- Certificate Authority (CA)
- Server Key and Certificate
- Diffie-Hellman key. read here
- Client Key and Certificate
Step 1 – Copy the Easy-RSA script generation to “/etc/openvpn/”.
cp -r /usr/share/easy-rsa/ /etc/openvpn/
Then go to the Easy-RSA directory and edit the vars file.
cd /etc/openvpn/easy-rsa/2.*/
vim vars
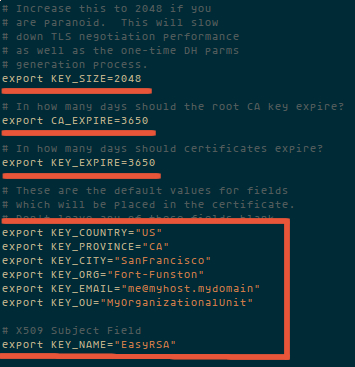
Now it is time to generate the new keys and certificates for our installation.
source ./vars
Then run clean-all to ensure that we have a clean certificate setup.
./clean-all
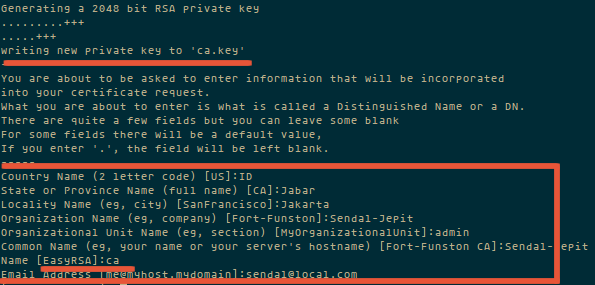
Now generate a certificate authority (CA). You will be asked about Country Name, etc., enter your details. See screenshot below for my values.
This command will create a file ca.crt and ca.key in the directory /etc/openvpn/easy-rsa/2.0/keys/.
./build-ca
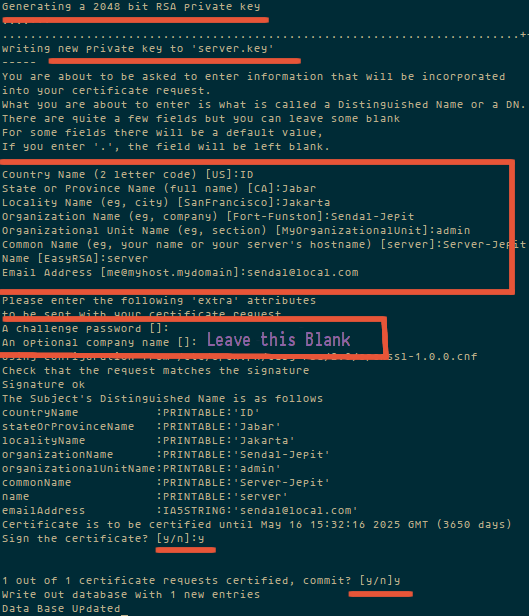
Step 2 – Now generate a server key and certificate.
Run the command “build-key-server server” in the current directory:
./build-key-server server
Step 3 – Build a Diffie-Hellman key exchange.
Execute the build-dh command:
./build-dh

Please wait; it will take some time to generate the files. The time depends on the KEY_SIZE you have set in the vars file.
Step 4 – Generate client key and certificate.
./build-key client
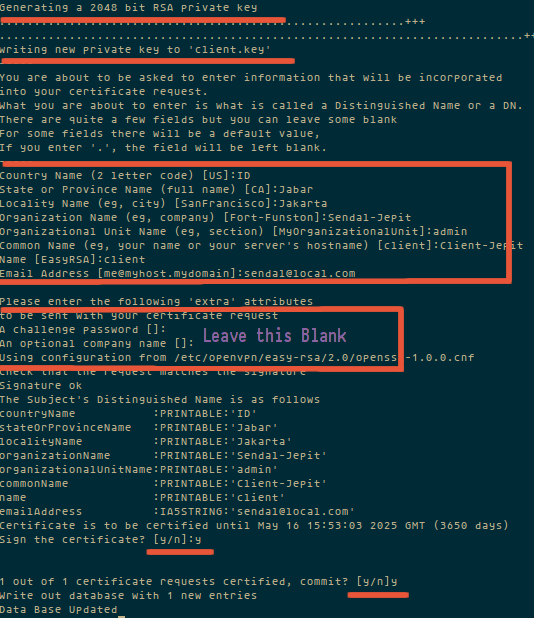
Step 5 – Move or copy the directory `keys/` to `/etc/openvpn/`.
cd /etc/openvpn/easy-rsa/2.0/
cp -r keys/ /etc/openvpn/
Configure OpenVPN
You can copy the OpenVPN configuration from /usr/share/doc/openvpn-2.3.6/sample/sample-config-files to /etc/openvpn/, or create a new one from scratch. I will create a new one:
cd /etc/openvpn/
vim server.conf
Paste the configuration below:
#change with your port
port 1337

#You can use udp or tcp
proto udp

# "dev tun" will create a routed IP tunnel.
dev tun

#Certificate Configuration

#ca certificate
ca /etc/openvpn/keys/ca.crt

#Server Certificate
cert /etc/openvpn/keys/server.crt

#Server Key and keep this secret
key /etc/openvpn/keys/server.key

#See the size of dh key in /etc/openvpn/keys/
dh /etc/openvpn/keys/dh1024.pem

#Internal IP range when already connected
server 192.168.200.0 255.255.255.0

#this line will redirect all traffic through our OpenVPN
push "redirect-gateway def1"

#Provide DNS servers to the client, you can use Google DNS
push "dhcp-option DNS 8.8.8.8"
push "dhcp-option DNS 8.8.4.4"

#Enable multiple clients to connect with the same key
duplicate-cn

keepalive 20 60
comp-lzo
persist-key
persist-tun
daemon

#enable log
log-append /var/log/myvpn/openvpn.log

#Log Level
verb 3
Save it.
Create a folder for the log file.
mkdir -p /var/log/myvpn/
touch /var/log/myvpn/openvpn.log
Disable firewalld and SELinux
Step 1 – Disable firewalld
systemctl mask firewalld
systemctl stop firewalld
Step 2 – Disable SELinux
vim /etc/sysconfig/selinux
And change SELINUX to disabled:
SELINUX=disabled
Then reboot the server to apply the change.
Configure Routing and Iptables
Step 1 – Enable iptables
systemctl enable iptables
systemctl start iptables
iptables -F
Step 2 – Add iptables rule to forward routing to our OpenVPN subnet.
iptables -t nat -A POSTROUTING -s 192.168.200.0/24 -o eth0 -j MASQUERADE
iptables-save > /etc/sysconfig/iptables.vpn
Step 3 – Enable port forwarding.
vim /etc/sysctl.conf
Add to the end of the line:
net.ipv4.ip_forward = 1
Step 4 – Restart network server
systemctl start openvpn@server
Client Setup
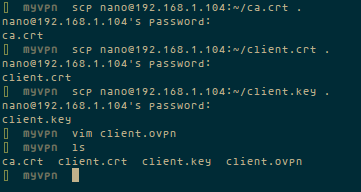
To connect to the OpenVPN server, the client requires a key and certificate that we created earlier. Please download the 3 files from your server using SFTP or SCP:
- ca.crt
- client.crt
- client.key
If you use a Windows Client, then you can use WinSCP to copy the files. Afterwards, create a new file called client.ovpn and paste the configuration below:
client
dev tun
proto udp

#Server IP and Port
remote 192.168.1.104 1337

resolv-retry infinite
nobind
persist-key
persist-tun
mute-replay-warnings
ca ca.crt
cert client.crt
key client.key
ns-cert-type server
comp-lzo
And save it.
Then download the client application for OpenVPN and install it on your client computer (most likely your Desktop):
Windows user
Mac OS user
Linux user.
Try networkmanager-openvpn through NetworkManager.
Or use terminal:
sudo openvpn –config client.ovpn
Conclusion
OpenVPN is an open source software to build a shared private network that is easy to install and configure on the server. It is a solution for those who need a secure network connection over the public internet.